When Apple made Xcode into its own app bundle it greatly simplified our lives as developers. This enabled incremental updates for the stable version can get from the app store. Also you get updates the same way as updates for other apps.
To cut down on file size Apple made several items optional downloads, like the documentation, older versions of Simulator or Command Line Tools. The latter you need if you are building stuff outside of Xcode, like Open Source projects. You know, bare knuckles, command line geekery.
However those tools are not needed if you want to say use svn or git. This article explains why.
When you download and install the “Command Line Tools” they integrate with your Unix file system structure the same way a compiler and header files would. The installer copies these files all over the place. All these tools (and many additional ones) are already included in Xcode.app as they are remote-controlled from Xcode when you build apps. Now if you update Xcode.app via the app store then the copies of these tools remain their current versions.
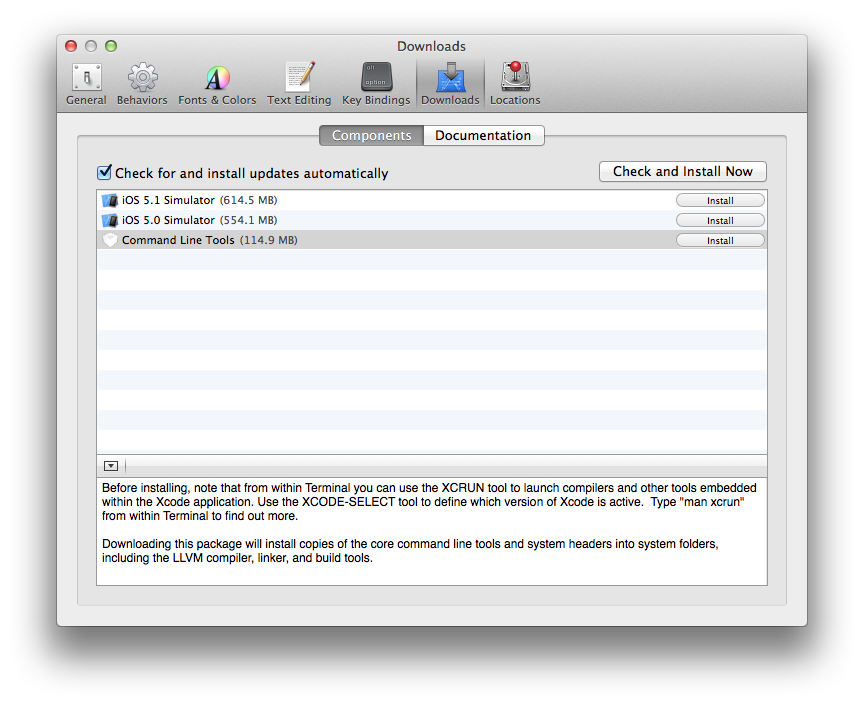
Have you ever read the description on the download window?
Image may be NSFW.
Clik here to view.
Even even tells you here, “Before installing, note …” that you don’t need this. It mentions two commands that will help us to live without it.
But! I want my GIT!
… and you shall have it. As I mentioned above the git tool (and svn too) are contained inside the Xcode.app bundle from where they are used by Xcode whenever you interact with repositories. There are two commands that you need to know to get to that.
You can have multiple Xcodes installed at the same time, the xcode-select command lets you inquire and set which Xcode is the one you want to use.
xcode-select --print-path /Applications/Xcode45-DP2.app/Contents/Developer |
In this instance my system already has the Xcode 4.5 DP2 set as the current on. To select a specific Xcode you use the –switch switch.
sudo xcode-select --switch /Applications/Xcode45-DP2.app |
Note that you are required to use sudo (and enter your admin password) with this. You specify the path to the .app bundle. The tool appends the Contents/Developer. You can also specify the full path yourself, but why type more than necessary?
Having selected the correct Xcode for our purposes (which most of the time will the the normal stable Xcode.app in Applications) we can now run all the contained tools by means of xcrun. Let’s try git.
xcrun git --version git version 1.7.10.2 (Apple Git-33) git --version git version 1.7.3.4 |
Oh how nice, the git version contained in Xcode is much newer than the one I had manually installed in /usr/local/bin. This nicely illustrates the big advantage of using the bundled tools over those “installed eons ago”.
Waqar Malik has this Pro Tip for us:
alias git=’xcrun git’ #protip
— Waqar Malik (@UIResponder) März 25, 2012
This awesome little statement sets up an alias for your shell. Whenever you begin a command line with git the shell knows to substitute xcrun git for it. To make this definition persist you have to add it to your .profile (or create a new one if you don’t have one yet) or .bashrc file in your home folder. Either one is fine as long as this gets executed when you launch a new shell.
In case you are curious which actual path xcrun would use for a specific tool, there is the –find switch to “inquire within”
xcrun --find svn /Applications/Xcode45-DP2.app/Contents/Developer/usr/bin/svn |
Armed with the above knowledge you can save the 115 MB that the Command Line Tools need. This package serves a very distinct purpose and it is great for the home-brew-crowd that Apple is making it available as well as is supporting it.
Removing Already Installed Tools
There is no simple way to get rid of the installed files as they are copied all over the place. But there is a manifest file which lists all folders and files that are installed by the package. This allows us to go all “brute force” on the tools and remove them.
remove_CLI_tools.sh
RECEIPT_FILE=/var/db/receipts/com.apple.pkg.DeveloperToolsCLI.bom RECEIPT_PLIST=/var/db/receipts/com.apple.pkg.DeveloperToolsCLI.plist if [ ! -f "$RECEIPT_FILE" ] then echo "Command Line Tools not installed." exit 1 fi echo "Command Line Tools installed, removing ..." # Need to be at root cd / # Remove files and dirs mentioned in the "Bill of Materials" (BOM) lsbom -fls $RECEIPT_FILE | sudo xargs rm -r # remove the receipt sudo rm $RECEIPT_FILE # remove the plist sudo rm $RECEIPT_PLIST echo "Done! Please restart XCode to have Command Line Tools appear as uninstalled." |
Use at your own risk, it might remove more than you bargained for. So make sure you made a time machine backup before running this.
There is a second copy of the CLI Tools still present on your system even if you remove them with the above script. Xcode downloads end up in ~/Library/Caches/com.apple.dt.Xcode/Downloads and there are another 112168 KBytes to be reclaimed by removing the DMG file that you find in there, at the time of this writing named Xcode.CLTools.10.8-1.7.dmg.
Conclusion
For the rest of us who live and breathe inside Xcode, who only go to the command line to work efficiently with git and svn, we don’t need to install it. By creating aliases for the tools we need in our daily business we reap the benefits of current bundled versions and auto-updating of those through the app store.
By removing the installed CLI tools as well as deleting the downloaded DMG file you can reclaim over 200 MB of valuable disk space without any drawback.
