Quantcast
Channel: Cocoanetics
Viewing all 428 articles
Browse latest View live

Great Apple Support

$
0
0

I have a collection of all iOS ever made, all iPhones, all iPod Touches, of course the iPads. I call it “my museum”. Though only the oldest are actually on display since the newer one are all in use. Of the iPhone 4S I even have 3 in active use, though when all my users will have moved on, I’ll sell away all but one to also take its honorary position.

My 3GS was in use by my Cousin-in-law who I am sponsoring to interest her in a career in tech. She’s got a website where she does iOS tutorials as well as app reviews. So I am seeing that – however far – related to my business and thus can justify the expense. It greatly pained me when I learned that the volume button had jumped off the device. “Dropped? Me?! NEVER!”

Thankfully I was able to get it restored to better-than-before mint-ness. This is how.


The first thing I checked was iFixit for an idea as to how much effort it would be to replace the volume rocker. 4 pages, difficulty “moderate”, but I gave up (reading) when I got to step 16 which employs a hair dryer to separate the battery from the back case. Pass! While the parts and needed materials would have been around $20, even an expert would probably have taken around 1-2 hours and still risking irreparable damage to the phone.

Next I called a Mac repair shop in Vienna and inquired about the costs for the repair. Turns out they cannot get just the volume button because on the 3GS everything is mounted onto the back case. That’s spare part can be gotten for €95. Add to that some expert screwing time and you again end up in the hundreds.

Finally I called Apple.

Apple have a fabulous repair policy. For €124,17 (excl. VAT) you can get any iPhone repaired. Devices covered by AppleCare probably cost less or nothing, but my 3GS never had AppleCare. Even if it did, it would have long been expired.

They send UPS to pick up the device and assess the damage in a central service center. If there’s any damage that cannot be easily fixed they instead will return a refurbished device. In my case exactly the same model: 32 GB, black, 3GS, no simlock.

The damage on the 3GS was all around. There was a crack on the back case, some damage on the front bottom bezel and of course the missing volume rocker. No way that this could have been repaired, so I got a “new” 3GS. Apple informed me to this effect by sending me an e-mail with the old and new IMEI of the device.

The next happenstance after my phone call was that a UPS driver came to pick up the device as it was. No need to even pack it or anything.

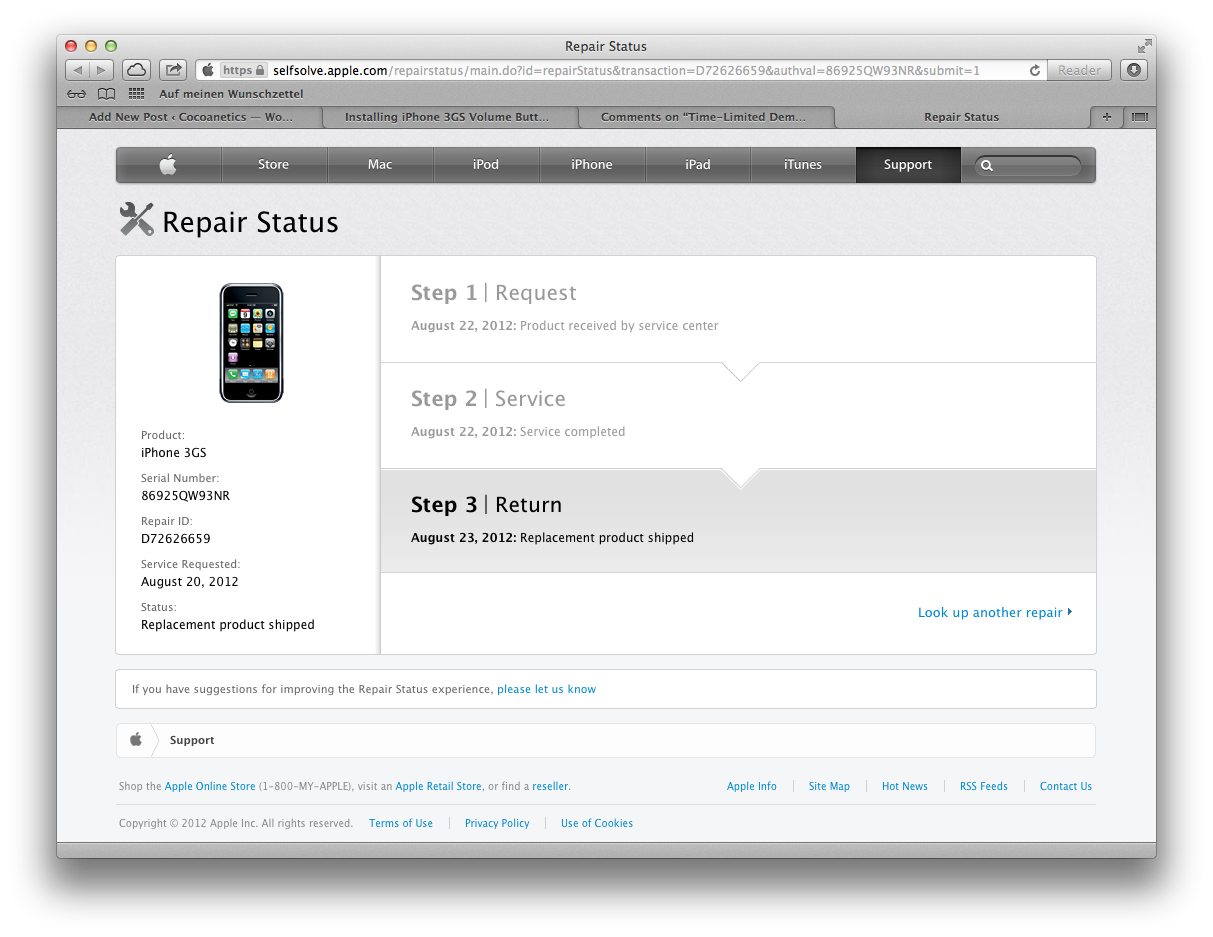
The whole process keeps you informed to a fault. You get emails and tracking information and so I was able to follow my device all the way to Eindhoven in the Netherlands and the new one back. You get email notifications every step of the way and there’s an online link where you can also see the current status of the repair.

I ordered the repair on August 20th, a Monday. Two days later the 3GS arrived at the service center. One day after that the replacement phone was shipped back and it arrived August 24th. 4 days total must be some sort of world record for a phone repair.

The refurbished device came in a nice box and had a protective film on front and back. This made the receiving of it an unboxing experience by itself. Isn’t that really cool?

I am extremely happy with this kind of service because getting an iPhone 3GS in good condition (even on eBay) still would have cost at least twice as much. Of course you cannot expect them to have devices in stock for devices that have gone out of fashion too long ago, but I assume that all devices still being supported by iOS 6 will be available.

Overall I give highest marks to Apple for providing such an awesome repair experience. Which is even cheap compared with the cost of buying a replacement device for my collection. Those are the kinds of experiences that make you proud to be working with Apple’s platforms.

flattr this!


Telling a Tale … Where Download-Code Sucks

$
0
0

I’ll be the first to admit that I love what Telltale Games have done to the long ago diseased adventure game genre. I played the Monkey Island Games via Steam, got Wallace & Grommit even though I don’t even possess a PC (unfortunately not available for Mac) and I loved the first episode of “The Walking Dead” on my iPad.

A mere 14 hours ago Telltale released the second episode for iOS but it turns out that their episode downloading code is utter crap. Much to my frustration because I am trying to get this episode for playing for around 10 hours now. It is quarter to 11 pm and I have reached a point where I need to vent my chagrin in a blog post.

If only to tell a tale how NOT to construct code that downloads many hundreds of megabytes.


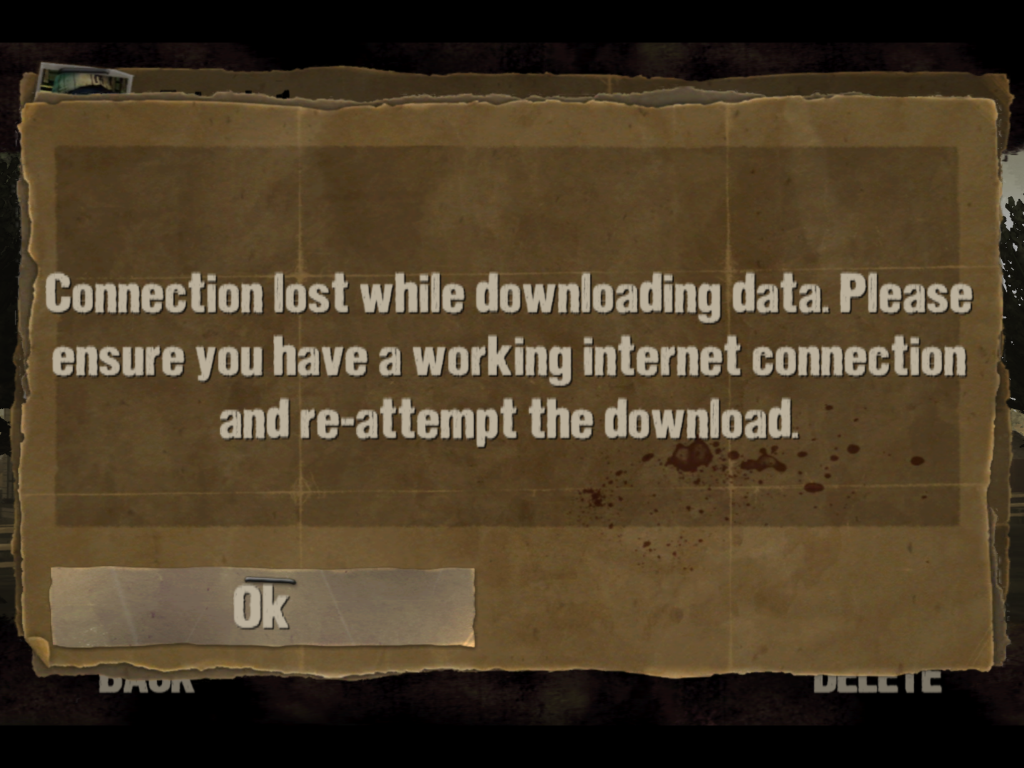
The big annoying problem with episode download can be summed up in this message:

This message is a symptom of so many bad ideas.

Of course I understand that graphically rich games like The Walking Dead require hundreds of MB of data. It is the job of the developers to make sure that the download experience is the least possible annoyance to the user. The current version of the download code does a bad job at this.

On entering the episodes screen iTunes is pinged for a list of available In-App purchases. The ones that are configured are then displayed as visible for download. Of course I had bought the “season pass” because episode one had done a great job hooking me on the new series. Sadly the first letdown of the game was that I only learned that a new episode was available by googling it. Haven’t they heard about push notifications?!

They had to get a unique app id provisioning profile anyway for enabling the IAPs, why not also enable push? Everybody who springs for the whole season has a right to learn at the earliest possible moment that new content is available for download.

The game itself is a whopping 329 MB, one would assume that this is about the size of an episode. Though even this is not certain because I remember having to wait exceptionally long when I launched the game the first time. It could also have been the case that they downloaded even more content during this time. Or maybe they uncompressed it, we’ll never know. So “hundreds of MB” is the best guess we have.

I peeked into the network traffic and found to my surprise that there were only two HTTP GET requests to the Telltale home page, but no trace of any other communication. Google does the same with their Ad network. You don’t see anything with Charles Debugging Proxy, but packets galore on other network snooping apps.

One can only assume that this is because they are afraid of somebody stealing the content. Certainly if you could simply get the content at a normal HTTP URL with a regular GET command it would take no time at all for crackers to download and re-package these coveted episodes and put then online illegally.

But what disturbs me that Telltale saw it necessary to add this level of copy protection instead of going for a good user experience first. The downloading doesn’t even do background completion for crying out loud! If you leave the app (e.g. home button) and return there was no progress made at all. A better mechanism would let me do something else with my iPad and then inform me via local push notification that the download has completed.

Oh, but I keep forgetting, background task completion only works if the process can finish in under 10 minutes. There might have been a workaround to ask the user to return before this time is up to get another 10 minutes of background downloading. Oh well, that might not really be a simple option after all.

BUT – BIG BUT – why in God’s name didn’t they implement download resuming? That is so easy to do, just look at my DTDownload class in my open source DTFoundation project. Oh, here the custom downloading functions again prevent this: you need to be using HTTP or HTTPS to benefit from range downloads via NSURLConnection.

They couldn’t have used NSURLConnection for the simple reason that if you use that then your traffic will have to pass through the system HTTP proxy if set. And then I would see it in Charles. So they are using something at a lower level that is not forced to go through the proxy. That brings with it another potential problem: HTTP (using TCP, as opposed to UDP) guarantees completeness of data. Missing packets are automatically and transparently re-transmitted. By not using HTTP and TCP they would have had to implement their own scheme to deal with lost data packets.

By this time I am beginning to feel sorry for the guys at Telltale who where tasked with this download mechanism. This all reeks as being dictated from above. No sane iOS developer would program the network stack like this, totally avoiding all the good and reliable things that Apple provides.

The process for download resuming is relatively simple: you download as much as you can and append the downloaded bytes to a file on disk. For resuming you then tell your server to continue with the next byte until the end of the file. Ideally you’d transfer it in a single ZIP file – to avoid unnecessary gaps and handshakes – and then you’ll unpack file on the client.

The next faux pas stems from the developers obviously never having tested their download code in “connectivity-challenged circumstances”. There are occasions where the download was so slow so that the iPad went into standby half way through. Of course you would then get the above mentioned error screen on relaunching the app. Back to square 1. $%§&§%!!

The final straw was one situation where the app insisted that my internet connection was offline even though I was able to surf with Safari. There is a known bug in Reachability where coming back from standby would still have the app believe it was offline. The workaround in this case is to stop the notifier when going into the background and to resume the notifier as soon as the app comes to the foreground again.

I cannot readily prove it, but I get the feeling that Telltale is not hosting their content on a CDN like Apple does (Akamai). But instead those hundreds of megabytes are coming across the big pond to Europe where I am located. This exacerbates the problem because I found that bandwidth suffers after around 8 pm when everybody is downloading stuff from America. One example is that until 7 pm or thereabouts I can rent a movie from iTunes USA and watch it while its downloading. That usually becomes impossible after 8pm.

I would bet they instead went for Amazon’s servers. Amazon is great for the US, but sucks for everywhere else because they lack local mirrors.

Conclusion

So let us summarize all their faux-pas:

  • no background task completion
  • no download resuming after an interruption
  • allowing the iPad to go into standby while the download is not complete
  • not testing for bandwidth-constrained scenarios
  • not testing for abort conditions that would leave the app stuck unable to proceed without being killed (aka Reachability bug)
  • not hosting on a Content Delivery Network (like Akamai)
  • their fear of piracy dictated what they could technically do
  • not using NSURLConnection and tried and true HTTP

Let this be a lesson for everybody who also faces the necessity of large DLC packages.

If it is at all feasible I would continue downloading in the background and inform the user when necessary about completed or interrupted download. Allowing downloads to resume is even more important as to not frustrate users, especially if low bandwidth caused them to wait excessively long already.

Imagine downloading like 95% of an episode and then getting the dreaded error. Just one example:


C’mon Telltale, you CAN do better. Please implement download resuming before shipping episode 3. Strangely enough while I was writing these lines the app finally finished the download, it must have been about the 10th or so attempt. So I’m now off playing this otherwise awesome game!

flattr this!

App Review Advice for YouTube v2

$
0
0

I googled “Clint Eastwood Invisible Obama” because I was wondering why suddenly everybody is posting pictures of chairs with invisible presidents in them, hash tag #eastwooding. Of course there already was a video of the 10-minute speech to be found on YouTube, so I watched that.

The video quality bad, really bad, 360p kind of bad. I was watching it on my iPad 3 where I still sport iOS 5. This is my comfortable consumption device and where would consumption be without a YouTube client. You know, iOS 6 doesn’t have one any more. I am not referring to Mr. Eastwoods remarks when I am calling the experience painful.

YouTube is going to great lengths to prevent people from getting at the h.264 videos they are specifically preparing for iOS devices. Only the YouTube app as well as the MPMoviePlayerController’s that webviews overlay to fake embedded video know how to request the actual video data from Google’s servers. This video stream is then served as a progressive download.

The video was stalling every 3-5 minutes and frantically hacking at the play button would not have made any difference. Only if I moved the slider into the future, waited until the new position was showing and then moving it back to where it had stopped was I able to continue viewing.


There are only two qualities for YouTube videos on iOS at the moment, a “mobile” quality which is used if you don’t have WiFi connectivity and a higher bitrate quality for when you do. The selection is exclusively done via the type of connection. No bandwidth rate adapting seems to be going on as would be expected from streaming video.

Oh THIS is why Apple is killing it!

The Verge reported that the reason for Apple removing their YouTube app as of iOS 6 was caused by their license to the app expiring:

Our license to include the YouTube app in iOS has ended, customers can use YouTube in the Safari browser and Google is working on a new YouTube app to be on the App Store.

But this statement is not entirely truthful. The original YouTube.app was written by Apple themselves, there is no lack of license that would require them to remove the app. Rather the license expires that gave Apple access to the above mentioned special API and video versions that display on iOS devices. Without these YouTube.app simply has nothing that it could display.

It could still get search results via the Google Data APIs, but not videos. Those APIs are geared towards giving web developers an embeddable player, not a directly playable video URL. As I said before, Google keeps a firm grasp of their content.

Apple abhors situations where most of the value inside a stock app comes from reliance of somebody else’s content platform. Google abhors situations where they cannot affix monetize their content as they are doing so at YouTube.com. The situation kind of reminds me of what is going on with Twitter at the moment. By weaning users from third party clients the content owner (Twitter) can make sure that ads are properly delivered. YouTube is doing exactly the same, with ads being overlaid the bottom of suitable videos in a way that the user needs to close them to see all of the video.

Now Apple did an exceptionally smart move by removing YouTube. They no longer have to face the blame for crappy progressive download stalling viewing experiences. They can conveniently point the finger at Google for not taking care of the best streaming experience.

Changes to UIWebView

Essentially the view that was playing a video inside the YouTube.app and one inside Safari where one and the same. iOS detected via the object or video tag that there was a video to be embedded, inquired the appropriate h.264 file URL and then used an MPMoviePlayerController to play that. Apparently Safari will still be able to do that, although I suspect that this is due to YouTube’s now available HTML 5 video.

Over the past year YouTube has been tinkering on their HTML5 embedded player to get in on par with the Flash-based version. On August 7th the documentation about the embeddable player has been last updated to reflect the fact that the IFRAME player is no longer in BETA. In fact I just went to YouTube and clicked on the first video I saw and it turned out to be served as HTML5 video.

This means that Apple can also remove the workaround code they had in place to replace the Flash objects. Now all it needs is to look for the HTML5 <video> tag and play the attached video. And Google will undoubtedly still employ fancy JavaScript to obscure and protect the true source of the h.264 video which they no longer just produce for Apple but for everybody who has a browser capable of playing h.264.

When I vented my anger about the Invisible Obama stalling, Joel Bernstein responded:


I can understand the reasoning, it is the solution that any good engineer would come up with presented the technical landscape. But I have good reason to believe that Apple would never approve such a solution.

Guidelines for YouTube.app v2

There are several reasons to be found in the app store review guidelines that also dictate the “correct” way for Google to make a YouTube client that Apple would approve for the App Store.

The “entry level” of new YouTube accounts is 15 minutes. If you posted good content for a while this is lifted and then you’re able to upload videos only limited by file size, up to 12 hours running time. Suffice it to say that much content is longer then 10 minutes.

9.4 Video streaming content over a cellular network longer than 10 minutes must use HTTP Live Streaming and include a baseline 64 kbps audio-only HTTP Live stream

HTTP Live streaming chops up videos into many little pieces and then has a manifest file that serves as an index for what piece fits where. Also multiple bitrates can be supported at the same time with the player switching between streams depending on available bandwidth. There is an “informal” spec at the IETF website that explains how it is implemented.

This requirement means that YouTube has to implement HTTP live streaming if they want to get their video to mobile devices. It is possible that they would also implement it on their website but that would again open up a pandoras box since everybody who gets their hands on a video’s manifest can get all the pieces and reassemble the best quality version outside of Google’s control.

It is more likely that YouTube will have a separate server for dealing with HTTP live streaming and have the iOS video playing views directly talk to that.

On the theory of “bunch of web views”:

12.3 Apps that are simply web clippings, content aggregators, or a collection of links, may be rejected

This is another hint. Apple does their best to reject apps that are collections of web views. YouTube definitely IS a “content aggregator” or maybe even a “collection of links” (to video pages). If it looks like it could be a browser view then Apple will tell you that you should do it as a mobile web app and not a native one.

I myself once got hit by this rule. The way around it was to add a good offline mode and interactivity that is not possible with only UIWebViews. From this experience I know how serious Apple takes this.

17.1 Apps cannot transmit data about a user without obtaining the user’s prior permission and providing the user with access to information about how and where the data will be used

YouTube is collecting information about their users for purpose of ad targeting. The new app will definitely some privacy settings and a privacy policy.

Finally this relatively new section should prompt Google to go well beyond a set of UIWebViews:

10.6 Apple and our customers place a high value on simple, refined, creative, well thought through interfaces. They take more work but are worth it. Apple sets a high bar. If your user interface is complex or less than very good, it may be rejected

From these facts I am deriving my prediction that the Google-made YouTube player app will have to far exceed what we have seen until now.

Conclusion

Google might try the “easy way out” solution with a bunch of UIWebViews, but it is extremely likely that Apple will look really hard at what they come up with. Any sub-par experience that violates the above mentioned guidelines will not be accepted into the App Store. Even more so because we know that Apple and Google are on competitive terms.

The review guidelines are there fore every developer to measure up against, so Google better pull their act together and finally give as a good HTTP Live Streaming based solution. If Google just took the look of the current YouTube app and reimplemented that with UIWebViews for the players then they can be certain of a rejection.

Here’s their chance of showing us that they are able to provide a better video viewing experience than Apple ever was able to.

flattr this!

Radar: Scroll Direction setting linked for Mouse and Trackpad

$
0
0

It is understandable to have this ominous “Natural Scrolling” setting for trackpads. And that there is a separate such setting for mice. But I don’t understand why Apple would like these two settings, because somebody working on a laptop might want to use the normal way to scroll with his mouse’s scroll while while using the “natural” setting for his trackpad.

Filed as Radar #12236447 and cross-posted on OpenRadar.


Scroll Direction setting linked for Mouse and Trackpad

Summary:

When changing the setting to reverse scroll direction for trackpad or mouse the other device’s setting is affected as well.

Steps to Reproduce:

  • check the trackpad scroll direction “natural” setting
  • uncheck the mouse scroll direction

Expected Results:

  • the mouse setting should be separate from the trackpad setting

Actual Results:

  • unchecking the mouse scroll direction checkbox also unchecks the setting for trackpad

Regression:

n/a

Notes:

This is a nuisance for people who are switching between a notebook internal trackpad and an external USB mouse with trackwheel.

flattr this!

Summertime 1.2.0

$
0
0

Our Summertime is a handy little tool that shows you when the next DST switch is in your local time zone.  The newest version brings these improvements:

  • Fixed: Cannot search for timezones that have a space.
  • Fixed: Some missing Time Zone localizations
  • Fixed: Text alignment issues with longer count down durations or Time Zone names
  • Fixed: Time Zone names not getting updated if system language was changed
  • Fixed: Broken Reminder function
  • Changed: first page is now always the local time zone
  • Improved: Scrolling Performance in Timezone selector

There were some other “crufty” things that we addressed behind the scenes. The project was converted to ARC and the import process for localized timezone names was parallel-ized to achieve the much improved scrolling performance.


With the major UI redesign in version 1.1 we implemented a similar UX as the built-in weather app. In more recent iOS versions Apple removed the switch for the local weather and gave this the prominent position on the first page. Time zones have the advantage of being available regardless of the users permission settings for location information. Also it is highly likely that users would want to always get the daylight savings information for their current time zone.

This triggered the decision to do it like Apple. The first page is now always the local one. The user can still pick and sort any other world-wide time zones on the other pages.

When implementing all these updates we found that Apple had added new time zones that where unknown to us in iOS 4. Apparently as some regions “opt out” of Daylight Savings Time the international community establishes a time zone just for them. With some delay those regions then also end up on iOS.

Those new time zones for which we needed localization were:

  • Africa/Juba
  • America/Creston
  • America/Kralendijk
  • America/Lower_Princes
  • America/Metlakatla
  • America/North_Dakota/Beulah
  • America/Sitka
  • Asia/Hebron

I find it interesting that Apple is keeping on top of these developments (even when it takes them some time). This validates the strategy of this app to not use its own database but to get the DST information straight from the OS.

There was an other VERY embarrassing bug I also fixed in this release. For testing purposes I had the local notification always fire 10 seconds into the future. This is of course utter nonsense to have in a production app. This had only been reported by a single user in the past year, so there might not be very many people trying to use this. However now it is working as it should.

The update has been sent to Apple and we will report when it has been approved.

PS: When updating the screen shots for version 1.2 I found that I had forgotten about changing the screen shots for version 1.1. for other languages than English. This teaches us to always diligently update all screenshots for all languages you have on iTunes.

flattr this!

Knowing that File Protection Works

$
0
0

In one of our business-specific apps we wanted to activate File Protection. But how do you know if its turned on and actually doing its job?

We even spent a tech incident (of two you get from free every year) to inquire how we could be certain if the feature is actually working. Though unfortunately Apple did not have any answer for us because there is no way to actually test this with “legal” means.

Our first thought had been to copy the app documents to the desktop via Xcode organizer. But of course you can only do this while the iDevice is unlocked and thus even file-protected files come across normally.


My associate René Pirringer had the idea to jailbreak on of our test iPads running iOS 5.1.1. This can easily be achieved with a tool called redsn0w. After jailbreaking you install OpenSSH and change the passwords for the root and mobile accounts. Then you’re set to go snooping around in the devices file system. The apps are under /private/var … I don’t remember the rest of the path, but you’ll find it from there if you want to duplicate this test.

At first we couldn’t see any effect from locking and unlocking the device. But closer inspection of the code revealed that we had actually not set the file protection flag on the file we were looking at. You have to be careful that you are actually setting the protection file attribute on the right file.

So we fixed the code so that the right file got the right attribute: NSFileProtectionComplete.

And here’s what we saw in SSH…

If you have the device unlocked and inside the app then you can view the file. In our test we had a simple text file which we output with the Unix cat command.

As soon as you lock the device with a passcode you can still view the file for a duration of approximately 10 seconds. We repeatedly repeated the cat command and the text showed up find. After the time out has elapsed you can no longer do that. I assume that this grace period is meant to enable a process that tries to access this file to quick finish some in progress operation.

If you try to do a cat on the protected file after the grace period has expired you get an “Operation not permitted” error. So we can conclude that this indeed works as designed.

There are a few misconceptions we had about file protection which were cleared up by this Jailbreaking experiment. File protection does not have anything to do whether you app is running or not, it is system-wide. So if the device is unlocked all documents of all apps become accessible. It is of no consequence whether your app is running, backgrounded or even if you kill it.

If an attacker would rip your iPhone from you after you locked the screen would only have 10 seconds to dump the files he’s interested in before losing access to them.

Conclusion

With no Apple-sanctioned way of seeing that File Protection is actually working you have to be extra careful that you are actually applying the correct protection attribute to the files you want to protect. There is an app entitlement to turn on file protection by default for all files that the app creates, but unfortunately this is broken in iOS 5. Because of this you can only enable it for apps that require iOS 6.

Of course file protection is only as good as the strength of your passcode. A simple 4-digit code can be brute forced in about 15 minutes. But the choice of passcode or not is up to the users, we developers should still enable file protection for any data that deserves any level of protection.

flattr this!

Linguan 1.1.2

$
0
0

This maintenance release for Linguan fixes a number of issues which where mostly reported by our users.

Changes

  • FIXED: blank path to ibtool considered valid
  • FIXED: broken display of relative paths
  • FIXED: weird handling of tab and return while editing
  • FIXED: Endless Loop with File Change Notifications
  • FiXED: Scan Sources did not add a token that was just removed
  • FIXED: Superfluous file modification message on saving
  • FIXED: Ordering by key should ignore case

Also we had to add a beautiful Retina icon for Retina MacBook Pro to be able to submit the update. It’s in Apple’s hands now and we will update this post as soon as it is through review.

We have to keep our fingers crossed because due to the way Linguan uses the xcodeproj it cannot be (easily) sandboxed. Though Apple had stated that they will accept minor fixes (like the ones mentioned above) for updates. We sincerely hope that they will honor this.

flattr this!

iPhone 5 Keynote Event

$
0
0

We just witnessed the iPhone 5 launch …almost live … at the Runtastic HQ where there was a Cocoahead special event. Let’s summarize what it means for us developers.

Tim Cook called iOS 6 and iPhone 5 the “biggest thing to happen to the iPhone since iCloud”.


iOS 6

  • iOS 6 will be released to the general public on September 19th
  • The new panorama mode in the Photo app sherlocks all the panorama stitching apps
  • Passbook does not require any special Apple technology on the servers of the companies that vend passes. That makes it ideally suited for anything from movie to airplane tickets. I’m hoping that this pushes wide adoption soon and sherlocks all the special apps for carrying individual tickets.
  • Safari now has a full screen mode and thus sherlocks all apps that are providing full screen browsing as their main (or only) feature.
  • Support for the new higher screen is enabled by adding a taller launch image.

Here’s a panorama made with the new panorama feature. It’s Sherlocked! (my dog is named “Sherlock Holmes”)

iPhone 5

  • iPhone 5 will have a taller screen, 4 inch with more pixels. 1136*640 pixels.
  • Release date will be September 21st in the USA. 20 countries a week later, including Austria.
  • if you don’t change anything in your apps then they will run “letterboxed”, with black bars at the top and bottom
  • it will be “very easy” to update your app to support the new resolution (see above)
  • The 5th Generation iPod touch will have an A5, touting 7 times performance of predecessor, clearly a play for the mobile console market, especially because it also supports AirPlay mirroring
  • iPhone 3GS will no longer be sold with the iPhone 4 taking its spot as the “free” option. iPhone 4S will be the “cheap” option with contract.
  • You can forget about using your LTE interchangably between USA and Europe. There are actually 3 models of the iPhone 5 with different frequencies.
  • Also you need a new nano Sim card.

Other Stuff

  • No new AppleTV or ability to develop apps for it or iPod Nano.
  • No iPod touch “maxi” or iPad “mini”.
  • The new earphones called “EarPods” look amazing, I’ll have to order a couple.

More details added as they become available.

Xcode 4.5 can no longer build for armv6, but instead it adds building for the new A6 CPU under the name “armv7s”. This means that if your apps use third party libraries you better include them as source code, preferably as sub-projects. Third party libraries (like Google Analytics) which only come in binary form cannot be used as these are missing armv7s and the Xcode linker is unable to find the armv7s symbols inside them for linking. In other words: you need to wait until the vendor gives you a static library/framework that includes armv7 and armv7s.

If you want to make a truly universal “fat” static library you have to separately build for i386, armv6 (with Xcode 4.4), armv7 and armv7s and then manually lipo these all together. Another reason why many developers will probably give in and simply retire support for armv6 (and thus iPhone 3G).


flattr this!


Retina Iconset Trouble

$
0
0

When I was done with QA on Linguan 1.1.2 I wanted to submit it for review. But when I tried the validation step in Xcode halted me. It complained that I didn’t have a 512×512@2x icon. Then it dawned on me: Retina Macs.

So you have to imagine me, all excited about being able to submit this, but unable to do so. The icons for Linguan were all contained in an icns and I was stumped … but only for a moment. With help from David Smith I was able to prepare an iconset, the best current method for preparing the multiple resolutions of icons for Mac apps.


In previous Xcode versions developers would use the Icon Composer utility but Apple chose to remove that as of Xcode 4.4. Instead they recommend using icon sets in the official documentation. Icon Composer was deprecated because it was unable to deal with 1024*1024 resolution.

Icon sets consist of a folder containing all the required resolutions of the app icon. The name of the folder can be anything but – as unusual as it may seem – this folder has to have the .iconset extension. This is necessary to inform Xcode that it should create the icns file during the resource copying build phase.

The complete list of required sizes is this:

  • icon_16x16.png
  • icon_16x16@2x.png
  • icon_32x32.png
  • icon_32x32@2x.png
  • icon_128x128.png
  • icon_128x128@2x.png
  • icon_256x256.png
  • icon_256x256@2x.png
  • icon_512x512.png
  • icon_512x512@2x.png

Since the 16×16@2x and the 32×32 are identical I was missing the 32×32 and 512×512 which I quickly got from my designer. I learned painfully that the iconutil tool seems to have problems with uppercase characters. At first I wanted to have my resulting icon to be named with an uppercase I, but strangely if you rename the above images accordingly then the tool will no longer be able to find any images. So I settled for all lowercase.

David Smith created the following shell script that creates all these files from the largest resolution. You need to have ImageMagick installed for the convert tool to work.

mkdir -p icon.iconset
convert $1 -resize 16x16 icon.iconset/icon_16x16.png
convert $1 -resize 32x32 icon.iconset/icon_16x16@2x.png
convert $1 -resize 32x32 icon.iconset/icon_32x32.png
convert $1 -resize 64x64 icon.iconset/icon_32x32@2x.png
convert $1 -resize 128x128 icon.iconset/icon_128x128.png
convert $1 -resize 256x256 icon.iconset/icon_128x128@2x.png
convert $1 -resize 256x256 icon.iconset/icon_256x256.png
convert $1 -resize 512x512 icon.iconset/icon_256x256@2x.png
convert $1 -resize 512x512 icon.iconset/icon_512x512.png
convert $1 -resize 1024x1024 icon.iconset/icon_512x512@2x.png

Alternatively if you don’t want to install ImageMagick you can fall back on the sips tool which comes preinstalled on OS X.

mkdir -p icon.iconset
sips --resampleWidth 16 $1 --out icon.iconset/icon_16x16.png
sips --resampleWidth 32 $1 --out icon.iconset/icon_16x16@2x.png
sips --resampleWidth 32 $1 --out icon.iconset/icon_32x32.png
sips --resampleWidth 64 $1 --out icon.iconset/icon_32x32@2x.png
sips --resampleWidth 128 $1 --out icon.iconset/icon_128x128.png
sips --resampleWidth 256 $1 --out icon.iconset/icon_128x128@2x.png
sips --resampleWidth 256 $1 --out icon.iconset/icon_256x256.png
sips --resampleWidth 512 $1 --out icon.iconset/icon_256x256@2x.png
sips --resampleWidth 512 $1 --out icon.iconset/icon_512x512.png
sips --resampleWidth 1024 $1 --out icon.iconset/icon_512x512@2x.png

Save the shell script in a text file named iconset.sh, chmod +x to make it executable and then call to produce the iconset folder:

./iconset.sh icon_1024x1024.png

When you drag and drop the iconset folder into Xcode you choose to copy it to the project. Instead of the normal yellow group folder icons you will see a blue folder which tells you that this is an actual folder on disk as opposed to a virtual group. When you select it you see a preview in the main editor view which you can resize between 16 and 512 points square with the slider at the bottom to preview the OS dynamically choosing the optimal base image for the given size.

If everything worked correctly you will see that Xcode is actually calling out to the iconutil tool for you and combine the icons. Check the build log to see it executing a ConvertIconSetFile set.

And indeed if you check the generated output product there is no longer any trace of the iconset folder. Instead there is an icon.icns file.

The build log kindly also tells us the exact script it executes. You can see that it uses the –convert icns option which means that the output should be an icns file. The other available option for this parameter is iconset to go the other way. With this you can start with an existing icon set and extra the individual pngs from it.

The CFBundleIconFile option in info.plist needs to match the file name of the resulting iconset. However you can omit the extension.

Conclusion

Icon sets are a handy addition to Mac apps that more or less replace the previous monolithic icns files. For a long time we’ve been used to working with multiple individual pngs on the iOS platform and this change of strategy also makes the Mac world be a little more like iOS.

If you have an existing project you can use the icon utility to split the icns file into the existing images and then add the missing resolutions before generating a new icon set.

Finally I am still astonished about iconutil being unable to work with input files that have an uppercase first character. So until this is fixed or somebody has a good explanation for me why this is, I’ll grungingly will name my Mac app icons with lowercase.

flattr this!

Back on Mac – OS X Tutorial for iOS Developers

$
0
0

I’ve been programming for the iOS platform ever since this is possible, since the iPhone 3G with iPhone OS 2.0 was released by Apple in Summer 2008. For all this time I had a healthy respect about programming for Mac. More precisely: Horror.

If you dig into it you can only applaud Apple for not having tried to craft touch screen and energy optimization stuff onto AppKit, but chose to go the forked OS route. Being a seasoned iOS developer you will find yourself often cursing about how complicated certain activities seem.

Having said that you also see the positive influence of iOS on AppKit all around. Now that Apple deprecated Garbage Collection and you are already well used to programming under the ARC paradigm you find yourself writing exactly the same code for both platforms more often than not.

This will be the first in a series of tutorials where I am sharing my experiences in diving into AppKit. Please let me know if this is in fact interesting to you by sharing and Flattr’ing it.


Rather than showing you messy code I am working on right now I decided to start this first part of the tutorial from scratch.

NSDocument-based Photo Shoebox for Mac

When we’re done with this tutorial we will have a document-based Mac app that has the following features:

  • Out-of-the-Box Document features: New Document, Rename, Move, Lock, Revert to earlier versions
  • Multi-Document-Interface, you can have as many documents open as you like
  • Custom icon for those Shoebox bundles, double-clicking will open the document
  • A document will be a collection of images, displayed in a grid
  • You can drag images from your desktop into a document and it will be added to the document
  • Dragging an image out of a document creates a copy of it on the desktop
  • You can rearrange the images also by dragging them around on the grid

Source code will be made available in my Examples GitHub repo.

NSDocument versus UIDocument

Document-based apps on Mac and iOS have something in common: there is a base-class from which you derive your own document class. This class is NSDocument on Mac and UIDocument on iOS. The reason for this split is because NSDocument fits in the Controller category of the Model-View-Controller paradigm. As such it is responsible for creating the Window that represents the document. Apple couldn’t have reused the same class for iOS (it was first on the Mac) because then it would have had a problem with all the Mac-specific controller methods. Because of this you have the iOS pendant in the form of UIDocument.

UIDocument (new in iOS 5) and NSDocument (around since OS X 10.0) both can be enabled to support iCloud. You’ll notice that Apple removed the display-controllery bits from NSDocument for UIDocument and left it entirely document-controlling on iOS. On Mac you’ll find methods grouped under “Creating and Managing Window Controllers” and “Managing Document Windows” which are totally absent from UIDocument. I suspect that this is mainly because Apple is now more strictly separating the MVC parts. NSDocument would totally fail this new approach as it mixes UI and document-interaction.

There are four kinds of document types that come to mind:

  • Flat file – use the data reading/writing methods of NSDocument
  • Bundle – use the fileWrapper reading/writing methods of NSDocument
  • CoreData – use NSPersistentDocument  (Mac only) which adds CoreData stuff to NSDocument
  • Custom – use the direct URL-based reading/writing methods of NSDocument

Note that bundles are a Mac speciality where a folder is made to be looking like a single file. Bundles are great while moving on Apple’s eco-system, but if you’re moving outside of that you’ll probably want to support a single-file format instead, or zip the bundle up to make it a single file for transmission.

NSFileWrapper

Our tutorial app will be using bundles. Each document will be a folder with a .shoebox extension and this will contain any number of assorted image files. A property list (plist) will keep track of our sort order. Because of this we will be using the approach via NSFileWrapper. This ancient (since OS X 10.0) class is available also on iOS (since iOS 4).

File wrappers are object-representations of single files, folders or symbolic links. You can think of them as a wrapper around a file system node that more or less exists independently from a physical location. It can and does happen all the time that a document will be moved somewhere else or be renamed without you being informed to that effect. But even if that occurs your file wrappers still let you access the file data. You don’t have to care where the actual files are located.

We won’t deal with symbolic links in this tutorial. Only files and folders. You can query a file wrapper isRegularFile, isDirectory or isSymbolicLink to quickly tell them apart. If you are talking to a folder then the file wrapper has its children in a dictionary named fileWrappers. Each dictionary key is the name of the child and each referenced value is in turn another NSFileWrapper. To get to the contents of an individual file you call regularFileContents to retrieve and NSData instance.

File – New -Project

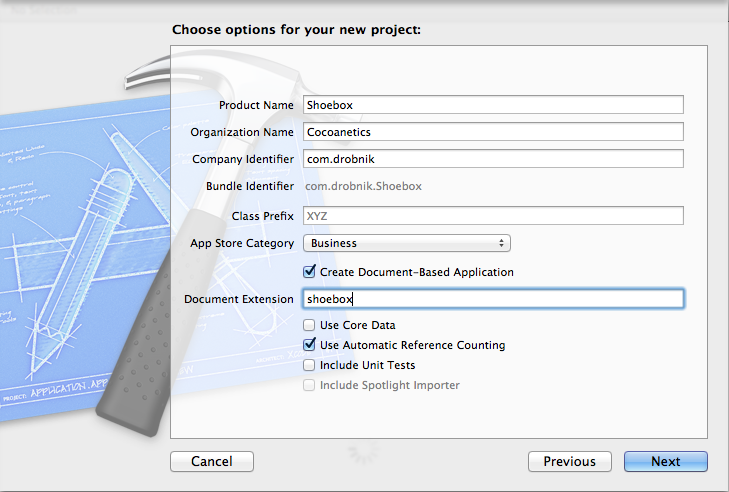
Armed with these basic principles we can get started with actual code. We’ll start a new Mac Cocoa app.

We don’t check “Use Core Data” because that would cause the template to set up the app using NSPersistentDocument. Also we already specify our document extension here. This sets up a document type in the info of the app target.

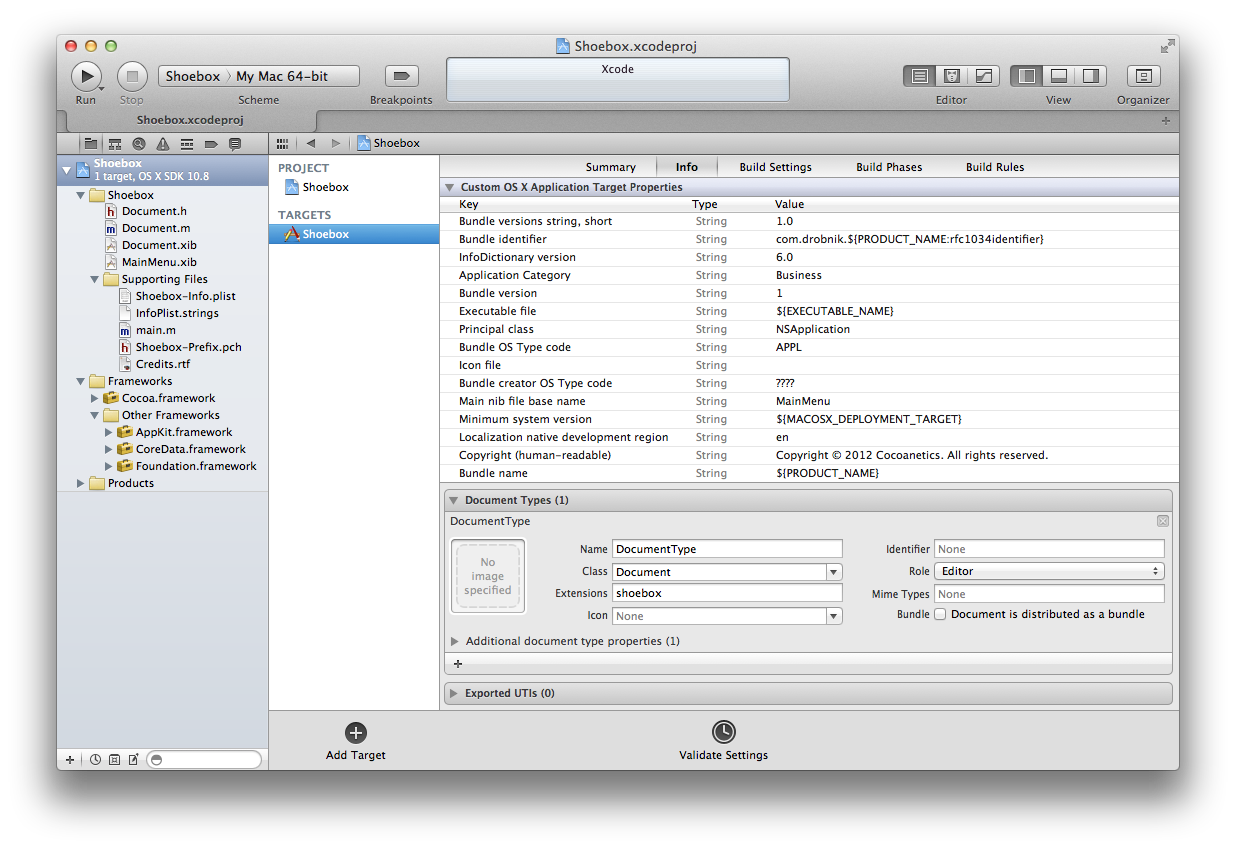
Let’s dive into this and customize it a bit. Take note of the Class “Document” which maps this type to our Document.h/.m/.xib. We change the Name to “Photo Shoebox”, set an identifier “com.drobnik.shoebox”, note that the role of our app will be to be an “Editor” of this type. Also we want to check the “Document is distributed as a bundle” option.

This icon can be any icns file that is located in the app bundle. More on that later.

If you run the app in this current state you will notice a warning logged on the console:

-[NSDocumentController fileExtensionsFromType:] is deprecated, and does not work when passed a uniform type identifier (UTI). If the application didn’t invoke it directly then the problem is probably that some other NSDocument or NSDocumentController method is getting confused by a UTI that’s not actually declared anywhere. Maybe it should be declared in the UTExportedTypeDeclarations section of this app’s Info.plist but is not. The alleged UTI in question is “com.drobnik.shoebox”.

So let’s also take care of the “Maybe it should be declared” right away. I yet have to find anybody who can explain the link between document types exported and imported UTIs. I know this from my own experiments. This setup registers our UTI so that the rest of the operating system knows that we are responsible for it.

With this registration in place the above mentioned warning does no longer occur. If anybody can shed some light on how this works, please contact me.

Upon inspection of Document.m you see that the template put in dataOfType:error: and readFromData:ofType:error: including the immediate throwing of an NSException should you not customize these. The Document.xib contains a Window that has one View plus some static text “Your document contents here”. We’ll be customizing those files in a bit, but before we need a bit of model.

Model

Since we want to be able to have our own order independent from a sort order by name we are going to keep the model objects in a mutable array. Because we also want to display the file name for each file we have to give our model object a name property too. To make it a bit more interesting we’re not going the easy route and also give the model object an image property. Instead we supply a weak link to the document from where each model object can retrieve the image. This is probably also a bit more efficient because as far as I can tell file wrappers only access the information on disk when they really needed it.

DocumentItem.h

@class Document;
 
@interface DocumentItem : NSObject
 
@property (nonatomic, strong) NSString *fileName;
@property (nonatomic, weak) Document *document;
 
- (NSImage *)thumbnailImage;
 
@end

DocumentItem.m

#import "DocumentItem.h"
#import "Document.h"
 
@implementation DocumentItem
 
- (NSImage *)thumbnailImage
{
	return [self.document thumbnailImageForName:self.fileName];
}
 
@synthesize fileName;
@synthesize document;
 
@end

The document property is weak because document items will be owned by the property and having a strong reference would cause a retain cycle. Weak properties have the added benefit that should a DocumentItem ever survive its Document then the deallocation of the document will automatically set the property to nil preventing a crash if some delayed method is still making a method call to it.

We’ll be using an NSKeyedArchiver to persist our array of DocumentItems, so we also need to implement the NSCoding protocol methods for our model object. Of course we could have also done this in CoreData but for simplicity’s sake we’ll still with keyed archiving.

#pragma mark NSCoding
 
- (id)initWithCoder:(NSCoder *)aDecoder
{
	self = [super init];
 
	if (self)
	{
		self.fileName = [aDecoder decodeObjectForKey:@"fileName"];
	}
 
	return self;
}
 
- (void)encodeWithCoder:(NSCoder *)aCoder
{
	[aCoder encodeObject:self.fileName forKey:@"fileName"];
}

Next up we need to teach our Document how to encode and decode an array of DocumentItems with file wrappers.

Implement Reading

At this stage we won’t have shoebox bundles yet to test it, so just take my word for it that this works. Typically you will overwrite one of these three methods:

  • - (BOOL)readFromURL:(NSURL *)url ofType:(NSString *)typeName error:(NSError **)outError
  • - (BOOL)readFromData:(NSData *)data ofType:(NSString *)typeName error:(NSError **)outError
  • - (BOOL)readFromFileWrapper:(NSFileWrapper *)fileWrapper ofType:(NSString *)typeName error:(NSError **)outError;

Can you guess which one is the one we want? Hint: see “four kinds of document types”.

Document.h

@interface Document : NSDocument
 
@property (nonatomic, strong) NSMutableArray *items;
 
- (NSImage *)thumbnailImageForName:(NSString *)fileName;
 
@end

Document.m

#import "Document.h"
#import "DocumentItem.h"
 
@implementation Document
{
	NSFileWrapper *_fileWrapper;
	NSMutableArray *_items;
}
 
- (id)init
{
    self = [super init];
    if (self)
	{
		// start out with an empty array
		_items = [[NSMutableArray alloc] init];
    }
    return self;
}
 
- (NSString *)windowNibName
{
	return @"Document";
}
 
- (void)windowControllerDidLoadNib:(NSWindowController *)aController
{
	[super windowControllerDidLoadNib:aController];
}
 
+ (BOOL)autosavesInPlace
{
    return YES;
}
 
// below this line our own code starts ---
 
- (BOOL)readFromFileWrapper:(NSFileWrapper *)fileWrapper ofType:(NSString *)typeName error:(NSError **)outError
{
	if (![fileWrapper isDirectory])
	{
		NSDictionary *userInfo = [NSDictionary dictionaryWithObject:@"Illegal Document Format" forKey:NSLocalizedDescriptionKey];
		*outError = [NSError errorWithDomain:@"Shoebox" code:1 userInfo:userInfo];
		return NO;
	}
 
	// store reference for later image access
	_fileWrapper = fileWrapper;
 
	// decode the index
	NSFileWrapper *indexWrapper = [fileWrapper.fileWrappers objectForKey:@"index.plist"];
	NSArray *array = [NSKeyedUnarchiver unarchiveObjectWithData:indexWrapper.regularFileContents];
 
	// set the property
	self.items = [array mutableCopy];
 
	// YES because of successful reading
	return YES;
}
 
@synthesize items = _items;
 
@end

Regardless of what you implement, the first called method will be readFromURL and the default implementation in NSDocument decides whether to call the file wrapper method or the data reading method. If you wanted to you could grab the document file URL from there, but I strongly advice against that. If the user chooses to move or rename the document while it is open in a window the URL will become invalid. There are several scenarios where the document might end up in a different spot on your hard disk, including renaming, duplicating, auto-saving and moving of the document.

Instead of having to worry about hard disk locations we’re holding onto the file wrapper that is passed to us. This allows us to access document resources (i.e. the images) later on. So this code is just a quick validity check to refuse flat files that might have ended up with a .shoebox extension.

Implement Writing

Similar to the reading you also have a choice of three methods, one of which you must implement.

  • - (BOOL)writeToURL:(NSURL *)url ofType:(NSString *)typeName error:(NSError **)outError
  • - (NSData *)dataOfType:(NSString *)typeName error:(NSError **)outError
  • - (NSFileWrapper *)fileWrapperOfType:(NSString *)typeName error:(NSError **)outError

Here we have to do a little bit more besides of encoding the item array. We also need to make sure that the new file wrapper contains all the images from the original bundle. So we walk through the item list, get the corresponding file wrappers for the images by name and add them to the list of files to be added.

- (NSFileWrapper *)fileWrapperOfType:(NSString *)typeName error:(NSError **)outError
{
	// this holds the files to be added
	NSMutableDictionary *files = [NSMutableDictionary dictionary];
 
	// encode the index
	NSData *data = [NSKeyedArchiver archivedDataWithRootObject:self.items];
	NSFileWrapper *indexWrapper = [[NSFileWrapper alloc] initRegularFileWithContents:data];
 
	// add it to the files
	[files setObject:indexWrapper forKey:@"index.plist"];
 
	// copy all other referenced files too
	for (DocumentItem *oneItem in self.items)
	{
		NSString *fileName = oneItem.fileName;
		NSFileWrapper *existingFile = [_fileWrapper.fileWrappers objectForKey:fileName];
		[files setObject:existingFile forKey:fileName];
	}
 
	// create a new fileWrapper for the bundle
	NSFileWrapper *newWrapper = [[NSFileWrapper alloc] initDirectoryWithFileWrappers:files];
 
	return newWrapper;
}

That’s enough meat for part 1. Let’s Build&Run and see what already works.

Result!!!

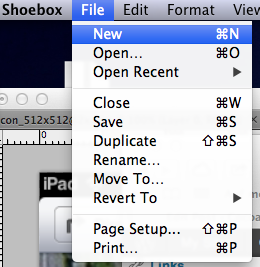
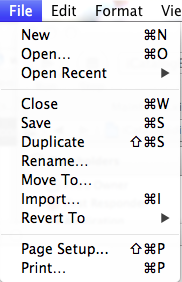
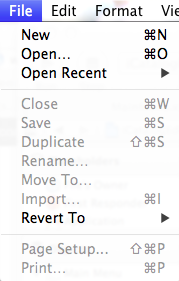
At this stage we have all the code necessary to get the out-of-the-box features that NSDocument gives us. Build&Run the app and you find that you can create a new document via the File Menu.

Also Open, Open Recent, Close, Save, Duplicate, Rename, Move To and Reverting work already! Only the Print lacks an implementation at this point. Also the handling of multiple open documents is complete. You can minimize document windows and switch between them.

If you create a new document then it is created in a special auto-save location under the user’s Library folder. Our Shoebox documents show up as files, and you have to “Show Package Contents” to peek inside. There you will find an index.plist file that is a keyed archive.

I’m sorry that we don’t have anything more visible yet, but I promise that we’ll get to drag/drop and NSCollectionView next. We’re done with the boring part and I promise that it will soon become more exciting as we enable adding and removing of images to our Shoebox documents.

Also, please let me know if you find this kind of iOS-to-Mac crossover tutorial useful. Use the Flattr button and/or share this article on your favorite social networks so that I can see if it is worth to spend the time on putting this tutorial together and seeing it through to the end.

flattr this!

iOS 6 out now

$
0
0

True to the predictions iOS 6 became available worldwide at exactly 7 pm central European time. The nice guys at istheapplestoredown.de were the first to call it and send out the notification e-mail that you can subscribe to.

The first question foremost on every developer’s mind: is the released version the same as the Gold Master.


Hey there, Apple just released the following new iOS Software:

    • iPhone 3GS (iPhone2,1) version 6.0 (Build 10A403), Download
    • iPhone 4 (iPhone3,1) version 6.0 (Build 10A403), Download
    • iPod Touch 4G (iPod4,1) version 6.0 (Build 10A403), Download
    • iPhone 4 (Verizon) (iPhone3,3) version 6.0 (Build 10A403), Download
    • iPad 2 (Wi-Fi) (iPad2,1) version 6.0 (Build 10A403), Download
    • iPad 2 (AT&T) (iPad2,2) version 6.0 (Build 10A403), Download
    • iPad 2 (Verizon) (iPad2,3) version 6.0 (Build 10A403), Download
    • iPhone 4S (iPhone4,1) version 6.0 (Build 10A403), Download
    • iPad2,4 (iPad2,4) version 6.0 (Build 10A403), Download
    • iPad 3 (Wi-Fi) (iPad3,1) version 6.0 (Build 10A403), Download
    • iPad 3 (AT&T) (iPad3,2) version 6.0 (Build 10A403), Download
    • iPad 3 (Verizon) (iPad3,3) version 6.0 (Build 10A403), Download
    • iPhone 4 (AT&T) (iPhone3,2) version 6.0 (Build 10A403), Download
    • iPhone5,1 (iPhone5,1) version 6.0 (Build 10A405), Download
    • iPhone5,2 (iPhone5,2) version 6.0 (Build 10A405), Download
    • iPod5,1 (iPod5,1) version 6.0 (Build 10A406), Download

Please feel free to share this email with your friends :-)
Thank you for your subscription.

How nice that they even mention the build numbers. So I was able to immediately check that against the GM I had installed on my main iPhone 4S and see that it is in fact an identical build number.

Only the iPod Touch 5G and the new iPhone 5 models have a slightly higher build number. But since those are new devices nobody outside of Apple would be wondering if they have the really latest version of iOS 6.

flattr this!

OS X Tutorial for iOS Developers (2)

$
0
0

In the first part of this series we started out by setting up the document type and export the UTI for the system to know about it. We also implemented methods to read the index from a file wrapper as well as persisting it to a new one. These steps where sufficient that we ended up with all the file manipulation candy (reverting to earlier versions, new doc, etc.) functional.

I promised that we would get go something more interesting today. We’ll be wiring up an NSCollectionView to show thumbnails and names of our images contained in shoebox documents. Then we need to dive into pasteboard as well drag-and-drop functionality to be able to manipulate those shoebox images. We want to be able to drag images from Desktop into shoeboxes and – time permitting – also be able to change their order by dragging as well.

Please let me know if this kind of tutorial is of interest to you by using the Flattr button and/or sharing it in your favorite social network.


To whet your appetite, this is what the app will look like by the end of this episode.

To make it interesting right away we shall enable the user to drag an image file from desktop into a document. But first we need to set up a collection view. With iOS 6 Apple has given us UICollectionView, on OS X we find NSCollectionView being its ancient ancestore because it has been on the Mac since 10.5.

NSCollectionView, NSArrayController and Data Binding

Collection Views are awesome because they take care of the nitty gritty of arranging multiple subviews automatically for us. On iOS you interact with them via delegate and datasource protocol methods. On Mac there is a paradigm called data binding. You can have objects basically watch some value (usually in a controller) and update themselves if they find that the bound value has changed.

You can either directly set the content property of the NSCollectionView or create a bind it to an NSArrayController’s arrangedObjects method. Array controllers have the ability of automatically sorting the array elements by a given sort key. Also you can change the element sort order separately from the order the objects have in the content array. I’m sure that there are other ways to achieve the ordering, but this is how Apple is demonstrating it in their IconCollection sample.

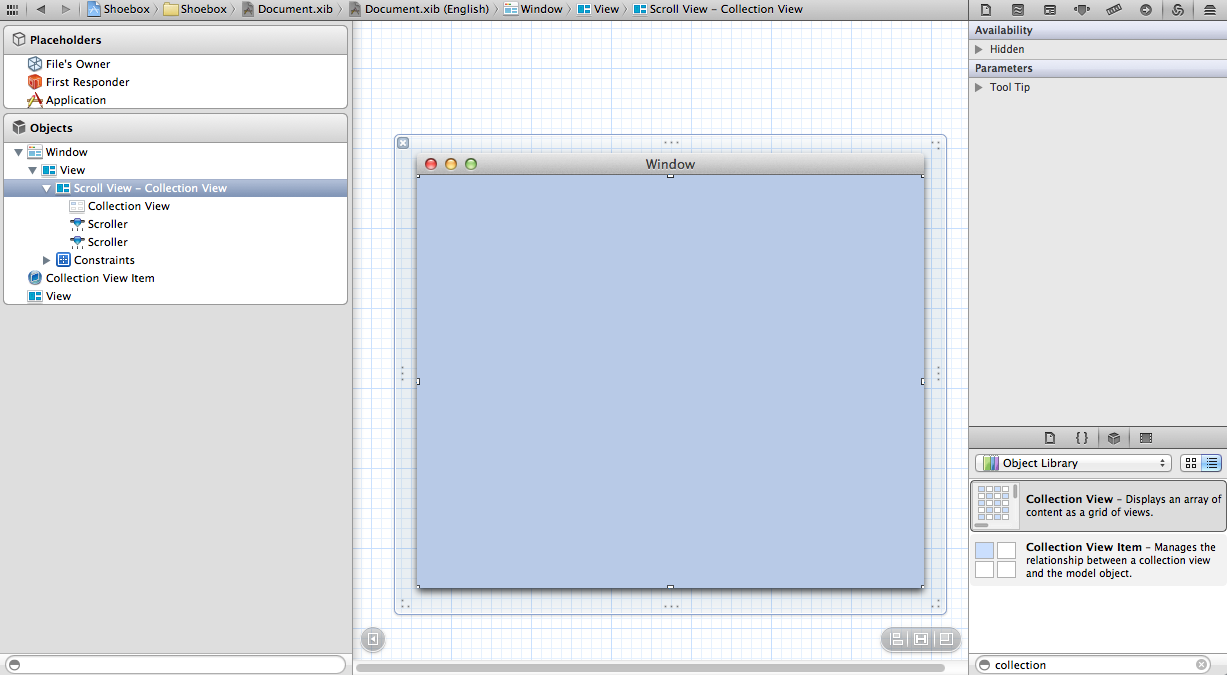
We open Interface Builder with Document.xib, remove the existing static label and drag a Collection View from the Object Library (right side panel) onto the Window. Resize it flush with the Window.

Please note that adding the collection view also automatically added a Scroll View around it as well as a “Collection View Item” which is connected to the itemPrototype property of NSCollectionView. This has an outlet view which is connected to the single lonely View item at the bottom of the list. This will be the canvas to construct our item representations later.

While we’re here we also add an NSArrayController by the same method. Apple has it between the Window and the Objects header, so shall we. When designing XIBs for Mac there is an additional tap for the bindings, resembling a water wheel. (Don’t ask me why Apple thinks that this is a good visual representation of the bindings concept)

We bind the array controller to “File’s Owner” which here is a proxy for Document instances. In part 1 we defined the mutable array for our items as public property there and so we can set the Model Key Path to “items” and auto-completion will show you that it found that.

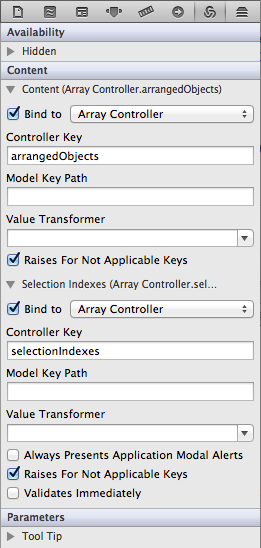
Next to be bound is the collection view. Select it (and not the scroll view) and adjust the bindings there. We bind the Content to “Array Controller”, Controller Key to “arrangedObjects”. Selection Indexes we also bind to “Array Controller” and Controller Key there to “selectionIndexes”.

NSCollectionView now observes the arrangedObjects in the array controller which in turn gets its data from the items property of Document. For each such item the collection view creates a Collection View Item, including the View attached to it. Now let’s set up those.

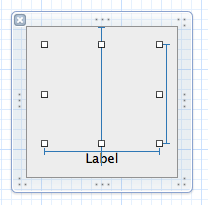
Select the lonesome View in the tree panel. Add a “Label” (NSTextField) from the object library and change it to center the text. For the image drag an “Image Well” and position it above the Label. This is a bit strange because this is still a regular NSImageView as you can see when clicking on the third inspector tab. On the fourth tab we remove the default Becel border so that our images have no border.

There are two ways to have the individual data-bound items fill in the label and image. You can either create a NSCollectionViewItem subclass and override the newItemForRepresentedObject in some responsible UIViewController. But data binding provides the much easier alternative.

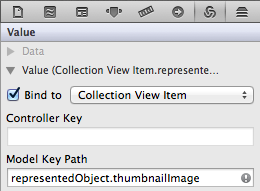
Using the Bindings inspector we can set the Value for the Label and Image View to be derived from the representedObject. So we bind it to “Collection View Item” and set Model Key path to “representedObject.thumbnailImage” and “representedObject.fileName” respectively.

All of this goes via Key-Value-Coding – hence the “Key Path” – so this is why we added the DocumentItem model class with a fileName and a thumbnailImage property. Each representedObject will be a DocumentItem instance and these bindings allow the collection item prototype view to retrieve its values for display.

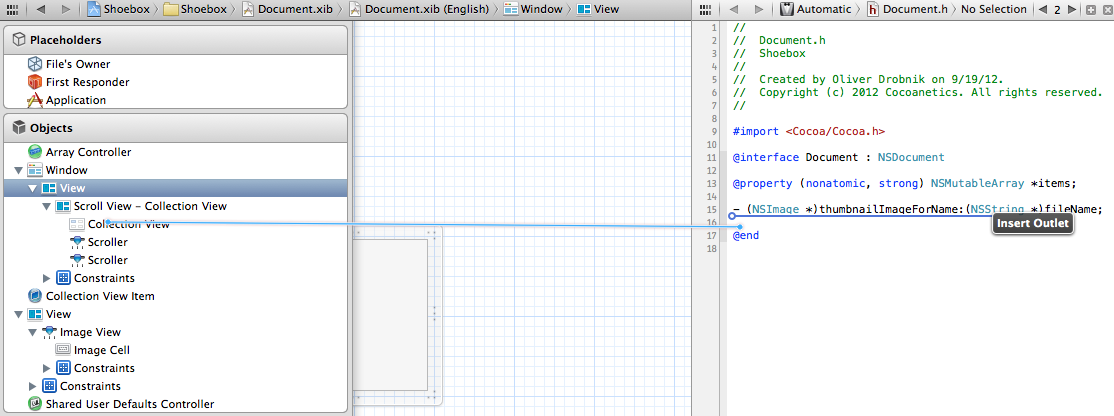
The final piece of setup we need is to have an outlet for the collection view in our Document class so that we can message to it. A nice fast way to achieve that is to open the Assistant Editor which editing the XIB in the main editor. This will show the header of the File’s Owner and allow you to Ctrl-Drag elements into the header.

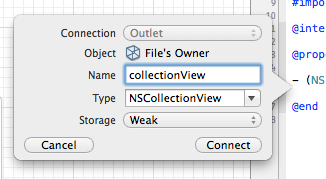
In the resulting popup we set up the outlet and this adds the appropriate code and links for us.

Data Binding is one really great thing on Mac that we don’t have on iOS. It builds on KVC and KVO, both of which are also on iOS. So we can keep our fingers crossed that Apple will add that to iOS at some point in the future.

Accepting Dragged Files

I hope that your patience has held until here with no way yet to see if the setup in Interface Builder and all these bindings are actually correct. Now we finally get to add stuff to our collection view by accepting dragged files from outside our app.

To make our Collection Views accept dragged files we need to tell it which UTIs we are willing to bother with. This is best done in Document in the first method that is called after the NIB was loaded by adding to windowControllerDidLoadNib:

- (void)windowControllerDidLoadNib:(NSWindowController *)aController
{
    [super windowControllerDidLoadNib:aController];
 
    // register types that we accept
    NSArray *supportedTypes = [NSArray arrayWithObjects:@"com.drobnik.shoebox.item", NSFilenamesPboardType, nil];
    [self.collectionView registerForDraggedTypes:supportedTypes];
 
    // from external we always add
    [self.collectionView setDraggingSourceOperationMask:NSDragOperationCopy forLocal:NO];
 
    // from internal we always move
    [self.collectionView setDraggingSourceOperationMask:NSDragOperationMove forLocal:YES];
}

Ignore the other types for the time being, the important one here is NSFilenamesPboardType which is an array of file URLs. This is the type used by Finder/Desktop to drag a list of one or more files. The types you set here are the ones that the collection view will accept.

There is one more thing you need to quickly set up in the Document.xib. There are certain delegate methods that collection view needs to see implemented so that dragging will work. For this purpose we have to connect the Collection View’s delegate outlet with the File’s Owner, i.e. the Document. You know, Ctrl-Drag from the collection view up onto the File’s Owner and choose delegate. Alternatively you could do that in code right next to the dragged type registration.

We need to implement a delegate method that evaluates a proposed drop operation.

- (NSDragOperation)collectionView:(NSCollectionView *)collectionView validateDrop:(id )draggingInfo proposedIndex:(NSInteger *)proposedDropIndex dropOperation:(NSCollectionViewDropOperation *)proposedDropOperation
{
	if (!draggingInfo.draggingSource)
	{
		// comes from external
		return NSDragOperationCopy;
	}
 
	// comes from internal
	return NSDragOperationMove;
}

The proposedDropOperation is a simple value which can either be NSCollectionViewDropOn if you are dragging onto an existing item or NSCollectionViewDropBefore if you are dragging to an empty space between elements. With an empty collection view the first image dropped causes proposedIndex to be 0 and proposedDropOperation to be Before.

The return value will inform the OS which badge to add to the dragged icon. NSDragOperationCopy will add a green plus, NSDragOperationMove shows nothing, NSDragOperationLink shows a link symbol. By returning NSDragOperationNone you can refuse certain drops based on the passed draggingInfo. This info contains a link to a special pasteboard that holds the dragged items and other info to base your decision on.

For our purposes we respond that we want he Copy icon to show when the drag operation originated outside of the collection view and a Move to occur if our app is the source.

The validateDrop method informs others that our collection view would be possible willing to accept dragged items. In case something is actually dropped we also need to handle.

- (void)insertFiles:(NSArray *)files atIndex:(NSInteger)index
{
	NSMutableArray *insertedObjects = [NSMutableArray array];
 
	for (NSURL *URL in files)
	{
		// add file to our bundle
		[_fileWrapper addFileWithPath:[URL path]];
 
		// create model object for it
		DocumentItem *newItem = [[DocumentItem alloc] init];
		newItem.fileName = [[URL path] lastPathComponent];
		newItem.document = self;
 
		// add to our items
		[insertedObjects addObject:newItem];
	}
 
	// send KVO message so that the array controller updates itself
	[self willChangeValueForKey:@"items"];
	[self.items insertObjects:insertedObjects atIndexes:[NSIndexSet indexSetWithIndex:index]];
	[self didChangeValueForKey:@"items"];
 
	// mark document as dirty
	[self updateChangeCount:NSChangeDone];
}
 
- (BOOL)collectionView:(NSCollectionView *)collectionView acceptDrop:(id &lt; NSDraggingInfo &gt;)draggingInfo index:(NSInteger)index dropOperation:(NSCollectionViewDropOperation)dropOperation
{
	NSPasteboard *pasteboard = [draggingInfo draggingPasteboard];
 
	NSMutableArray *files = [NSMutableArray array];
 
	for (NSPasteboardItem *oneItem in [pasteboard pasteboardItems])
	{
		NSString *urlString = [oneItem stringForType:(id)kUTTypeFileURL];
		NSURL *URL = [NSURL URLWithString:urlString];
 
		if (URL)
		{
			[files addObject:URL];
		}
	}
 
	if ([files count])
	{
		[self insertFiles:files atIndex:index];
	}
 
	return YES;
}

The draggingPasteboard method of draggingInfo gives us access to the temporary pasteboard that holds the dragged items. We retrieve the string for URLs, convert it into URLs and if we got a valid URL we add it to our list. You can query an NSPasteboardItem by UTI type for either string, data or property list.

The insertFiles helper method creates a file wrapper for each passed URL, creates a DocumentItem model object and then inserts the bunch of objects at the correct index in the items array. Note the use of willChangeValueForKey: and didChangeValueForKey: to send a KVO message to trigger an update from NSArrayController watching the “items” key path.

Calling updateChangeCount tells the system that a change was made and upon doing that an “Edited” label appears in the window title bar. Please forgive the extreme simplicity of this code. For one it does not check if the passed files are really images. It also does nothing to deal with a file being added a second time. These tidbits are left to the reader’s imagination.

We also need to implement the method by which a thumbnail is retrieved for each image. For sake of simplicity we don’t bother with resizing those as NSImageView takes care of this for us. Also on Macs we typically don’t face the same kinds of memory constraints as we do on iOS devices.

- (NSImage *)thumbnailImageForName:(NSString *)fileName
{
   // get the correct fileWrapper for the image
   NSFileWrapper *fileWrapper = [_fileWrapper.fileWrappers objectForKey:fileName];
 
   // create an image
   NSImage *image = [[NSImage alloc] initWithData:fileWrapper.regularFileContents];
   return image;
}

Et voilá! We can now drag single or multiple images into the Shoebox and for each added file an item appears at the location were you let go of it. Also try resizing of the entire window to see how the collection view automatically redistributes the contents.

What’s even cooler is that the app already supports auto-saving and reverting to earlier versions. After having made some modifications and saving these you can go to the Revert To option in the Menu to get the familiar Time Machine interface for selecting an earlier version to restore.

This chapter dealt with handling of dragging files from outside of the app into an NSCollectionView acting as drop target.

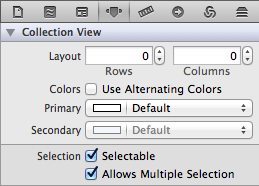
As a prerequisite to local drag-drop-reordering we need to enable selection on the collection view and also do something so that the selection becomes visible to the user. So we enable selection and multiple selection in interface builder.

The collection view keeps track of selected elements in the selectionIndexes property and calls the setSelected method on each item. We need to implement our own NSView subclass that knows how to draw a selection. This class replaces the default NSView for the item prototype, so you have to change that in interface builder as well.

DocumentItemView.h

@interface DocumentCollectionItemView : NSCollectionViewItem
 
@property (nonatomic, assign, getter = isSelected) BOOL selected;
 
@end

DocumentItemView.m

#import "DocumentItemView.h"
 
@implementation DocumentItemView
{
	BOOL _selected;
}
 
- (void)drawRect:(NSRect)dirtyRect
{
    // Drawing code here.
	NSRect drawRect = NSInsetRect(self.bounds, 5, 5);
 
	if (self.selected)
	{
		[[NSColor blueColor] set];
		[NSBezierPath strokeRect:drawRect];
	}
}
 
#pragma mark Properties
 
- (void)setSelected:(BOOL)selected
{
	_selected = selected;
	[self setNeedsDisplay:YES];
}
 
@synthesize selected = _selected;
 
@end

We also need to create a NSCollectionItemView subclass so that changes to the selected state of that are forwarded to our prototype view.

DocumentItemView.m

#import "DTCollectionItemView.h"
#import "DocumentItemView.h"
 
@implementation DTCollectionItemView
 
- (void)setSelected:(BOOL)selected
{
    [super setSelected:selected];
 
	// forward selection to the prototype view
	[(DocumentItemView *)self.view setSelected:selected];
}

Update both classes in the interface builder and you will find that selected images now display a blue border. You selected multiple items by dragging a rectangle around them or by pushing the usual keyboard modifiers and clicking on individual items. (Shift to extend range, CMD to add/remove individual items)

Reordering by Dragging

Since we’re having fun lets enhance the dragging functionality further to also allow changing of the sort order of the items in a Shoebox document.

You can specifically allow certain items to be dragged by implementing the collectionView:canDragItemsAtIndexes:withEvent: delegate method. If you omit that then all items are draggable. To support dragging from the collection view it also needs to be selectable, which we already established above.

Typically you want to teach your model object how to represent itself on the pasteboard in a variety of multiple formats aka UTIs. Model objects need the <NSPasteboardWriting> added in the header to be accepted by NSPasteboard and also several methods implemented. Here is a very crude implementation for this tutorial.

#pragma mark NSPasteboardWriting
- (NSArray *)writableTypesForPasteboard:(NSPasteboard *)pasteboard
{
	// support sending of index for local and file URL for external dragging
	return [NSArray arrayWithObjects:@"com.drobnik.shoebox.item", kUTTypeFileURL, nil];
}
 
- (id)pasteboardPropertyListForType:(NSString *)type
{
	if ([type isEqualToString:@"com.drobnik.shoebox.item"])
	{
		// get index from Document
		NSUInteger index = [self.document indexOfItem:self];
 
		// simplicty: just put the item index in a string
		return [NSString stringWithFormat:@"%ld", index];
	}
 
	if ([type isEqualToString:(NSString *)kUTTypeFileURL])
	{
		NSURL *URL = [self.document URLforTemporaryCopyOfFile:self.fileName];
 
		return [URL pasteboardPropertyListForType:(id)kUTTypeFileURL];
	}
 
	return nil;
}
 
- (NSPasteboardWritingOptions)writingOptionsForType:(NSString *)type pasteboard:(NSPasteboard *)pasteboard
{
	return 0; // all types immediately written
}

In writeableTypesForPasteboard: you return an NSArray that lists all the UTIs that this document is able to represent itself. In writingOptionsForType:pasteboard: you specify which types are immediately pasted (0) or only promised (NSPasteboardWritingPromised). Promised values are deferred until somebody actually asks for them. Because I don’t quite understand how to properly implement this promising concept yet, I chose to simply put everything on the pasteboard right away. A method on document gives me the index of an item, another creates a temporary copy of an image and returns its file URL.

- (NSUInteger)indexOfItem:(DocumentItem *)item
{
	return [self.items indexOfObject:item];
}
 
- (NSURL *)URLforTemporaryCopyOfFile:(NSString *)fileName
{
	// get the correct fileWrapper for the image
	NSFileWrapper *fileWrapper = [_fileWrapper.fileWrappers objectForKey:fileName];
 
	// temp file name
	NSString *tmpFileName = [NSTemporaryDirectory() stringByAppendingPathComponent:fileName];
 
	// write it there
	[fileWrapper.regularFileContents writeToFile:tmpFileName atomically:NO];
 
	return [NSURL fileURLWithPath:tmpFileName];
}

Especially the latter method is an ideal candidate for promising because even when only dragging locally you end up creating lots of temporary image copies.

When you add an object that supports NSPasteboardWriting then it will first be queried what types it wants to support, then for each type it is asked whether it will provide it right away or only promise delivery. Finally the method to provide data for one type is called for each type. Typically you will want to return an NSData object with the encoded representation inside, but for strings the pasteboard will do that for us. Valid return values here are: NSArray, NSData, NSDictionary, or NSString objects—or any combination thereof.

Ok, finally we need to enhance our acceptDrop method to also deal with internal dragging.

- (BOOL)collectionView:(NSCollectionView *)collectionView acceptDrop:(id <NSDraggingInfo>)draggingInfo index:(NSInteger)index dropOperation:(NSCollectionViewDropOperation)dropOperation
{
	NSPasteboard *pasteboard = [draggingInfo draggingPasteboard];
 
	if ([pasteboard.types containsObject:@"com.drobnik.shoebox.item"])
	{
		// internal drag, an array of indexes
 
		NSMutableArray *draggedItems = [NSMutableArray array];
		NSMutableIndexSet *draggedIndexes = [NSMutableIndexSet indexSet];
 
		for (NSPasteboardItem *oneItem in [pasteboard pasteboardItems])
		{
			NSUInteger itemIndex = [[oneItem stringForType:@"com.drobnik.shoebox.item"] integerValue];
			[draggedIndexes addIndex:itemIndex];
 
			// removing items before insertion reduces it
			if (index>itemIndex)
			{
				index--;
			}
 
			DocumentItem *item = [self.items objectAtIndex:itemIndex];
			[draggedItems addObject:item];
		}
 
		[self willChangeValueForKey:@"items"];
		[self.items removeObjectsAtIndexes:draggedIndexes];
 
		for (DocumentItem *oneItem in draggedItems)
		{
			[self.items insertObject:oneItem atIndex:index];
		}
 
		[self didChangeValueForKey:@"items"];
 
		// mark document as dirty
		[self updateChangeCount:NSChangeDone];
 
		return YES;
	}
 
// ... handling of file URLs
}

This code is a bit more complex because when removing objects by index the subsequent insertion index also changes. If we only supported dragging single items then this would be a bit simpler. You again see the will/didChangeValueForKey trickery to get the Document to know that it was changed.

With this code in place we also implemented yet another kind of drag operation: drag images from a document window onto Desktop. The “com.drobnik.shoebox.item” representation is simply the indexes in the item array that are being dragged.

There is another flaw that becomes apparent only if you open multiple Document windows. You can also drag images from one Document into another, but this fails miserably. A quick idea as to how to resolve that might be to give each Document a GUID and also encode the parent document GUID with each item. Then upon seeing that the item belongs to another document you would fall back to the file URL method.

Another enhancement idea would be to also accept the public.image UTI so that you can drag any kind of image from controls that vend images directly into Shoeboxes.

Wrap Up

Our Shoebox app is taking shape and now we can even drag around images, into, out of and to change their sort order. There might be many additional things we could tweak that only become apparent when working with multiple documents. But we can pat ourselves on the back because the first giant leap has been made towards our first document-based app on OS X.

Let me know by Flattr or social sharing of these articles that you appreciate me taking so much time to find out and document how we iOS developers can also begin to play with the big boys who make mac apps.

flattr this!

Target Conditionals and Availability

$
0
0

The great thing about building apps for both iOS and Mac is that many pieces of code work just the same on both platforms. There are some scenarios however where you want to add different kinds of Apple SDKs based on which platform you are building for.

A good place to put all headers that often used is the Precompiled Header File (PCH) which gets precompiled and then reused throughout your app. Whenever you have an #import statement in your code the compiler needs to figure out whether this header has already been imported because the same header file can potentially be imported from several locations.

I generally like to put all imports for Apple headers into my PCH file as well as my own app-wide classes like my DTFoundation library which has a growing selection of methods that I frequently use. Having these imports in the PCH means that the preprocessor can prepare them for faster compiling once and then can virtually prepend all these definitions for every source code file.

Today I learned something new, namely how you can use the same PCH for Mac as well as iOS.


The magic term is “Target Conditionals”. This is a header supplied by Apple which defines multiple handy macros for code that is conditional on the target. Hence the name.

The problem here is that if you just try to use these macros they are stubbornly undefined… unless you apply the easy remedy of actually importing it. Consider this PCH file:

#import <TargetConditionals.h>
 
#ifdef __OBJC__
 
#if TARGET_OS_IPHONE
	#import <UIKit/UIKit.h>
#endif
 
	#import <Foundation/Foundation.h>
	#import "LoadableCategory.h"
 
	// DTDownloadCache
	#import <CoreData/CoreData.h>
#endif

Thanks to Jamie Montgomerie who was the first to supply the answer to me on Twitter.

The most interesting defines in TargetConditionals are:

  • TARGET_IPHONE_SIMULATOR
  • TARGET_OS_MAC
  • TARGET_OS_IPHONE

Note however that the iPhone OS is a sub-variant of Mac OS. Because of this TARGET_OS_MAC is also defined when building for iPhone. So if you want to restrict code to only be included on iPhone use TARGET_OS_IPHONE, for Mac-only use #if !TARGET_OS_IPHONE. (Exclamation mark negates it). That is, unless you are writing code for even more platforms than these two. There you would have to include additional target conditionals, like the ones for certain CPUs.

Availability

There is another header that is equally as useful as TargetInternals.h. This adds defines that allow you to vary your code based on the deployment target or maximum SDK available. This header is Availability.h, also imported in angle brackets and without a path if needed.

Let’s say you wanted to use weak properties if the deployment target (i.e. minimum iOS version allowed to execute your app) is greater or equal than iOS 5. Zeroing weak references are only available from this version on upwards. Below that level you would use assign properties and tag your ivars with __unsafe_unretained.

#import <Availability.h>
 
#if __IPHONE_OS_VERSION_MIN_REQUIRED >= 50000
#define __WEAK __weak
#define WEAK weak
#else
#define __WEAK __unsafe_unretained
#define WEAK assign
#endif
 
@property(nonatomic,WEAK) UIView *targetView;

When building for iOS the deployment target is __IPHONE_OS_VERSION_MIN_REQUIRED and the maximum SDK is __IPHONE_OS_VERSION_MAX_ALLOWED. The latter can be used to add code that only works if the SDK you’re building with is at least as high. This way you can for example code with Xcode 4.5 against the iOS 6 SDK, but have this code be omitted on your build server where you might not have upgraded yet.

You can compare these two defines against a number like 50000 or use the corresponding define __IPHONE_5_0. Note that there’s a stumbling block gower when doing so: __IPHONE_6_0 is only defined when building with the 6.0 SDK and would cause an error on earlier compilers. So in this case you’d do either of the following:

#if __IPHONE_OS_VERSION_MIN_REQUIRED >= 60000
// deployment target is iOS 6 or greater (we wish!)
#endif
 
#if __IPHONE_OS_VERSION_MAX_ALLOWED > __IPHONE_5_1
// building with iOS 6 SDK
#endif

You can glance at the defined versions also in Availability.h. Just add the import in Xcode and then CMD+Click on the file name.

Again you can adde the import to the PCH file to also have these defines available, for example you would conditionally import headers there that only became available with the new SDK versions.

One more thing …

I briefly confused myself by adding some #defines to the PCH but getting an error from Xcode that they are unknown. The reason for this was that the app I was building was using a different PCH than the static library that I was adding the defines to. The PCH of a project is only visible to targets that are using it. Doh!

flattr this!

Component Shuffling

$
0
0

I made some updates recently that I wanted to mention so as to minimize some surprises. Also there are some  changes that were prompted by iOS 6 being released.


DTLoupeView

The component is for sale by itself or as part of DTRichTextEditor. It is a perfect copy of the 3 magnifying glasses that are part of iOS including the showing and hiding animations. Since Apple still does not give access to the native loupe this component still has a reason to live.

Yesterday I did some major reworking due to a crash that started to occur on iOS 6. When presenting the loupe the developer specifies a target view. I would walk up the view hierarchy until I reached the UIWindow and then moved back down one level to find the root view. UIWindows don’t get rotated when the device is rotated, but the first view does which made this the perfect spot to mount the loupe view on.

There is a bug/feature in iOS 6 that a modally presented view controller does not like if a subview is added higher up in the view hierarchy than the internal views that are used to display the shadow of the modal view. Strangely this would result in a crash on [CALayer layer] in Apple’s code. Probably a bug, but I cannot be certain because I was doing a nasty hack anyway.

The loupe contents comes from a renderLayerInContext and to avoid the loupe seeing itself I was briefly hiding it, rendering the layers and then immediately showing it again. Another nasty hack.

To work around the problem I changed the strategy such to give the loupe its own UIWindow. Now when the loupe is being presented I am synching the rotation and bounds of the loupe special window with the root view. This extra window has the additional benefit that I don’t need the hide/show hack any more as well.

While I was at it I also made the loupe window and instance a singleton. Now you don’t call alloc/init any more on the loupe but retrieve the singleton via [DTLoupeView sharedLoupe]. To be honest the previous implementation sucked, because it would cause loupes to pile up over time. The new one doesn’t have this effect.

DTFoundation

This project is the repository for all the kinds of helper methods that I am using myself all the time. It also has become home to several key classes that I want a central place to maintain them at.

I found some categories on classes that exist both on iOS and Mac very useful, but the previous monolithic static library several annoying drawbacks. It mixed stuff that is platform-independent with categories on UIKit views. So I started a solo target that allows me to include the pieces that also work on Mac via Mac library.

The other annoying thing was that some components in DTFoundation would have dependencies. DTHTMLParser for example would require libxml2. If you included DTFoundation then the linker would force you to also link in libxml2, even if you didn’t do any HTML parsing in your project. The same is true for DTZipArchive which requires zlib and DTDownloadCache which requires CoreData.

So I decided to split these out of DTFoundation and provide static library targets for these by themselves. The goal being that if you included DTFoundation you would never have to add additional dependencies that you don’t need.

I want to add a podspec for DTFoundation as well and there it also makes sense to have specs for the individual parts that have dependencies independent from those which don’t.

DTCoreText

Something that was bugging me for quite some time was the fact that DTCoreText is using two classes that had found their home in my DTFoundation project: DTVersion and DTHTMLParser. I had to maintain a duplicate version of these inside of DTCoreText. I recently fixed a bug there when encountering a processing instruction and of course I had to copy this over into DTCoreText as well.

So I removed the duplicate classes and instead added DTFoundation as git submodule. DTHTMLParser is linked in via the new static library containing only it. DTVersion is universal and comes from the standard DTFoundation static library. Both of these are merged into the DTCoreText static library. For developers who also use DTFoundation directly in their projects there is a static library target for DTCoreText that does not include the DTFoundation stuff.

As more and more people seem to want to use CocoaPods to include other developer’s components into their projects I was nudged to think how to also resolve the duplication there. If I’m referencing DTFoundation and DTHTMLParser from one git submodule then there should be a method to model that via podspecs as well. Though here I still need to do a bit of research. Is it possible to create one podspec that works for both Mac and iOS and also have sub-specs that mirror the 3 new sub-libraries?

The 1.0.2 tag on the DTCoreText project is the last one that does not have the dependency on DTFoundation.

DTRichTextEditor

There is one more change of note in DTCoreText, related to my rich text editor component. Previously any HTML tag would inherit a plethora of attributes from its parent. If you copy a snippet from mobile Safari then it is encoded as a web archive on the pasteboard. It looks like iOS 6 is doing a more complete job there than it did previously.

One client of mine reported that if you copied a table that had a gray background color under iOS 6 the text pasted into DTRichTextEditor would now also get a gray background. The reason of course being the mentioned “brute force” inheritance. I modified DTCoreText to only inherit background-color from an inline element. A block-level element like div or table would be in charge of drawing the entire box in the stated color and thus it would not make sense to pass it on to contained inline-level elements.

Since I have the master repo for DTRichTextEditor on my Subversion server I need to have a repo-local mirror of DTRichText inside it. Again a form of duplication that bothers me for a long time now. Because of this I am considering to switch to git as soon as my Linux guru can set up a git server for me. I also thought about paying for a private GitHub repo, but I don’t feel comfortable having my most valuable code hosted by a third party.

And here the circle closes, because DTRichTextEditor is also a heavy user of DTLoupeView mentioned at the beginning of this article and also got an update there via svn sub-module. So if you are a user of that please make sure that you recursively update all the projects in there.

Closing Thoughts: DTCoreText versus iOS 6

iOS 6 added a few object-based attributes to CoreText and also the capability to display attributed strings using these new attributes in several UIKit classes, most importantly UITextView. This works fine for the most part unless…

  • you have projects that still need to support earlier iOS versions
  • you want to embed images, video or custom objects in the text
  • you have HTML as the stuff to generated attributed strings out of

A few months ago i had to rename the initWithHTML methods to initWithHTMLData because linking against the iOS 6 BETA SDKs would cause a duplicate symbol problem. This tells us that the initWithHTML is actually present in the OS now, as it has been for a while on Mac. But at present it is a private method and not app-store legal. (I filed a Radar for that: rdar://11664604, closed as duplicate of rdar://11689785)

I get the impression that Apple engineers where rushing to get rich text support into UIKit for iOS 6, but had to leave out several items to be on par with the Mac. There is NSFileWrapper, but NSTextAttachment (which is used for images on the Mac) didn’t make it into iOS so far.

The next big chance for Apple to completely sherlock DTCoreText+DTRichTextEditor+DTLoupeView+DTWebArchive is in Summer 2013 with iOS 7. This leaves these components a useful lifetime of at least a year from now.

The next big thing to do with DTCoreText is to add support for the new NS* tags where they can replace the CoreFoundation-based previous ones. Like for example NSParagraphStyle can replace CTParagraphStyle which is no Obj-C object and such had forced me to create the DTParagraphStyle wrapper in DTCoreText. I envision to detect the OS version this is running on and then use the new attributes where available or fall back on the old ones where not.

An attributed string that only uses attributes that are NSCoding-compliant (i.e. not CoreFoundation non-bridgable, but actual Objective-C objects) would also gain the ability of being persisted with NSKeyedArchiver. This would also solve a problem many people are experiencing. The only current way I have to persist attributed strings is by creating a so-so HTML representation. NSCoding would also allow for much faster caching of attributed strings because you could persist  anywhere that accepts NSData, like for example a CoreData table.

As far as I am aware NSAttributedStrings are NSCoding-compliant on the Mac. So it would be awesome if the outcome would be platform-independent to allow transferring thus persisted attributed strings between iOS and Mac.

All those big plans however have a big problem: so far I only found 2 companies willing to pay for enhancements on DTCoreText. I need to make a living as well and without somebody footing the bill I can only spend a few minutes here and there on it. DTCoreText is done entirely for the benefit of the community as I have no apps myself using it. So if you are interested in sponsoring improvements please get in touch.

flattr this!

Radar: CGRectMakeWithDictionaryRepresentation

$
0
0

This is one of those rare jewels of a bug that will cost you days to figure out if you encounter it in the context of a large app. It makes you doubt our own sanity until you come to the painful conclusion that the problem indeed resides in Apple’s code, not yours.

In this special case we had a couple of rare circumstances that worked together to form a scenario where CGRectMakeWithDictionaryRepresentation partially fails to reconstitute a CGRect from a dictionary. This function is literally ancient, it exists since iOS 2 and Mac OS 10.5. This makes it even more implausible that nobody has stumbled across this before us.

In the project where we first saw the problem these where the steps that led to this bug’s discovery:

  1. Create a CGRect that is not an integer
  2. Write a dictionary from iOS simulator which contains a dictionary encoding this CGRect
  3. Open this dictionary in Xcode’s property list editor
  4. Upon saving some of the least significant digits change in the “real” items
  5. This new dictionary can no longer be parsed on iOS

What’s even funnier is that some such modified values can still be read, but then the function fails internally and the remaining values don’t get parsed, i.e. stay zero.

From what I have seen researching this bug looks like certain floating point numbers cannot be represented on iOS. The normal parsing functions are able to round to the closest value that can be represented in 32-bit floats, whereas CGRectMakeWithDictionaryRepresentation fails to do so. The first value that cannot be exactly represented is truncated, all following values turn out to be Zero.

This was filed as rdar://12358120 and on OpenRadar.


CGRectMakeWithDictionaryRepresentation

Summary

CGRectMakeWithDictionaryRepresentation on iOS fails to parse certain float values from a plist saved on Mac.

This bug is a very rare occurrence because it only appears if you have non-integer values encoded in a property list, modify this on Mac (e.g. Xcode) and then try to parse it again on iOS.

Steps to Reproduce

  1. on iOS: create a CGRect (123.2112731933594,123.2112731933594,123.2112731933594,123.2112731933594)
  2. save it into a file, notice that the value will be 123.21127319335938 instead.
  3. open it with Xcode plist editor
  4. save it, the values in the file will change to be 123.2112731933594
  5. load the dictionary from disk, try to extract the CGRect by CGRectMakeWithDictionaryRepresentation

Expected Results

the CGRect values should be 123.21127319335938 or 123.2112731933594

Actual Results

only origin gets a truncated value, all other values are zero: {{123.211, 0}, {0, 0}}, return value of the function is FALSE which means an error occurred.

Regression

n/a

Notes

A sample project is provided that demonstrates the issue in the form of unit tests:

  • testOriginalPlist parses an iOS generated plist without issue
  • testMofiedPlistByXCode parses a plist modified by Xcode showing the failure
  • testParseRealString shows that the problematic representation works with float/doubleValue
  • testRectMake demonstrate how modifying a fresh encoded number fails if the 5938 (iOS) is changed to 594 (Mac)

NSDictionaryCGRectParsing Sample Project

flattr this!


Fun with UTI

$
0
0

… no, were not talking about the kind of fun that burns when taking a leak. In this article I want to summarize what I learned over the past weeks about working with Universal Type Identifiers.

On Windows files where always only identified by their file extension. In the olden days Apple was using multiple additional methods of determining what to do with certain files, amongst them HFS codes and MIME types.

The modern way to deal with file types is to use UTIs which are typically a reverse domain name, like “public.html” for a generic HTML file or ”com.adobe.pdf” by the PDF type created by Adobe. UTIs have an additional advantage that other methods of identifying types do not possess: a file can actually possess multiple types.


A PDF file for example conforms to the following UTIs in addition to the “com.adobe.pdf” one: public.data, public.item, public.composite-content, public.content. For comparison HTML is also public.text, public.data, public.item, public.content. So you see that these widely different file types have some things in common. This is a form of “multiple inheritance”.

Apple maintains the public.* domain as sort of the basic building blocks of the UTI system and we developers can base our own types on the system-declared UTIs. That an UTI “inherits” from other UTIs is called “conformance”. Let’s take the example of HTML. The public.html type conforms to public.text, which has the effect that those files can also be opened by applications that know how to deal with public.text files. Because of this inheritance you only need to declare the immediate super-class for a new UTI, the lower more generic UTIs will get inherited as well.

A Tale of Two Hierarchies

There really are two conformance hierarchies on the system: One is physical, like is the file a bundle or a single file. The other is functional, is that an image or a address book contact. Apple has this nice chart in their UTI Overview

It is exactly because of these two hierarchies that we see both the public.item (physical) and the public.contents (functional) UTIs in both HTML and PDF files. Another example would be public.jpeg which conforms to public.image on the functional side (the function is to store an image) and to public.data on the content side.

You can use the mdls tool to inspect the UTIs currently attached to any item in your file system. This is also quite useful to see if your UTI definitions for your custom type are correct.

olivers-imac:Desktop Oliver$ mdls test.html
kMDItemContentCreationDate     = 2012-09-26 12:24:28 +0000
kMDItemContentModificationDate = 2012-09-26 12:24:28 +0000
kMDItemContentType             = "public.html"
kMDItemContentTypeTree         = (
    "public.html",
    "public.text",
    "public.data",
    "public.item",
    "public.content"
)
kMDItemDateAdded               = 2012-09-26 12:24:28 +0000
kMDItemDisplayName             = "test.html"
kMDItemFSContentChangeDate     = 2012-09-26 12:24:28 +0000
kMDItemFSCreationDate          = 2012-09-26 12:24:28 +0000
kMDItemFSCreatorCode           = ""
kMDItemFSFinderFlags           = 0
kMDItemFSHasCustomIcon         = 0
kMDItemFSInvisible             = 0
kMDItemFSIsExtensionHidden     = 0
kMDItemFSIsStationery          = 0
kMDItemFSLabel                 = 0
kMDItemFSName                  = "test.html"
kMDItemFSNodeCount             = 680
kMDItemFSOwnerGroupID          = 20
kMDItemFSOwnerUserID           = 501
kMDItemFSSize                  = 680
kMDItemFSTypeCode              = ""
kMDItemKind                    = "HTML document"
kMDItemLastUsedDate            = 2012-09-26 12:24:31 +0000
kMDItemLogicalSize             = 680
kMDItemPhysicalSize            = 4096
kMDItemUseCount                = 1
kMDItemUsedDates               = (
    "2012-09-25 22:00:00 +0000"
)

I’ve also seen instances where the content type had a dyn.* prefix. Those occur if the system did not have an exact UTI attached to the item, but instead had to derive it from extension, OSType or other so-called “tags”. Say your app encounters pasteboard content of an unknown type. With the help of some utility functions you can derive a dynamic UTI for use with methods that requires a UTI string.

Troubleshooting UTIs gone Bonkers

UTIs get registered whenever you launch an app containing UTI definitions in their info.plist. Because of this there is potential that UTIs get out of synch with installed apps, especially if developers have faulty definitions set up.

Developer Stefan Vogt, having dealt with such UTI troubles himself, found out how you can clean out the UTI database which is being kept by Launch Services. I needed to do that several times on multiple computers. My colleague had experimented with creating a com.drobnik.icatalog123 type using the icatalog extension. A different app that was registering com.drobnik.icatalog was working fine on my machine. On Stefan’s Mac we would get this exception trying to auto-save when he ran mine, both had specify the .icatalog as file extension.

2012-09-27 10:32:15.824 iCatalogEditor[519:303] -[NSDocumentController openUntitledDocumentOfType:andDisplay:error:] failed during state restoration. Here's the error:
Error Domain=NSCocoaErrorDomain Code=256 "The file couldn’t be opened."
2012-09-27 10:32:36.508 iCatalogEditor[519:303] This application can't reopen autosaved com.drobnik.icatalog123 files.

This was driving us crazy for the better part of an afternoon, simply because we didn’t have any com.drobnik.icatalog123 anywhere set up in the app. Looks like OS X was wrongfully inferring this UTI from the extension and then no longer able to deal with the saved file due it having an unknown UTI.

Cleaning out the UTI database fixed the problem (thanks, Stefan Vogt!):

/System/Library/Frameworks/CoreServices.framework/Versions/A/Frameworks/LaunchServices.framework/Versions/A/Support/lsregister -kill -r -domain local -domain system -domain user

Right after this we hit build&run and now the crash no longer occurred.

The whole episode taught us that UTI are quite dangerous because at present there is no mechanism to make sure that UTI registrations are correct. One misbehaving app can mess up another one. In fact there is an Radar for that: rdar://10778913.

Getting It Right

There are 3 sections in an app’s info.plist and their purpose are not quite obvious:

  • Document Types – Those are the types of documents that your app is able to handle. When showing a Save panel you get to choose between all these types that have a role of “Editor”. Also these types specify which NSDocument sub class to use to display them. The legacy method would involve specifying OSType, MIME type or extensions. The modern method only references UTIs.
  • Exported UTIs - Types which are available for use by all other parties. For example, an application that uses a proprietary document format should declare it as an exported UTI.
  • Imported UTIs – Types that the bundle does not own, but would like to see available on the system. For example if your app could read a proprietary format exported by another company’s app then you would want to re-declare it as an imported UTI, because potentially on some systems the other app might not be present (and as such the UTI be unknown) without your import definition.

If the system only sees the imported UTI then this is used. If the exported UTI is present then it takes precedence.

To summarize, you define UTIs as exported or imported and once this is set up you specify the various document types that your app can support referencing these UTIs.

Let’s inspect Apple’s own definition for xcodeproj, ripped straight from the Info.plist in my Xcode’s app bundle. Xcode defines 83 document types, 5 imported and 78 exported UTIs. If anyone then it should be Apple to get it right, right?

<dict>
     <key>UTTypeIdentifier</key>
     <string>com.apple.xcode.project</string>
     <key>UTTypeConformsTo</key>
     <array>
          <string>public.composite-content</string>
          <string>com.apple.package</string>
     </array>
     <key>UTTypeReferenceURL</key>
     <string>http://developer.apple.com/tools/xcode/</string>
     <key>UTTypeTagSpecification</key>
     <dict>
          <key>public.filename-extension</key>
          <array>
               <string>xcodeproj</string>
               <string>xcode</string>
               <string>pbproj</string>
          </array>
     </dict>
</dict>

The Xcode project type as the unique type identifier “com.apple.xcode.project”. It conforms functionally to “public.composite-content”, physically to “com.apple.package”. Then there is a reference URL, a mere bonus without value. The UTTypeTagSpecification key contains additional info how the system can know that it is dealing with project files. The modern way seems to be to only list the acceptable file extensions there.

This UTI definition is referenced by a document type definition.

<dict>
     <key>CFBundleTypeExtensions</key>
     <array>
          <string>xcodeproj</string>
          <string>xcode</string>
          <string>pbproj</string>
     </array>
     <key>LSIsAppleDefaultForType</key>
     <true/>
     <key>LSTypeIsPackage</key>
     <true/>
     <key>CFBundleTypeName</key>
     <string>Xcode Project</string>
     <key>CFBundleTypeIconFile</key>
     <string>xcode-project_Icon</string>
     <key>LSItemContentTypes</key>
     <array>
          <string>com.apple.xcode.project</string>
     </array>
     <key>CFBundleTypeRole</key>
     <string>Editor</string>
     <key>NSDocumentClass</key>
     <string>Xcode3ProjectDocument</string>
</dict>

The type extensions echo the same file extensions mentioned in the UTI definition. LSIsAppleDefaultForType is a secret Apple tag that is not documented everywhere and seems to mean that this app is the default default app to deal with these documents.

The LSTypeIsPackage true tells the system that this is a bundle format instead of a plain file. The CFBundleTypeName specifies the name you see for these files if this app is chosen as the default opener. The icon file references a document icon coming from the app bundle. LSItemContentTypes now specifies the possible UTIs that such a document can contain.

Apple defines the role to be None, Editor or Viewer. None is for example used by com.apple.dt.ide.plug-in, you cannot view or edit a plug-in. Editor allows opening and saving of this document type. Viewer will only open it but not be an option for saving.

Finally the document class is the name of the NSDocument class that OS X will automatically create when opening such a file.

From Apple’s docs comes this info on how UTIs and document types are related:

A document type usually has a one-to-one correspondence with a particular file type. However, if your app treats more than one file type the same way, you can group those file types together to be treated by your app as a single document type. For example, if you have an old and new file format for your application’s native document type, you could group both together in a single document type entry. This way, old and new files would appear to be the same document type and would be treated the same way.

The legacy method for mapping files to documents used CFBundleTypeExtensions to specify which file extensions an app could open. According to the Info.plist Key Reference  this key (which only exists for OS X apps) has been deprecated as of OS X 10.5. It still works if you don’t specify the LSItemContentTypes for a document, but will be ignored if you do. I guess Apple had simply forgotten about them and that extensions for types are now defined via the UTIs.

iOS is much cleaner in this respect, as most of the legacy keys are not even supported by the UTI definition form.

Programming against UTIs

If you are working with files you might need to find the correct UTI for a given “Tag”, i.e. MIME type or file extension.

// get the UTI for an extension
NSString *typeForExt = (__bridge NSString *)UTTypeCreatePreferredIdentifierForTag(kUTTagClassFilenameExtension, CFSTR("jpg"), NULL);
// "public.jpeg"
 
// get the UTI for a MIME type
NSString *typeForMIME = (__bridge NSString *)UTTypeCreatePreferredIdentifierForTag(kUTTagClassMIMEType, CFSTR("application/pdf"), NULL);
// "com.adobe.pdf"

Other possible “tags” to retrieve a UTI for are kUTTagClassNSPboardType for pasteboard types and kUTTagClassOSType for the legacy HFS OSType.

The other direction is also possible. Say you need the MIME type for uploading a given file:

// get the MIME type for a UTI
	NSString *MIMEType = (__bridge NSString *)UTTypeCopyPreferredTagWithClass(CFSTR("public.jpeg"), kUTTagClassMIMEType);

Note that not all UTIs have a registered MIME type. Many do, but even more don’t. So you want to fall back to “application/octet-stream” if this function returns nil.

A couple more methods exist for snooping around in the UTI system.

// get the bundle URL who defined this
NSURL *URL = (__bridge NSURL *)UTTypeCopyDeclaringBundleURL(CFSTR("public.jpeg"));
// result: /System/Library/CoreServices/CoreTypes.bundle/
 
// get the description name of a UTI
NSDictionary *dict = (__bridge NSString *)UTTypeCopyDescription(CFSTR("com.adobe.pdf"));
// result: "Portable Document Format (PDF)"
 
// get the declaration of a UTI
NSDictionary *dict = (__bridge NSString *)UTTypeCopyDeclaration(CFSTR("com.adobe.pdf"));

The latter showing exactly how Adobe’s PDF UTI is set up:

{
UTTypeConformsTo =     (
"public.data",
"public.composite-content"
);
UTTypeDescription = "Portable Document Format (PDF)";
UTTypeIconFiles =     (
"PDF~iphone.png",
"PDF@2x~iphone.png",
"PDFStandard~ipad.png",
"PDFStandard@2x~ipad.png",
"PDFScalable~ipad.png",
"PDFScalable@2x~ipad.png"
);
UTTypeIdentifier = "com.adobe.pdf";
UTTypeTagSpecification =     {
"com.apple.nspboard-type" = "Apple PDF pasteboard type";
"com.apple.ostype" = "PDF ";
"public.filename-extension" = pdf;
"public.mime-type" = "application/pdf";
};
}

So if you know the UTI or any of its tags then you can get a little bit of extra info and transfer from tags to the UTI and vice versa. I would have wished for a way to list all UTIs that conform to a generic type, but such a function is not available in UTTypes.h where all these mentioned utility functions are defined.

Case Study: Multiple UTIs for one Document Type

You know, I could laugh. When I dig into a topic I have a knack of discovering problems. A lesser man would probably give up. I find it fascinating. In this chapter I’ll sum up a few things I learned configuring the file types for my new iCatalog Editor app.

Previously created iCatalogs would all have a .bundle extension because back when I spec’ed it I liked that the default on Mac is to not show contents of packages making it simpler to move around. For the future I wanted to create my own UTI “com.drobnik.icatalog” with an .icatalog extension. Though I wanted to still be able for the app to open the bundle files. For writing all new bundles should use the new type. I didn’t want to mess with redefining all bundles.

<key>CFBundleDocumentTypes</key>
<array>
   <dict>
      <key>CFBundleTypeIconFile</key>
      <string>CatalogDocumentIcon</string>
      <key>CFBundleTypeName</key>
      <string>iCatalog Bundle</string>
      <key>CFBundleTypeRole</key>
      <string>Editor</string>
      <key>LSItemContentTypes</key>
      <array>
         <string>com.drobnik.icatalog</string>
         <string>com.apple.bundle</string>
      </array>
      <key>LSTypeIsPackage</key>
      <true/>
      <key>NSDocumentClass</key>
      <string>DTCatalogDocument</string>
   </dict>
</array>

… and in line with what I mentioned above an UTI export for my own type as well as an UTI import for the bundle type. Though I think you can also omit the import because the com.apple.bundle type should be present on every system that this app will ever run. But better safe than sorry… again many thanks to Stefan Vogt.

<key>UTExportedTypeDeclarations</key>
<array>
   <dict>
      <key>UTTypeConformsTo</key>
      <array>
         <string>public.composite-content</string>
         <string>com.apple.package</string>
      </array>
      <key>UTTypeDescription</key>
      <string>iCatalog Bundle</string>
      <key>UTTypeIconFile</key>
      <string>CatalogDocumentIcon</string>
      <key>UTTypeIdentifier</key>
      <string>com.drobnik.icatalog</string>
      <key>UTTypeTagSpecification</key>
      <dict>
         <key>public.filename-extension</key>
         <array>
            <string>icatalog</string>
         </array>
      </dict>
   </dict>
</array>
<key>UTImportedTypeDeclarations</key>
<array>
   <dict>
      <key>UTTypeConformsTo</key>
      <array>
         <string>com.apple.package</string>
      </array>
      <key>UTTypeDescription</key>
      <string>Apple Bundle</string>
      <key>UTTypeIdentifier</key>
      <string>com.apple.bundle</string>
      <key>UTTypeTagSpecification</key>
      <dict>
         <key>public.filename-extension</key>
         <array>
            <string>bundle</string>
         </array>
      </dict>
   </dict>
</array>

So far the only thing special about this setup are the 2 UTIs present in the document type. This allows the app to open either one.

A problem became apparent when I tried to save a new document. In the save panel I would see a File Format box, but with no text. On clicking the triangle I would see my document type descriptive name:

I lost many hours on this trying to figure out how to fix this.

The first solution that came to mind was to actually separate the two formats into two distinct document types. Save Panels show all the document types that you have your app defined to be an Editor for. With the following setup it can save both formats.

<key>CFBundleDocumentTypes</key>
<array>
   <dict>
      <key>CFBundleTypeIconFile</key>
      <string>CatalogDocumentIcon</string>
      <key>CFBundleTypeName</key>
      <string>iCatalog Bundle</string>
      <key>CFBundleTypeRole</key>
      <string>Editor</string>
      <key>LSItemContentTypes</key>
      <array>
         <string>com.drobnik.icatalog</string>
      </array>
      <key>LSTypeIsPackage</key>
      <true/>
      <key>NSDocumentClass</key>
      <string>DTCatalogDocument</string>
   </dict>
   <dict>
      <key>CFBundleTypeIconFile</key>
      <string>CatalogDocumentIcon</string>
      <key>CFBundleTypeName</key>
      <string>iCatalog Bundle (bundle)</string>
      <key>CFBundleTypeRole</key>
      <string>Editor</string>
      <key>LSItemContentTypes</key>
      <array>
         <string>com.apple.bundle</string>
      </array>
      <key>LSTypeIsPackage</key>
      <true/>
      <key>NSDocumentClass</key>
      <string>DTCatalogDocument</string>
   </dict>
</array>

This of course results in both types showing up on the save panel which is not what I want.

BTW that only works because I named the second format differently in the CFBundleTypeName. If you name them the same, then you get the exact same empty box problem shown above.

I don’t want the user to be able to create bundles, so the next logical step was to change the CFBundleTypeRole to Viewer for the bundle document type. And this fixes the problem.

With only one document type claiming the role of Editor the save panel does not bother to show the File Formats drop-down.

The root cause of the empty format box seems to be that document types need to have a unique display name. If two types have the exact same string then OS X bugs out. If you have multiple document types defined the fix is simple to make, but if you go with my original goal of having only one document type with two UTIs you need to touch code instead.

OS X has a shared NSDocumentController which determines the name to display for a given file type. To override it you create your own sub-class of NSDocumentController and instantiate it somewhere. Basically the first such class to be instantiated (either in code or from a NIB) wins and becomes the shared document controller.

@implementation DTDocumentController
 
- (NSString *)displayNameForType:(NSString *)typeName
{
	// return something usefully unique
	return typeName;
}
 
@end

In this experiment I returned the typeName (UTI) for each display name. And again this worked displaying the UTIs in the Save Panel.

Even with the single document setup with 2 UTIs displayNameForType: is queried for each UTI. Since both get the same default display name from the info.plist we again see the bug. So we could easily remedy this and for example append the extension in brackets or name them differently. But this still does not allow us to have our app only be Editor for our own type.

There is another piece of code you can override. NSDocument has a default implementation of +writableTypes which returns all UTIs of all Editor document types. The advantage of overriding it there is that we already have our own NSDocument sub-class and don’t need to mess with NSDocumentController.

+ (NSArray *)writableTypes
{
	return @[@"com.drobnik.icatalog"];
}

With this little bit of code in my document class I also avoid a File Format selection, faulty or otherwise.

Conclusion

There are many things you can do wrong when defining file types and document types on OS X. When googling I could only find some well written guides by Apple, but almost nothing in terms of entry-level tutorials.

To recap: Define your own file types via exported UTIs, file types owned by other apps you should add as imported UTIs and then add the document types defining the icons, names etc referencing these. And omit the legacy stuff that you find some people still having in their mailing lists posts from many years ago. UTIs are the way to go.

Big thanks to Stefan Vogt for helping me a long way towards understandings UTIs.

flattr this!

The Amazing Responder Chain

$
0
0

Do you remember, back when you first opened Interface Builder?

How long did it take you to understand the purpose of File’s Owner?

That is a proxy for the object that loads this NIB, usually a UIViewController. This allows you to connect IBOutlets and IBActions with elements contained in the NIB file. IB knows about these because you tell it what class the File’s Owner has and from parsing this class’ header it finds all things that you can connect to by the IBOutlet and IBAction keyword.

That one was easy. Second question: How long did it take you to understand the purpose of First Responder?

If you are like me then you started out developing for the iPhone and other iOS devices. And then you probably also learned to ignore this proxy object because on iOS it does not serve an obvious purpose. In fact you can go for years developing iOS apps without ever doing anything with it. I know I did.

It is only know that I am starting to dabble in developing for the Mac that I had to begin to develop and appreciation for the responder chain. And so finally I understand the purpose and usefulness of the “First Responder” object and I want to share this with you.


You might have heard about or read about the existence of this Responder Chain. The closest one usually gets to dealing with it is that you want to dismiss the keyboard of a UITextField and you do this by calling resignFirstResponder. The second run in usually is when you implement cut/copy/paste and you need to allow a UIView to canBecomeFirstResponder and then you implement cut:, copy: and paste: methods to have these show up in the UIMenuController popover.

Why You Didn’t Use It So Far

On iOS you usually only ever have to deal with a single screen full of information. This screen, especially on iPhone, is usually contained in a single UIViewController. So you can easily get by with connecting all your actions to outlets in the File’s Owner. Seriously, why would anybody want to have an object outside of the current NIB respond to an action like a button press or copy command?

Well, on Mac the story is more complex since you can have multiple windows open at the same time. You can be working on 3 documents simultaneously. But which of these windows is now supposed to respond to the user choosing Copy in the menu? It took me about an hour to rid my head from the notion of connecting a menu item to a specific view controller and uncover how it is done differently there.

If you connect a button to an outlet this employs the target/action paradigm. The action is defined by the name of a selector. The target can either be a concrete object or it can be NULL. If you connect to File’s Owner then the target is set to the concrete instance that File’s Owner is acting as proxy for. If you do this in code you call addTarget:action:forControlEvents: achieving exactly the same.

On Mac we cannot say at design time in IB who will take care of a specific action. Hence we need to employ the awesome services of the Responder Chain.

The Chain of Responders

You can think of the Responder Chain as a very elegant solution for answering the question “Who might be interested in this event X?”

Whenever any event occurs the system first asks the current First Responder. On iOS any UIResponder subclass can become first responder. If a text field is active and the cursor is blinking inside it to show the readiness for text input then it has first responder status. So it gets first dips on all events.

There might be some actions however where the text fields does not know how to respond to. For these cases the system walks up this Responder Chain and keeps asking each object in this chain if it is interested in dealing with this action. Considering for example the standard action copy: the default is to assume that a responder wants to take care of the the copy action if such a selector exists in the responds’s implementation. This can be overridden by implementing canPerformAction:withSender: and responding with NO. Then the next responder will be asked.

This process of asking each responder will be done for each action and for the entire chain. A variant of this process occurs if the system wants to display a menu item (on OSX) or a popup menu (on iOS). If there is no responder willing to volunteer then the menu option will be disabled or invisible. This is quite useful because there you don’t need to implement logic to enable/disable menu options, but this is done for you. If there is a willing responder to an action then it will be enabled, otherwise disabled.

Let’s get a quick picture of how the responder chain looks on iOS and OSX.

Apple explains the rules for traveling along the chain such:

  1. The hit-test view or first responder passes the event or message to its view controller if it has one; if the view doesn’t have a view controller, it passes the event or message to its superview.
  2. If a view or its view controller cannot handle the event or message, it passes it to the superview of the view.
  3. Each subsequent superview in the hierarchy follows the pattern described in the first two steps if it cannot handle the event or message.
  4. The topmost view in the view hierarchy, if it doesn’t handle the event or message, passes it to the window object for handling.
  5. The UIWindow object, if it doesn’t handle the event or message, passes it to the singleton application object.

As of iOS 5 there is a step 6: The app delegate gets the final word on events. Beginning with iOS 5 the app delegate inherits from UIResponder and no longer from NSObject as it did before.

In short: first the view, if the view has a view controller then that, next the superview until the top of the hierarchy, the window. From there to the application and finally to the app delegate.

The addition of the app delegate as potential responder is a welcome addition since we rarely – if ever – subclass UIApplication or UIWindow. But we always have our own app delegate if only to create the window and add the rootViewController in the application:didFinishLaunching… delegate method. So this happens to be the de facto best place for a responder to fall back to if there is none in the entire view hierarchy.

Look at the following comparison and you can see that the concept is virtually identical on iOS (left) and Mac (right).

The only obvious difference here is that view controllers appear to be a relatively new concept to OS X. I presume that this is because view controllers are much less used on OS X than they are on iOS. They also load a view from a NIB. One scenario where I saw NSViewController to be used was as an accessory view in a file open dialog.

On OS X the top level control object would typically be an NSWindowController, again in charge of a window loaded from NIB. On iOS view controllers play a much more important role because container view controllers like UITabBarController or UINavigationController would work with these as a means to group views.

Long story short, at present view controllers are not part of the responder chain on Mac, but they are on iOS.

But the story does not end there if your Mac-app is document-based, because there the responder chain is extended to include multiple document-related objects as well.

From what I have seen so far on Mac you can go a long way without sub-classing NSApplication, NSDocumentController or even providing an app delegate. The must-subclass element in this chain is NSDocument.

Consider an import: action that would allow the user to import content into an open document. If there is no document window open the action should be grayed out. Of course the NSDocument sub-class would be the ideal place for the implementation as this function relates to a specific document.

Implementing Responder-Chained Actions on Mac

As I mentioned before I was stumped at first trying to implement an import menu item for a Mac app. There you have a MainMenu.xib that has a File’s Owner class of NSApplication. So NSApplication loads the menu from NIB when the app launches. So there it wouldn’t make sense connecting actions to File’s Owner since in all likelihood you wouldn’t even have a custom NSApplication sub-class.

Instead you click on First Responder and go to the inspector tab with the Shield icon. There you can see all user-defined actions and we add an import action.

Now you can Ctrl-Click and drag a line from the newly inserted menu item onto First Responder.

In the subsequent pop up you can choose which action to connect that to. Besides of the freshly defined import you also see all the system-defined actions.

… and of course the other direction of connection works just as well. In the outlets tab the import selector also appears.From its circular outlet symbol you can also drag to the menu item.

Next you implement a matching action method in the document class.

- (void)import:(id)sender
{
   // fancy importing action
}

No need for an IBAction keyword instead of the void here. Contrasting to the route via File’s Owner we don’t need this hint to tell interface builder in the header which actions are available to link to.

That is all there is to it. If you have a document window open, the responder chain knows that there is somebody able to take care of the import and so the Menu Option becomes available. Conversely if you close all document windows it automatically becomes grayed out.

“Awesome service!” that’s what we call that. The best code is always the one we don’t have to write.

And now for the same stunt on iOS.

Implementing Responder-Chained Actions on iOS

The use case for those is obviously a much rarer on iOS. As I alluded to above the main reason being that you don’t have an app-wide menu by which the user would give the majority of commands, but rather you’d have some controls laid out on a view controlled by a view controller. And this view controller would be the File’s Owner offering the outlets for connection to the controls.

There is however a scenario where knowing about this method can simplify your life. Consider the situation where you want to have an event in a subview trigger something on the application level. Flipping between two view controllers comes to mind.

The current Xcode template for a utility app employs a complicated system for achieving the flip. There is a MainViewController which has an info button which presents a FlipsideViewController. This button is linked to the view controller via File’s Owner.

Without any changes to our code we could also define a showInfo user-defined action to the MainViewController’s First Responder. Then we could link the info button to that instead of the File’s Owner. Everything still works.

Consider another example. Let’s say you have an app that has multiple view controllers that are peers. Those would be presented by a container view controller, similar to a UITabBarController. You could have a button in one of these sub-viewcontrollers, but the responding action method could be part of the container view controller.

There the event would travel up the responder chain. View, view controller, superview (= container’s view), container view controller and there it would find the action. Without the responder chain you would have to employ some trickery to have the button press be communicated all the way up to the container view controller.

In fact even Apple often employs delegate protocols to have a view controller communicate to its superior. For example the FlipSideViewController of the above mentioned utility app template has a protocol just for handling the Done button:

@protocol FlipsideViewControllerDelegate
- (void)flipsideViewControllerDidFinish:(FlipsideViewController *)controller;
@end

With what we know now we can easily make this delegate protocol unnecessary and instead have a flipBack action on the responder chain that achieves the same effect with much less code.

Create a flipBack: action on the First Responder and link the Done button action to that after breaking the link to File’s Owner.

Then implement the flipBack action in MainViewController.

- (void)flipBack:(id)sender
{
	[self dismissViewControllerAnimated:YES completion:nil];
}

Now we can get rid of the delegate protocol, the delegate property on FlipsideViewController and the done: action there that calls the delegate’s flipsideViewControllerDidFinish: method.

If the user taps on the Done button now the action travels: FlipsideViewController, MainViewController’s view, MainViewController and there it finds the flipBack: action to execute.

Granted, there are scenarios where you want the modally presented sub-viewcontroller communicate success or failure to its delegate. But for a simple scenario like this using the responder chain makes it much simpler.

Bonus: Hiding the Keyboard Even Without Knowing the Current First Responder

You can also employ the responder chain mechanism for triggering actions where you don’t know or don’t care who the responder will be. Like, for example, when you want the keyboard to go away but could not be bothered to keep track of the current first responder.

The iOS keyboard shows whenever a view is first responder that implements the UIKeyInput or UITextInput protocol. If you have multiple UITextField instances on screen then you would have to keep track which currently is the first responder if you wanted to be able to dismiss the keyboard programmatically. Or alternatively I’ve been known to call resignFirstResponder on all text fields in succession because any one of them would be it.

Knowing about the responder chain allow us to dismiss the keyboard without any prior knowledge. We only would have to know how to send a message down the responder chain and we’d be guaranteed that the keyboard-producing view would be first in line.

Mac Guru Sean Heber taught us how:

Any selector can be used for the action parameter of the sendAction method that UIApplication used to message the responder chain. If the recipient is nil then it will start to travel in the responder chain, of course beginning with the First Responder. Oh and what a coincidence! This first responder is also the text field that we want to resign its status as such.

Conclusion

The responder chain is a great concept and it simplifies Menu actions on Mac where you want the document to respond to the actions. On iOS Apple employes the very same method albeit refined with the insertion of view controllers in the chain.

Understanding how to use the responder chain to your advantage can save you a few architectural headaches and the basic knowledge presented in this article should have gotten you a long way along to a better understanding of how to use it to your advantage.

Since the app delegate has been promoted to a UIResponder as of iOS 5 there might even be some scenarios where you’d want to have the responding action located there. And then you could trigger these actions from way down your view hierarchy without having to go via the [UIApplication sharedApplication].delegate singleton. Admit it, you are guilty of doing that on more than one occasion, right?

flattr this!

Radar: First Responder defunct when used in Storyboard

$
0
0

Hot on the heels of my research into the responder chain comes this bug report. Nikita Korchagin deserves the main credit for mentioning this first to me.

Turns out that Apple broke the responder chain as it used to work on Mac and non-storyboard apps. I’m filing this as a bug report to find out if this indeed a bug or an “undocumented feature”. rdar://12402078


Summary

Controls hooked up to user-defined actions on the First Responder proxy object fail to message the responder chain.

Steps to Reproduce

  • Create a new Utility app
  • Add a doSomething:(id)sender to the app delegate, add a breakpoint there
  • in the storyboard for FlipsideViewController define doSomething: under user-defined actions
  • replace the link of the Done button with one to the First Responder proxy object and choose the doSomething action
  • Build&Run

Expected Results

The action should travel the responder chain and end up at the breakpoint in the app delegate

Actual Results

No action is invoked

Regression

The behavior is broken in Storyboards. It works when not using story boards.

Notes

On a non-storyboard app the sendAction of UIApplication has the next upper view controller as target. When using a storyboard the sendAction instead messages the UIBarButtonItem first. I suspect that because UIBarButtonItem is not a UIResponder subclass the default behavior is for the event bubbling to stop there.

If you add a new button to the FlipsideController and also hook this hop to the doSomething: action it doesn’t even call the application’s sendAction. On a non-storyboard app this would also normally send the action to the closest view controller.

flattr this!

iPhone 5 Image Decompression Benchmarked

$
0
0

One of the first lucky owners of the iPhone 5, David Smith, kindly ran my Image Decompression Benchmark on the latest 3 generations of iPhone. These benchmarks measure the time it takes for an image to get from disk to screen and encompass 5 resolutions, PNG crushed and uncrushed, as well as 10 compression levels of JPEG. Christian Pfandler prepared the charts for us.

We like to repeat the same benchmarks on every new CPU that Apple likes to solder into their devices, you can read past analyses iPhone 3G through iPad 2,  iPad 3. One note of caution if you want to compare these to the results in this article, we changed the methodology of logging the times from NSLog to CFAbsoluteTime. NSLog itself takes up to 50 ms per logged statement. The new method is more exact and does not have this drawback of including the logging time in the measurements.

Executive Summary: the iPhone 5 can indeed be claimed to be twice as the predecessor.


Running this benchmark on earlier iOS devices had shown the pattern that increases in GPU power did have no relevant impact on the numbers. At the same time the rendering speed improvements seemed to be entirely a function of the CPU. This theory was confirmed by an Apple engineer at WWDC who told me that all the UIKit image decompression indeed happens on the CPU.

The only way to get images to be decoded on the GPU would by via CoreImage. The problem is while image decoding there would be faster you still have the bottleneck of having to get the decoded image transferred to a CALayer and again back into the render tree. So decoding images via CoreImage probably only makes sense if you can keep them on the GPU, like for video compositing or use as 3D textures.

Knowing that this benchmark only looks at the CPU however we still think that it is a valid method to evaluate overall CPU performance from one iOS device generation to the next.

iPhone 5 Results

Small images sizes do not show much of a difference dealing with JPGs, though PNGs (both crushed and uncrushed) are showing a definite improvement there.

The blue area which measures the alloc/init of a UIImage with the corresponding test image seems to be about constant. The reason is probably that the SSD in the iPhone has not much increased in throughput.

The green parts measure the time it takes to draw the images into a bitmap context of identical size to avoid skewing of the number by adding the need to resize the image. There was a bit of an improvement there from the 4S over iPhone 4 for the smallest two images sizes the potential increased memory bandwidth from CPU to GPU does not yet show here.

512×384 is the first time that we really see an effect of better throughput from the CPU to the GPU with the green parts being noticeably shorter. Uncrushed PNGs are way quicker to decompress. For the first time we see PNGs of this size clock in slightly faster than 100% JPGs.

The remarkable increase in PNG decoding performance again beats 100% JPGs. Accross the board the time to decompress and render on the iPhone 5 is equal to the uncompression time alone on iPhone 4S and 4.

PNGs have always been the slowest at higher resolutions. Which is why in my original benchmark article we concluded that PNGs are great for small UI elements and icons. But for full screen catalogs we went with 80% JPGs because of the overall speed benefit.

Out of all these numbers my personal favorite is to compare the highest resolution on all three devices:

iPhone 4: Flower_2048x1536.png (JPG 80%) init: 4 ms decompress: 168 ms draw: 76 ms total 248 ms

iPhone 4S: Flower_2048x1536.png (JPG 80%) init: 2 ms decompress: 160 ms draw: 72 ms total 234 ms

iPhone 5: Flower_2048x1536.png (JPG 80%) init: 3 ms decompress: 91 ms draw: 31 ms total 124 ms

At this level you can easily see the 2x improvement the CPU has over the previous generation. JPEGs from 10% to 90% all prove this point. Contrasting to the numbers of the iPad 3 both PNG and JPEG performance gets a benefit. If you remember, when we benchmarked the iPad 3 there was almost no speed improvement in JPEGs, but only some on PNGs.

With the iPhone 5, the improvement for decoding PNGs is just as remarkable: crushed a little less, uncrushed a little more. On the iPhone 5 the difference is almost not noticeable, but for earlier devices it still pays to have Xcode automatically crush the PNGs when building apps.

Conclusion

The A6 processor in the iPhone supports VFPv4, a special set up instructions to highly parallelize floating point operations, VFP is short for “Vector Floating Point”. The presence of these instructions leads Anandtech to conclude that it must be the first SoC entirely designed by Apple in-house, albeit based on the ARM 7 architecture.

If I’m reading this right then the improved VFP performance comes from having 32 registers in there, twice as many as the VFPv3 previously had. This simply means that twice as many floating point numbers can be crunched in parallel, explaining the doubling of floating point performance on the CPU. This “going wider” yields its benefit at roughly the same battery usage.

The custom silicon that Apple invented for the iPhone 5 lets it easily win by a factor of 2 over previous generation devices.

flattr this!

Once Upon a Contract

$
0
0

Notice: The following text is a rant and entirely my own opinion, not being a lawyer by profession, but a developer at heart.

Over the past month or so I was negotiating with a US-based company who wanted to retain my services as an expert on Rich Text and HTML parsing. Let me share a problem I had with a certain section in the contract that I was asked to sign, a problem that related to my previously created code and for-pay components.

Even experienced developers might be overly anxious to sign their next big contract to put food on the table without knowing what rights in their works they are signing over by this. This should serve as a gentle reminder: Better to read through the contract, all 19 pages of it, than having to be afraid that you inadvertently giving away your crown jewels.

If I learned one thing from Steve Jobs then it is to not trust contracts that are longer than a single page …


The “boilerplate contract” they sent me contained this section. Emphasis mine.

4B. Pre-Existing Materials. Subject to Section 4.A, Consultant agrees that if, in the course of performing the Services, Consultant incorporates into any Invention or utilizes in the performance of the Services any pre-existing invention, discovery, original works of authorship, development, improvements, trade secret, concept, or other proprietary information or intellectual property right owned by Consultant or in which Consultant has an interest (“Prior Inventions”), (i) Consultant will provide the Company with prior written notice and (ii) the Company is hereby granted a nonexclusive, royalty-free, perpetual, irrevocable, transferable, worldwide license (with the right to grant and authorize sublicenses) to make, have made, use, import, offer for sale, sell, reproduce, distribute, modify, adapt, prepare derivative works of, display, perform, and otherwise exploit such Prior Inventions, without restriction, including, without limitation, as part of or in connection with such Invention, and to practice any method related thereto. Consultant will not incorporate any invention, improvement, development, concept, discovery, work of authorship or other proprietary information owned by any third party into any Invention without Company’s prior written permission.

This wording would have codified a commercial right in my previously written code that is simply not acceptable. If I make use of any prior invention – like a commercial component or even open source code of mine – I grant the Company a broad license to start selling my works by themselves. I can understand that they want to be able to sell the software I am creating for them, but any license to use my “prior art” should be limited to within the works I create for them.

This might not be an issue for most developers who don’t have a portfolio of for-pay components that they are deriving part of the income from. Also the Company mentioned told me that they would “never do such a thing” and that they are “not in the business of doing that”. But why – if you permit my question – does your contract include this wording then?

The proper way to deal with a subject matter expert who brings prior inventions to the table is to insure a free and ongoing license to use of code that the developer chooses to include. This royalty-free license should allow the Company to sell their software to another party without having to check on the developer. I can understand the need for a US-based startup to own the rights to all software which contractors will build for them, so that they can sell their business with no problems to Facebook, say for a Bazillion Dollars. But those rights should be fair to their service providers.

This episode leaves a bad taste in my mouth. I feel like I’m a plumber who is called to fix an urgent plumbing problem, only to be presented with a contract that the caller also wants to have the right to sell my tools and materials. No Go!

flattr this!

Viewing all 428 articles
Browse latest View live