Quantcast
Channel: Cocoanetics
Viewing all 428 articles
Browse latest View live

GIC Acquires Cocoapedia

$
0
0

Grupo Imaginación Cibernética (GIC), a software development company based in Mexico, agrees to acquire Cocoapedia’s brand and assets after winning the bidding on Monday, July 16th. Cocoanetics sought to sell Cocoapedia because it no longer fit the company’s focus.


The transition involves transferring the current contents to a new server, transferring the two domain names Cocoapedia.org and Cocoapedia.com as well as the matching Twitter account.

Daniel Salazar, General Manager of GIC, on the future of Cocoapedia:

We plan to keep making it grow. There are lots of information that we as developers  need on the subject, specially, controls and source code you can purchase, like the ones you and others develop and which are a really great time saver on projects.

About Grupo Imaginación Cibernética:

We have 15 years experience in the mobile market. We started a long time ago with windows mobile. We are developing an RSS Reader for iPhone/Android/Blackberry/WP7. We sponsor several events in Mexico using this reader. Events in Mexico for Televisa, Telefonica, Blackberry and now the International Morelia Film Festival 2012 which begins in a few weeks. We also have about 2 or 3 million readers of newspapers in mobile phones using our applications. We publish law reference books in the same mobile platforms and have one of the most successful apps in Canada on this market. We sell this app as a white label app to publishers in Italy, Mexico and Canada. And now we are developing a Twitter monitor service for iPad.

We at Cocoanetics are delighted to have a competent company as GIC take on the responsibility of maintaining Cocoapedia as a research tool for iOS and Mac developers.

flattr this!


Before Renewing Your Membership …

$
0
0

The month before your membership in the iOS Developer program expires Apple begins to gently remind you that renewal is coming up. If you don’t want to experience an “interruption in service” you better renew as soon as possible.

There are however a few gotchas that I’d like to point out to you … watch your provisioned devices as well as your DTS tickets!


As an individual or company developer you can register up to 100 devices per year for development purposes. While you register devices (manually or through Xcode) the counter counts down from 100 to 0. You can see the current number of this counter on the iOS Provisioning Portal.

Those devices begin to pile up over time and by your second or third year of doing iOS development you might find that you are approaching the limit of new devices that you can add. Even removing them does not increase the counter. It is only when you renew your program that this gets set back to 100.

Step 1: Remove as many of the devices from the list of registered devices as you can.

You probably have tons of devices of your clients in there that had been used for testing apps which have long since been published to the app store. Also there might be many devices that you don’t actually own any more or have handed off to your relatives when you got the latest and greatest new Apple device for your own (and for “testing purposes”) use.

After your renewal got activated (seems to be a manual process that takes some time) the remaining device counter should snap back to 100. This is actually the first time that I am closely watching this number myself because in previous years I had been sufficiently far away from not being able to add new devices.

Step 2: Find some good uses for your Technical Support Incidents

Your year of program membership also comes with 2 tech inquiries. You can see the available amount and history for each of the developer programs you are a member of in the Member Center. Both the Mac and the iOS programs afford you with 2 such incidents.

Those incidents are really fabulous, often they are even more valuable than speaking to an engineer at WWDC. I had a very enjoyable experience with the very incident I sent in November 2010. At that time I wanted to know how to animate in a date picker over a table view to enter a date. Within a few days I had gotten an answer of sorts and the solution even ended up in the developer samples.

Apple describes the services such:

The Apple Developer Technical Support (DTS) team is made up of highly qualified engineers with development expertise in key Apple technologies. Whether you need direct one-on-one support troubleshooting issues, hands-on assistance to accelerate a project, or helpful guidance to the right documentation and sample code, Apple engineers are ready to help you.

You can also file tech incidents if you are not sure if the problem is in Apple’s code or in your own. If the fault lies with Apple then they will credit back the incident to your balance. I filed two new cases this week, both with good chances of them actually being Apple bugs.

When you renew your program tech incidents from the previous year are lost and you end up with 2. Nobody can save these up for a better use. Of course you can always BUY MORE. The 2-Pack costs 79 Euros at present which is more than you paid for the membership.

The point that I am trying to make here is that these incidents are a valuable and perishable good that you should not let go to waste. Use them for anything that you always wanted to have an Apple engineer explain to you.

There is one more thing that I am trying to test this year. We sent off two iOS incidents and then I purchased the program extension. I am interested to find out this: if it turns out that one of the cases is an Apple bug and I get it credited back, will I then end up with a higher number of incidents for next year?

Conclusion

Cases you don’t use will perish and not removed devices will bog down your list. Before renewing your developer program you should clean up your provisioned devices as well as make use of your tech incidents. Because these things are not immediately obvious I think they constitute good advice.

flattr this!

Urban Airship Commander BETA

$
0
0

Imagine yourself implementing APN (Apple Push Notifications) using Urban Airship’s API and service. How do you go about testing the push functionality and possibly demonstrating it in front of your client?

The usual approach would be to peruse a web form on the Urban Airship site to send such notifications.

We felt a need to simplify the procedure and make it more fun for developers. So today we’re announcing UAC (Urban Airship Commander) which sets out to do exactly that.


We have identified to kinds of users that would want to use this app on their iPhone. 1) Developers who want to set up a few test devices and effortlessly be able to test their APN implementations. 2) Clients of said developers who would use the app to broadcast APNs to their users from a mobile app.

You start by setting up an app similar to how you do it on the Urban Airship web site. You can even set an app icon if you have one your device. You can configure custom fields that would get appended to the push notification and set a friendly short name and default value.

Once you have done the initial setup and your UA credentials have been validated you are good to go. Tap on the app, specify the message and custom values and send off the message. A log shows all past sent messages and also allows you to copy a recent message to a new push notification. This is especially useful for example if you send the same message (and custom values) every month.

http://www.youtube.com/watch?v=dvGEOU-bg9E

We are now looking for a couple of BETA testers who will try out the app on their own UA implementations. Also we hope to gain feedback as to what the actual use cases for this app are. Limited BETA spots are available, email me info about how you plan to use this app and don’t forget to send me a UDID of the device you want to test it on.

flattr this!

Multi-Context CoreData

$
0
0

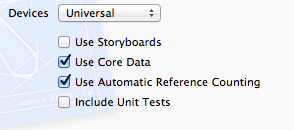
When you start using CoreData for persisting your app data you start out with a single managed object context (MOC). This is how the templates in Xcode are set up if you put a checkmark next to “Use Core Data”.

Using CoreData in conjunction with NSFetchedResultsController greatly simplifies dealing with any sort of list of items which you would display in a table view.

There are two scenarios where you would want to branch out, that is, use multiple managed object contexts: 1) to simplify adding/editing new items and 2) to avoid blocking the UI. In this post I want to review the ways to set up your contexts to get you what you want.

Note: I am wrapping my head around this myself for the very first time. Please notify me via e-mail about errors that I might have made or where I am explaining something incorrectly.


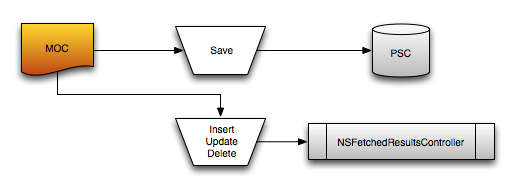
First, let’s review the single-context setup. You need a persistent store coordinator (PSC) to manage talking to the database file on disk. So that this PSC knows how the database is structured you need a model. This model is merged from all model definitions contained in the project and tells CoreData about this DB structure. The PSC is set on the MOC via a property. The first rule to remember: A MOC with a PSC will write to disk if you call its saveContext.

Consider this diagram. Whenever you insert, update or delete an entity in this single MOC then the fetched results controller will be notified of these changes and update its table view contents. This is independent of the saving of the context. You can save as rarely or as often as you want. Apple’s template saves on each addition of an entity and also (curiously) in applicationWillTerminate.

This approach works well for most basic cases, but as I mentioned above there are two problems with it. The first one is related to adding a new entity. You probably want to reuse the same view controller for adding and editing an entity. So you might want to create a new entity even before presenting the VC for it to be filled in. This would cause the update notifications to trigger an update on the fetched results controller, i.e. an empty row would appear shortly before the modal view controller is fully presented for adding or editing.

The second problem would be apparent if the updates accrued before the saveContext are too extensive and the save operation would take longer than 1/60th of a second. Because in this case the user interface would be blocked until the save is done and you’d have a noticeable jump for example while scrolling.

Both problems can be solved by using multiple MOCs.

The “Traditional” Multi-Context Approach

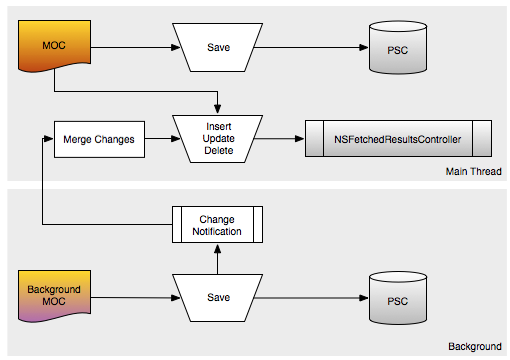
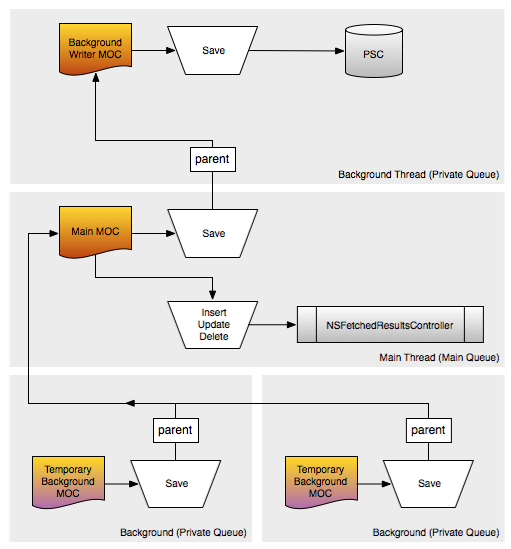
Think of each MOC as being a temporary scratchpad of changes. Before iOS 5 you would listen for changes in other MOCs and merge in the changes from the notification into your main MOC. A typical setup would look like this flow chart:

You would create a temporary MOC for use on a background queue. So allow the changes there to also be persisted you would set the same PSC on the temporary MOC as in the main MOC. Marcus Zarra put it like this:

Although the NSPersistentStoreCoordinator is not thread safe either, the NSManagedObjectContext knows how to lock it properly when in use. Therefore, we can attach as many NSManagedObjectContext objects to a single NSPersistentStoreCoordinator as we want without fear of collision.

Calling saveContext on the background MOC will write the changes into the store file and also trigger a NSManagedObjectContextDidSaveNotification.

In code this would roughly look like this:

dispatch_async(_backgroundQueue, ^{
   // create context for background
   NSManagedObjectContext *tmpContext = [[NSManagedObjectContext alloc] init];
   tmpContext.persistentStoreCoordinator = _persistentStoreCoordinator;
 
   // something that takes long
 
   NSError *error;
   if (![tmpContext saveContext:&error])
   {
      // handle error
   }
});

Creating a temporary MOC is very fast, so you don’t have to worry about frequently creating and releasing these temporary MOCs. The point is to set the persistentStoreCoordinator to the same one what we had on the mainMOC so that the writing can occur in the background, too.

I prefer this simplified setup of the CoreData stack:

- (void)_setupCoreDataStack
{
   // setup managed object model
   NSURL *modelURL = [[NSBundle mainBundle] URLForResource:@"Database" withExtension:@"momd"];
   _managedObjectModel = [[NSManagedObjectModel alloc] initWithContentsOfURL:modelURL];
 
   // setup persistent store coordinator
   NSURL *storeURL = [NSURL fileURLWithPath:[[NSString cachesPath] stringByAppendingPathComponent:@"Database.db"]];
 
   NSError *error = nil;
   _persistentStoreCoordinator = [[NSPersistentStoreCoordinator alloc] initWithManagedObjectModel:_managedObjectModel];
 
   if (![_persistentStoreCoordinator addPersistentStoreWithType:NSSQLiteStoreType configuration:nil URL:storeURL options:nil error:&error]) 
   {
   	// handle error
   }
 
   // create MOC
   _managedObjectContext = [[NSManagedObjectContext alloc] init];
   [_managedObjectContext setPersistentStoreCoordinator:_persistentStoreCoordinator];
 
   // subscribe to change notifications
   [[NSNotificationCenter defaultCenter] addObserver:self selector:@selector(_mocDidSaveNotification:) name:NSManagedObjectContextDidSaveNotification object:nil];
}

Now please consider the notification handler which we set as target for whenever such a didSave notification arrives.

- (void)_mocDidSaveNotification:(NSNotification *)notification
{
   NSManagedObjectContext *savedContext = [notification object];
 
   // ignore change notifications for the main MOC
   if (_managedObjectContext == savedContext)
   {
      return;
   }
 
   if (_managedObjectContext.persistentStoreCoordinator != savedContext.persistentStoreCoordinator)
   {
      // that's another database
      return;
   }
 
   dispatch_sync(dispatch_get_main_queue(), ^{
      [_managedObjectContext mergeChangesFromContextDidSaveNotification:notification];
   });
}

We want to avoid merging our own changes, hence the first if. Also if we have multiple CoreData DB in the same app we want to avoid trying to merge changes that are meant for another DB. I had this problem in one of my apps which is why I check the PSC. Finally we merge the changes via the provided mergeChangesFromContextDidSaveNotification: method. The notification has a dictionary of all the changes in its payload and this method knows how to integrate them into the MOC.

Passing Managed Objects Between Contexts

It is strictly forbidden to pass a managed object that you have gotten from one MOC to another. There is a simple method to sort of “mirror” a managed object via its ObjectID. This identifier is thread-safe and you can always retrieve it from one instance of an NSManagedObject and then call objectWithID: on the MOC you want to pass it to. The second MOC will then retrieve its own copy of the managed objects to work with.

NSManagedObjectID *userID = user.objectID;
 
// make a temporary MOC
dispatch_async(_backgroundQueue, ^{
   // create context for background
   NSManagedObjectContext *tmpContext = [[NSManagedObjectContext alloc] init];
   tmpContext.persistentStoreCoordinator = _persistentStoreCoordinator;
 
   // user for background
   TwitterUser *localUser = [tmpContext objectWithID:userID];
 
   // background work
});

The described approach is fully backwards-compatible all the way down to the first iOS version that introduced CoreData, iOS 3. If you are able to require iOS 5 as deployment target for your app then there is a more modern approach which we shall inspect next.

Parent/Child Contexts

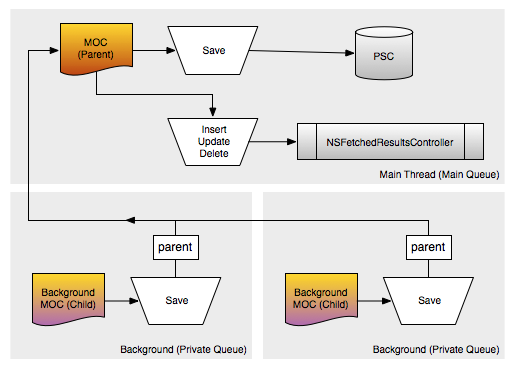
iOS 5 introduced the ability for MOCs to have a parentContext. Calling saveContext pushes the changes from the child context to the parent without the need for resorting to the trick involving merging the contents from a dictionary describing the changes. At the same time Apple added the ability for MOCs to have their own dedicated queue for performing changes synchronously or asynchronously.

The queue concurrency type to use is specified in the new initWithConcurrencyType initializer on NSManagedObjectContext. Note that in this diagram I added multiple child MOCs that all have the same main queue MOC as parent.

Whenever a child MOC saves the parent learns about these changes and this causes the fetched results controllers to be informed about these changes as well. This does not yet persist the data however, since the background MOCs don’t know about the PSC. To get the data to disk you need an additional saveContext: on the main queue MOC.

The first necessary change for this approach is to change the main MOC concurrency type to NSMainQueueConcurrencyType. In the above mentioned _setupCoreDataStack the init line changes like shown below and the merge notification is no longer necessary.

_managedObjectContext = [[NSManagedObjectContext alloc] initWithConcurrencyType:NSMainQueueConcurrencyType];
[_managedObjectContext setPersistentStoreCoordinator:_persistentStoreCoordinator];

A lenghty background operation would look like this:

NSMangedObjectContext *temporaryContext = [[NSManagedObjectContext alloc] initWithConcurrencyType:NSPrivateQueueConcurrencyType];
temporaryContext.parentContext = mainMOC;
 
[temporaryContext performBlock:^{
   // do something that takes some time asynchronously using the temp context
 
   // push to parent
   NSError *error;
   if (![temporaryContext save:&error])
   {
      // handle error
   }
 
   // save parent to disk asynchronously
   [mainMOC performBlock:^{
      NSError *error;
      if (![mainMOC save:&error])
      {
         // handle error
      }
   }];
}];

Each MOC now needs to be used with performBlock: (async) or performBlockAndWait: (sync) to work with. This makes sure that the operations contained in the block are using the correct queue. In the above example the lengthy operation is performed on a background queue. Once this is done and the changes are pushed to the parent via saveContext then there is also an asynchronous performBlock for saving the mainMOC. This again is happening on the correct queue as enforced by performBlock.

Child MOCs don’t get updates from their parents automatically. You could reload them to get the updates but in most cases they are temporary anyway and thus we don’t need to bother. As long as the main queue MOC gets the changes so that fetched results controllers are updated and we get persistence on saving the main MOC.

The awesome simplification afforded by this approach is that you can create a temporary MOC (as child) for any view controller that has a Cancel and a Save button. If you pass a managed object for editing you transfer it (via objectID, see above) to the temp context. The user can update all elements of the managed object. If he presses Save then you save the temporary context. If he presses cancel you don’t have to do anything because the changes are discarded together with the temporary MOC.

Does your head spin by now? If not, then here’s the total apex of CoreData Multi-Context-ness.

Asynchronous Saving

CoreData guru Marcus Zarra has shown me the following approach which builds on the above Parent/Child method but adds an additional context exclusively for writing to disk. As alluded to earlier a lenghty write operation might block the main thread for a short time causing the UI to freeze. This smart approach uncouples the writing into its own private queue and keeps the UI smooth as button.

The setup for CoreData is also quite simple. We only need to move the persistentStoreCoordinator to our new private writer MOC and make the main MOC be a child of this.

// create writer MOC
_privateWriterContext = [[NSManagedObjectContext alloc] initWithConcurrencyType:NSPrivateQueueConcurrencyType];
[_privateWriterContext setPersistentStoreCoordinator:_persistentStoreCoordinator];
 
// create main thread MOC
_managedObjectContext = [[NSManagedObjectContext alloc] initWithConcurrencyType:NSMainQueueConcurrencyType];
_managedObjectContext.parentContext = _privateWriterContext;

We now have to do 3 saves for every update: temporary MOC, main UI MOC and for writing it to disk. But just as easy as before we can stack the performBlocks. The user interface stays unblocked during the lengthy database operation (e.g. import of lots of records) as well as when this is written do disk.

Conclusion

iOS 5 greatly simplified dealing with CoreData on background queues and to get changes flowing from child MOCs to their respective parents. If you still have to support iOS 3/4 then these are still out of reach for you. But if you are starting a new project that has iOS 5 as minimum requirement you can immediately design it around the Marcus Zarra Turbo Approach as outlined above.

Zach Waldowski pointed out to me that using a private queue concurrency type for “editing view controllers” might be overkill. If you use NSContainmentConcurrencyType instead on the child view controllers context then you don’t need the performBlock wrapping. You’d still have to performBlock on the mainMOC for saving.

The confinement concurrency type is “the old way” of doing contexts, but that doesn’t mean it’s legacy. It simply ties the operations of the context to a self-managed threading model. Spinning up a private queue for every new view controller is wasteful, unnecessary, and slow. -performBlock: and -performBlockAndWait: don’t work with the confinement concurrency type for a reason, because neither blocks nor locking are necessary when you’re doing multiple contexts in the way that you are in the “editing” view controller setup.

NSManagedObjectContext knows how to save and merge intelligently, and because the main thread context is bound to the main thread, its merges are always performed safely. The editing view controller is bound to the main thread just like the main view controller; the only way it’s a separate operation is just in a UI sense, which is why it’s appropriate to use the confinement concurrency type here. The editing context isn’t conceptually a “new” thing, it’s just deferring the change until later, while still allowing you to discard the changes entirely.

So it really boils down to your personal preference: private queue with performBlock or confinement concurrency without. Personally have a tendency to prefer private queues because of the warm fuzzy and safe feeling I get from using them.

flattr this!

Out of Office

$
0
0

We’re offline for “maintenance” until August 2nd with no way to receive emails or respond to your requests and orders. We mention this so that you know why you won’t hear from us until then. We haven’t forgotten about you, we’ve just remembered about ourselves.

So please be patient while we’re recharging.

flattr this!

GeoCorder 1.3.3

$
0
0

GeoCorder was having a problem that only became apparent if used over longer durations. Also it was quite elusive so we needed to open a technical support ticket with Apple to get help in finding it. And so we did, or more precisely: they found it and we fixed it.

Changes

  • FIXED: Crash when recording for a long duration
  • FIXED: Various stability improvements

Updates for both the free and the paid versions have been submitted to Apple.

flattr this!

Softly Killing iPhone 3G

$
0
0

The latest version that ever ran on the iPhone 3G was iOS 4.2.1, but even though iOS 4 brought multi-tasking to the platform the iPhone 3G never got that. The iPhone 3G had been introduced in June 2008 with 16 and 8 GB capacities. Of these the 16 GB was discontinued after 1 year while Apple kept the 8 GB model around as the cheaper iPhone. This was discontinued on June 4, 2010 when the iPhone 3GS took its place as the “cheap one” while the iPhone 4 became the “current model”.

Long story short: The iPhone 3G has been discontinued 2 years ago. But there is also a technical reason why 2012 will be the final nail in the coffin that buries the iPhone 3G: The deprecation of armv6.


The discontinuation of support for armv6 has been already a year in the making. In Xcode 4.3 Apple had already removed the armv6 setting from the ARCHS_STANDARD_32_BIT, that was strike one. I argue by accident because at that time you still had to submit so-called “fat binaries” that have compiled code for armv6 and armv7 in the same file. From that point on you had to manually add the armv6 setting to the Architectures in Build Settings.

Apple didn’t bother with this oversight because there’s a simple workaround and since armv6 deprecation was on their roadmap for a long time. And everybody had to remember to add this setting for any project or sub-project to be able to build app store legal apps.

The second strike was with the 7th and final preview version of Xcode 4.4, build  4F243, where – another incident of overzealousness? – the ARClite library was missing the armv6 binary causing the following linker warning:

ld: warning: ignoring file /Applications/Xcode44-DP7.app/Contents/Developer/Toolchains/
XcodeDefault.xctoolchain/usr/lib/arc/libarclite_iphoneos.a, 
file was built for archive which is not the architecture being linked (armv6): 
/Applications/Xcode44-DP7.app/Contents/Developer/Toolchains/
XcodeDefault.xctoolchain/usr/lib/arc/libarclite_iphoneos.a

You would see this warning if your project contained ARC either in the main project or in any of its sup-projects because this is the situation where Xcode needs to add the ARC Lite static library. I guess that this library is needed to support ARC on iOS 4 devices.

This was an actual bug. Fortunately Apple saw the error in their ways and fixed this in the released version of Xcode 4.4, build 4F250 which is the one that’s now on the app store. If they hadn’t done so then there would have been no way to build for armv6 on Mountain Lion because Xcode 4.3 no longer runs on this. Everybody is anxious to upgrade their shiny new Macs and thus this would have been a major pain in the backside.

There is a support document which outlines the third strike:

As of 4.5, Xcode no longer supports building armv6 code, or working with armv6 devices and does not support below iOS 4.3.

As they say, “three strikes and you’re out”.

What are those armv6 and armv7 devices anyway?

I find it hard to remember myself which devices were able to support the armv6 and armv7 instruction sets. Especially because some devices actually support both, namely all armv7 CPUs are backwards compatible. But of course if your app binary has both versions compiled in then the armv7 CPUs will only use the variant optimized for them.

Fortunately there is the iTunes Connect Developer Guide: Appendix C: Device Compatibility Matrix.

This tells us that that these are all the devices that didn’t support armv7:

  • iPod Touch 1st Gen (max iOS 3.1.3)
  • iPod Touch 2nd Gen (max iOS 4.2.1)
  • iPhone (max iOS 3.1.3)
  • iPhone 3G (max iOS 4.2.1)

All newer devices support armv7 and can also run iOS 5. So by the time iOS 6 ships (and you will switch to Xcode 4.5) you have no reason to keep supporting iOS 4, even though technically you could still target iPod Touch 3rd Gen and iPhone 3GS running iOS as low as 4.3. But who in his right mind doesn’t use the iCloud-sweetness available for free with iOS 5?

Won’t we miss out on many existing iPhones that are now no longer supported?

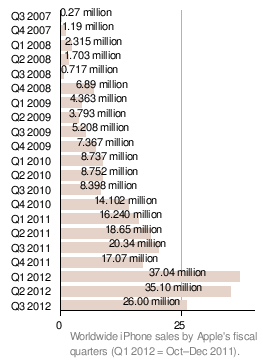
Well, Apple does not publish exact numbers of how many iPhone 3G had been sold in comparison with other devices. But out of scientific curiosity let’s do a rough estimate. Apple did publish the worldwide iPhone sales by fiscal quarter, with the year and first quarter starting around September 25th.

Those are Apple’s worldwide iPhone sales by fiscal quarters.

So the iPhone 3G was the main iPhone roughly from Q1 2008 until Q4 2009. This is really REALLY rough estimating, but we get an appreciation for the orders of magnitude in difference. This pretends that there never was a cheaper “free” model and only assumes that Q1-Q4 capture one model. You can see that in some quarters the was a reduction in sales as people anticipated the next iPhone.

  • iPhone (until Q4 2008): 13 Mio
  • iPhone 3G (until Q4 2009): 21 Mio
  • iPhone 3GS (until Q4 2010): 40 Mio
  • iPhone 4 (until Q4 2011): 72 Mio
  • iPhone 4S (until Q4 2012): probably over 124 Mio

43 Million armv6 iPhones versus 236 Million armv7 iPhones. So by my estimate of all iPhones that would have been sold by Fall 2012 the armv6 models account for 15%. This is a best case number.

BUT, assuming that most people are getting a new iPhone every 2 years with contract we can assume that only a fraction of these devices is still in use. The latest date that you could have gotten a subsidized iPhone 3G was in June 2010, over two years ago. Though I don’t see any good reason why somebody would have preferred the 3G over the then-new 3GS model.

Conclusion

The iPhone 3G holds a special place in our hearts since it was the second generation of a revolutionary device and the first that added high speed cellular data. But as technology progresses there must come a time when the iPhone 3G has well deserved its retirement.

Apple thinks so too and has sealed its fate in three strikes as outlined above. iOS 6 will no longer run on armv6 hardware and also Xcode 4.5 will no longer be able to build for iPhone 3G. Retiring support for it means good riddance to the last iOS device that didn’t support multi-tasking.

May the iPhone 3G rest in piece.

flattr this!

A Taller iPhone is a Giraffe

$
0
0

Blogger Mark Gurman from 9to5Mac caused quite a stir when he showed screen shots showing that Apple had secretly updated the iOS Simulator to be able to deal with the rumored higher resolution of the next iPhone. His hack involved some nasty code injection that had previously been used to demo iPad on Retina resolution long before the iOS Simulator supported that.

The point of his article was that the main visible difference between the 5.x and 6.0 springboards when having more screen space available. On iOS 5 you always get 4 evenly spaced rows of icons there while on iOS 6 you will get an extra row of icons with no increase in spacing.

Because Mark did not give detailed instructions as he achieved the result (to “protect his sources”) developers all around started to investigate and Cédric Luthi beat everybody to the punch, revealing a method that is so simple, even I was able to follow it.


Cédric inspected the iOS Simulator app with a disassembler and found references to a File.txt and names of secret keys to add to the device settings that would enable the higher resolution. The code words are: “Eagle” and “Giraffe”.

Seriously! I kid you not!

How To Make The Giraffe Fly

Since these modifications work on released software which is no longer under NDA I can publish the steps below. They work with Xcode 4.4.1 which was published as a 47.48 MB incremental update just yesterday. What their effect is with unreleased future Xcode versions I cannot comment on (NDA) but you can easily find out yourself.

So first, I updated my Xcode to Version 4.4.1 (4F1003).

Then I created a File.txt in ~/Library/Application Support/iPhone Simulator with these contents:

<?xml version="1.0" encoding="UTF-8"?>
<!DOCTYPE plist PUBLIC "-//Apple//DTD PLIST 1.0//EN" "http://www.apple.com/DTDs/PropertyList-1.0.dtd">
<plist version="1.0">
<dict>
<key>E</key>
<string>Well, this was fun to discover. But don't change this magic value!</string>
<key>EagleEnabled</key>
<true/>
<key>GiraffeEnabled</key>
<true/>
</dict>
</plist>

This file with this exact contents and at this exact location tells the iOS Simulator to enable the two secret Eagle and Giraffe settings.

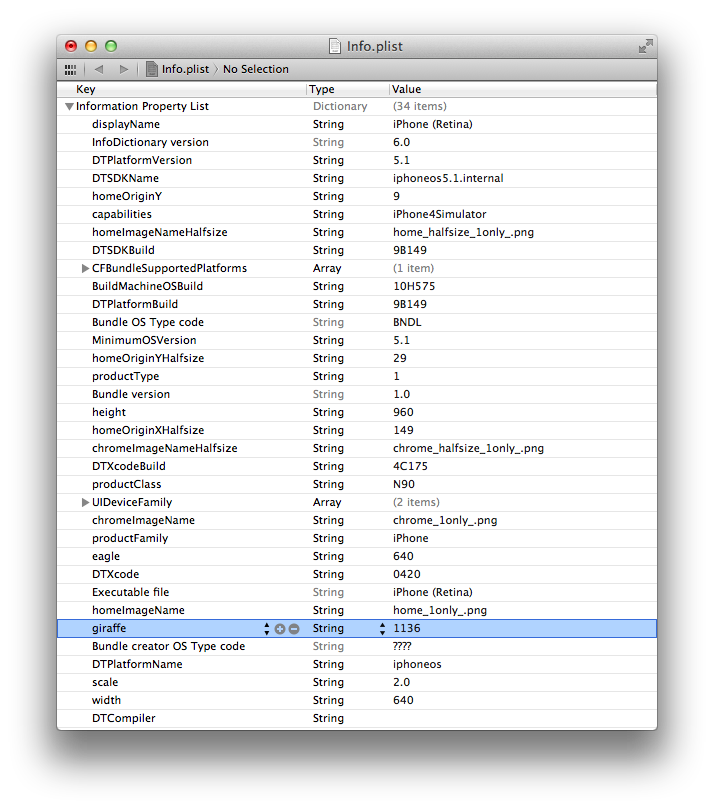
The next step is to modify the Info.plist of the iPhone Retina device settings. Those are found in /Applications/Xcode.app/Contents/Developer/Platforms/iPhoneSimulator.platform/Developer/Applications/iPhone Simulator.app/Contents/Resources/Devices/iPhone (Retina).deviceinfo folder.

The simplest way to modify this file – since it is write-protected and owned by root – was to drag a copy to the desktop. Then double-click on it to open it with Xcode’s plist editor and make the modification. Saving keeps it as a binary plist and then you can drag it back to the original location and replace the original Info.plist.

Quit the iOS Simulator if it is running and the next time you start it you’ll find that the display is higher. If you have sufficient screen size for the simulator to show the chrome then you will see that the view in between has grown larger, like in this screen shot posted by PSPDFKit creator Peter Steinberger.

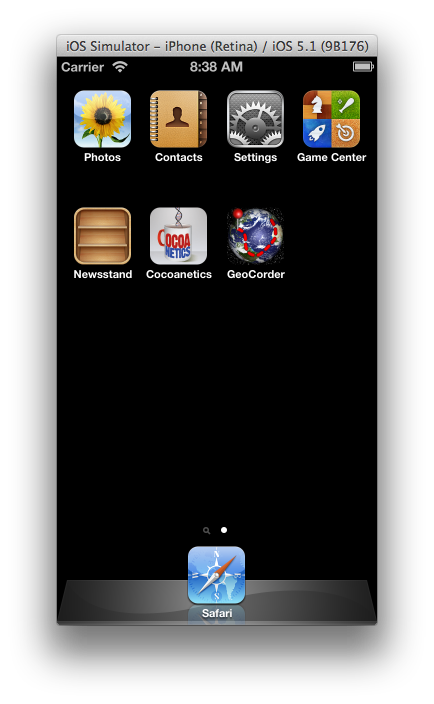
My 13″ MacBook Air does not have sufficient resolution to show the chrome and thus falls back to the chrome-less version. Here’s a screenshot of my 5.1 simulator at 50% scale. You can easily see that the 4 rows on springboard stretch apart and why it is a better design choice to add another row in a possible future version of the OS.

I also wanted to see if you can run your own apps at the higher resolution and it turns out you can, albeit with a caveat.

The problem only becomes apparent if you try to switch to other tabs of this UITabBarController. The underlying UIWindow does not get resized to the larger resolution and thus taps at the bottom corner get clipped. You can only interact with the upper region that falls into the “normal” resolution.

You can probably work around this by modifying the UIWindow’s bounds at run time. Here my experiments ended, because the point was to validate Cédric’s find. Especially because of the hilarious code names that I couldn’t believe at first.

Conclusion

In any case this does not prove that “the new iPhone” will have a different resolution and we should not publicly comment about the features of iOS 6 that are still under NDA. But we’re glad that this hack exists and allows us to tinker with the different resolution.

Cédric Luthi is our hero for telling us way in advance of anything “official” that we can test our apps for different resolutions. Apps that display something of variable size (i.e. a table) should have no problems adapting, they would simply show more scrollable content.

Giraffe, Long Neck, get it?

If anything then this can serve as a gentle reminder to never hard-code resolutions in your iOS apps. You should make proper use of autoresizing masks or auto-layout to have our interfaces adapt to different resolutions automatically.

flattr this!


Unit Tests Don’t Bite

$
0
0

You might have heard about the term “Test Driven Development”. The idea is – as I understand it – that for every problem you find in a component of your apps you create a Unit Test that fails. Then you fix the bug. The Test now passes. This can be carried further by writing your test cases even before you write any implementation code.

Especially when encapsulating your frequently-used code in static libraries or frameworks those unit tests can help save you a lot of grief. Imagine adding some nifty new feature to inadvertenly  introducing a bug that would break some other existing functionality. If you run the unit tests they would show you immediately that your change broke something.

In this blog post I’m summarizing a couple of things to help you get your own unit tests started.


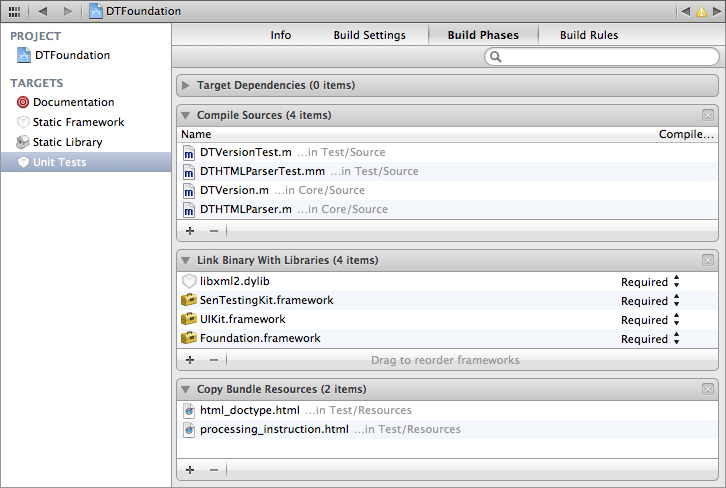
Unit Tests are set up in Xcode like any other target. They have a product with extension octest which contains the code and resources for the test. So just like with any other target you have to assign the source files and resources to the unit test target.

For this demonstration I added several tests for DTHTMLParser to my DTFoundation project which you can get on GitHub.

Step 1: Setting up a Test Bundle

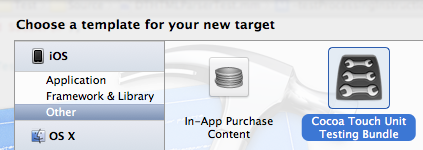
You start up by adding a new “Cocoa Touch Unit Testing Bundle”.

This adds this as a target to your project, creates a subfolder by the same name below your project root and places an empty test case class there as well. The bundle will also contain an Info.plist and a precompiled header file (PCH).

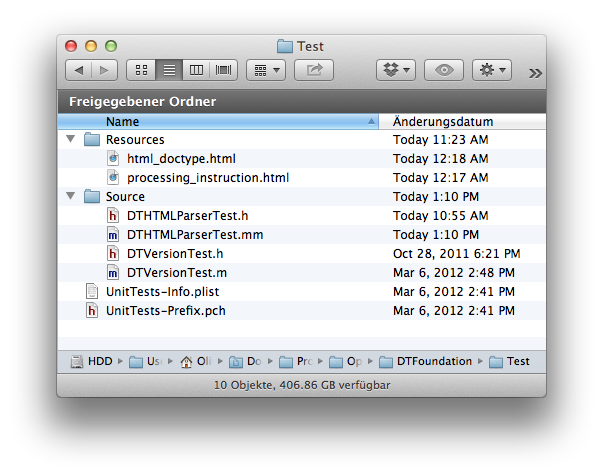
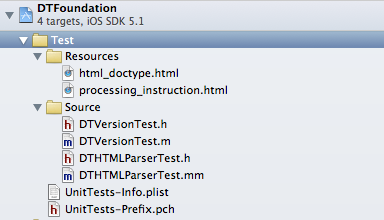
I generally don’t like this as I have a certain project structure I want to enforce. This has a “Test” subfolder below the project root, there you find the PCH and Info.plist. In the “Source” subfolder I want to keep the header and implementation files. In the “Resources” subfolder I keep all other resources, for example HTML files for testing. The structure looks like this:

You can choose your own file system structure if this one doesn’t fit your needs. You just have to make sure of the following items:

  • All resource files need to be assigned to the test target
  • All implementation files (.m) need to be part of the target
  • No header files (.h) are part of the target
  • Neither are Info.plist nor PCH

If you change the structure like you want you can remove the references to the previous items by reference and then add the new structure. If you do you can choose to add all to the files and then afterwards you manually remove the plist and PCH from the target.

As a reminder you can modify target membership of files either in the right sidebar or in the build phases, resources are in “Copy Bundle Resources”, source files are in “Compile Sources”.

The plist and PCH are referenced not by being a member of the target, but by path in the build settings. As mentioned above the Xcode template for test bundles puts them into a subfolder, you you might need to adjust their path as well.

Here you can see that I like to have the product name short and without Spaces, while the target name is longer and more descriptive. The default setting for a new target to use the target name as product name. You are free to adjust that in the build settings as well.

Step 2: Adding Code Tests

I recommend to put all tests related one high level class into a HighLevelClassTest class. For this purpose you add that to your Source folder. “New File…” – “Objective-C test case class”.

The individual test cases are methods that are prefixed “test”. Let’s add a very simple test case to make sure that the initializer returns nil when passed invalid parameters.

// DTHTMLParserTest.h
@interface DTHTMLParserTest : SenTestCase
- (void)testNilData;
@end
 
// DTHTMLParserTest.m
#import "DTHTMLParser.h"
 
@interface DTHTMLParserTest ()
 
@end
 
@implementation DTHTMLParserTest
- (void)testNilData
{
	// try to create a parser with nil data
	DTHTMLParser *parser = [[DTHTMLParser alloc] initWithData:nil encoding:NSUTF8StringEncoding];
 
	// make sure that this is nil
	STAssertNil(parser, @"Parser Object should be nil");
}

Of course you need to add an #import for the class header you are testing. Then you do the operations you want to test. After each individual test step you can use the STAssert macros. Those are behaving similar to NSAsserts, if the first parameter is not true then the test is aborted and the description in the second parameter is being logged.

The most common STAssert macros you will use are:

  • STFail – fails the test right away
  • STAssertNil – parameter must be nil
  • STAssertNotNil – parameter must be not nil
  • STAssertTrue – parameter must be true, YES, non-0
  • STAssertFalse – parameter must be false, NO, 0
  • STAssertEquals - Generates a failure when a1 is not equal to a2. This test is for C scalars, structs and unions.
  • STAssertEqualObjects – the first two parameters are object that must be equal to pass (isEqual:)
Executing test code is just the same as executing app code. So you can even debug your tests by adding breakpoints to pause execution for inspecting variables.

Step 3: Using Bundle Resources

In iOS apps you would usually get the path to bundle resources via [[NSBundle mainBundle] pathForResource:ofType:]. This does not work for unit tests because there is no main bundle. Rather you have to first get the NSBundle that contains the test class and from there you can get the path for the resource.

We have a processing_instruction.html file as member of the test target and a test using this would look like so:

- (void)testProcessingInstruction
{
    NSBundle *bundle = [NSBundle bundleForClass:[self class]];
    NSString *path = [bundle pathForResource:@"processing_instruction" ofType:@"html"];
    NSData *data = [[NSData alloc] initWithContentsOfFile:path];
    DTHTMLParser *parser = [[DTHTMLParser alloc] initWithData:data encoding:NSUTF8StringEncoding];
    parser.delegate = self;
    [parser parse];
 
    STAssertTrue([parser parse], @"Cannnot parse");
    STAssertNil(parser.parserError, @"There should be no error");
}

The basic process is that you set up a test, perform a step, assert some result, perform another step, assert again and so on. Any test that reaches its end without an assert failing it is considered passed.

Step 4: Configuring a Scheme for Testing

As of Xcode 4 we got several things you can do for any target: Run, Test, Profile, Analyze. Each of these can be configured separately. The kind of action you want to perform on the currently selected target can be chosen by long pressing on the round button in the upper left hand corner.

Xcode creates a scheme for each new target by default. These schemes (unless shared) are only visible for you. Another user checking out the project will again have schemes for all targets auto-generated. As far as I know you cannot prevent this process if the other user has “Autocreate schemes” checked.

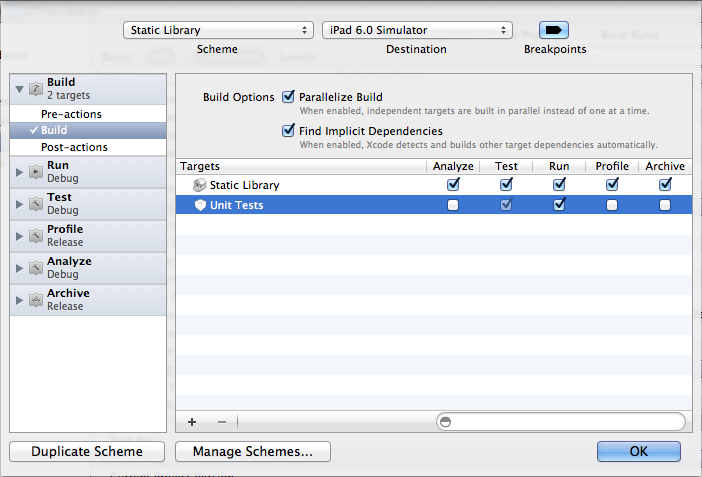
A scheme for a Unit Test target is quite unnecessary, so we can safely remove that. Instead we will tell Xcode that these tests belong to the “Static Library” target.

Usually you would set up your unit tests to be the Test option for an app. Here in DTFoundation there is no app, so we configure the unit tests for the static library target.

Product – Edit Scheme. Then add the Unit Test target via the Plus button and optionally uncheck individual tests you don’t want to be performed.

Having done that you can perform a one-off run of the tests. Long-Press on the top left round button and choose test. This will perform the tests for the selected scheme, “Static Library” in this case. Usually you would run unit tests on the simulator.

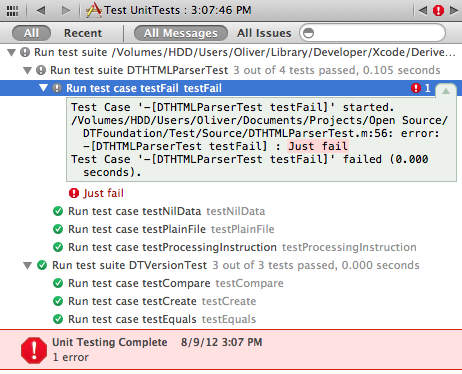
After the test was run you can check the log to see if all tests worked. For demonstration purposes I added a test that always fails with STFail. You will only see lines for the test cases plus what is logged from STAssert macros. If you have an NSLog in the test you can see that if you open up the details panel.

The green checkmarks are just as soothing as the red exclamation marks are annoying. That in itself should motivate you to get all tests to be green as soon as possible.

Step 5: Testing with Every Build

With the setup from the previous test you can manually run the tests via the round button or CMD+U. I sometimes makes sense to force yourself to test with every build of a target because you might start getting lazy always having to push CMD+B for building and CMD+U for testing.

You can easily automate the process to have the tests automatically occur whenever you execute a build so that you immediately know if you have broken something.

In the Build Settings of the unit test target set the “Test After Build” flag to YES. This causes the tests to be run whenever the unit test bundle was built.

Then you edit your scheme and add a checkmark in the Run Column of the Unit Tests.

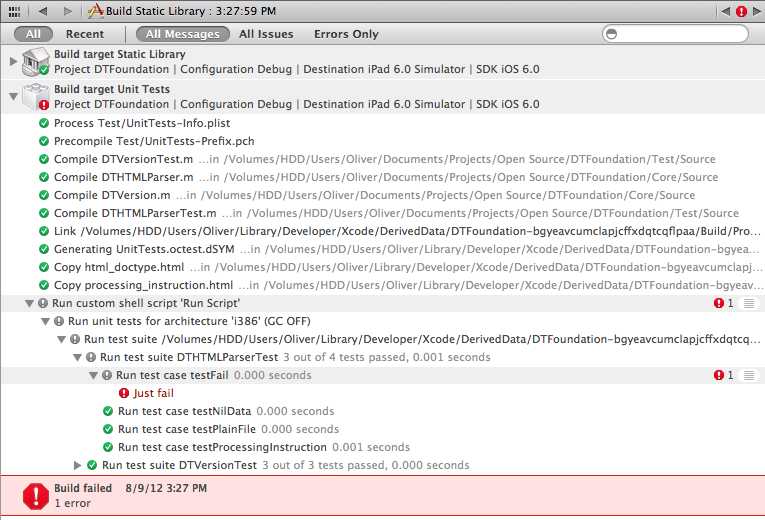
With this change you will see that the Unit Tests are built and executed right after the building of the main target.

If you have a sufficiently fast Mac then you don’t notice the processing time needed for the tests at all. If you have a larger project you might want to refrain from testing with each build but rather have your continuous integration server (e.g. Jenkins) perform the Unit Tests on each check in.

Step 6: Using Specific App States and Locations

Let me mention for sake of completeness that there are two interesting tools for use with unit testing. Look at the graphic in Step 4 and you see two columns which you can individually set for each test.

Those allow you to have a specific app state being restored from a package before the testing commences and a given location/path. The application data bundle you can retrieve from a device running the app via Organizer. The location data can either be a location from a list or you can even add a GPX file to simulate movement along a path.

Though I have to admit never having tried these out myself. I’d be interested to hear about your experiences with these.

Conclusion

Unit Tests are easy to create and can save you from some unpleasant surprises when somebody (or even you) breaks something that was working previously. Even if you don’t subscribe to the “Test-driven Development” paradigm it is still something worthwhile because even just the act of thinking what could go wrong with your classes makes you code more defensively.

Ultimately your software will be less prone to accidentally re-introduced bugs – provided that you add extensive tests for each bug you fixed.

flattr this!

Cubed CoreAnimation Conundrum

$
0
0

One of the big mysteries of CoreAnimations are 3D transforms. You might have seen them used in popular apps like Flipboard (page turn) but there are hardly any good tutorials in how they actually work. In fact, you find only one from 2008 what was written when OS X Leopard was still around.

I blame that there are several things that are counterintuitive about using 3D transforms and perspective with CoreAnimation why not more people play with it … and then write up what they learned in some useful guide.

Session 421 Core Animation Essentials  from WWDC 2011 had an example of 6 squares that would animate into a three-dimensional box that the presenter could even rotate around. That inspired me to figure out how to do this as well, and with the help from several people on twitter I was successful.


Layers back all views on iOS. You can think of layers as only in charge of what you see while views have many more purposes including touch handling. If you set a transform on a UIView this is strictly two-dimensional. At least facing the developer, because behind this simplified interface at the UIKit level hides a powerful world. On the CoreAnimation level all transforms are CATransform3D i.e. three-dimensional.

Layers are also the thing that you actually see when you look at an iOS app. Basic CALayer instances have two ways how they can show content. Either you set their contents property to point to a CGImage or you point their delegate to some other object that knows how to perform drawLayer:inContext: for the layer. Of course layers can also have a backgroundColor set and if you subclass them you can override the drawLayer.

Let’s Be Square

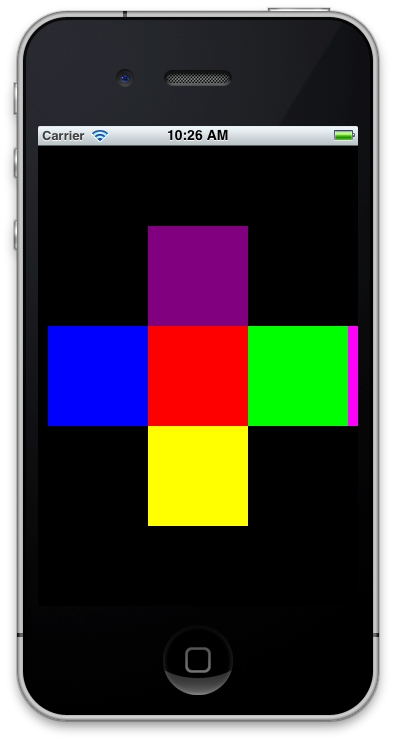
We will start out by creating 6 layers for the sides of the cube. Contrasting got UIViews where the anchor point will always be at the top left, in CALayers the default anchorPoint is at (0.5, 0.5) which is in its center. The anchorPoint will also the point around which 3D rotations will occur, so we have to move this to the edges. So we set up all layers with bounds of (0,0,100,100), adjust the anchorPoint where it should be and then change the position such that the squares line up.

For simplicity I’m just coloring the individual squares differently. As I mentioned above – in real life – the contents of these layers could come from images or being drawn in code.

CALayers don’t preserve three-dimensionality of their sublayers. Say if you have a layer that has a sublayer rotated in 3D space then you will only ever see the two-dimensional projection of the sublayer onto the layer at z=0. This is why most people fail with even their very first 3D attempts because nobody tells them about this.

There is a specialized layer class CATransformLayer which does NOT  simplify 3D-transformed geometry of sublayers so this is what we shall use as the base layer for our experiment. I used a simple single view template project and added the setup for the squares to viewDidLoad.

@implementation DTViewController
{
	CATransformLayer *baseLayer;
	CALayer *greenLayer;
	CALayer *magentaLayer;
	CALayer *blueLayer;
	CALayer *yellowLayer;
	CALayer *purpleLayer;
 
	BOOL isThreeDee;
}
 
- (void)viewDidLoad
{
	[super viewDidLoad];
 
	UIPanGestureRecognizer *pan = [[UIPanGestureRecognizer alloc] initWithTarget:self action:@selector(pan:)];
	[self.view addGestureRecognizer:pan];
 
	UITapGestureRecognizer *tap = [[UITapGestureRecognizer alloc] initWithTarget:self action:@selector(tap:)];
	[self.view addGestureRecognizer:tap];
 
	self.view.backgroundColor = [UIColor blackColor];
 
	baseLayer = [CATransformLayer layer];
	baseLayer.anchorPoint = CGPointZero;
	baseLayer.bounds = self.view.bounds;
	baseLayer.position = CGPointMake(CGRectGetMidX(self.view.bounds), CGRectGetMidY(self.view.bounds));
 
	[self.view.layer addSublayer:baseLayer];
 
	CALayer *redLayer = [CALayer layer];
	redLayer.backgroundColor = [UIColor redColor].CGColor;
	redLayer.frame = CGRectMake(0, 0, 100, 100);
	redLayer.position = CGPointMake(0,0);
	[baseLayer addSublayer:redLayer];
 
	blueLayer = [CALayer layer];
	blueLayer.backgroundColor = [UIColor blueColor].CGColor;
	blueLayer.bounds = CGRectMake(0, 0, 100, 100);
	blueLayer.anchorPoint = CGPointMake(1, 0.5); // right
	blueLayer.position = CGPointMake(-50,0);
	[baseLayer addSublayer:blueLayer];
 
	yellowLayer = [CALayer layer];
	yellowLayer.backgroundColor = [UIColor purpleColor].CGColor;
	yellowLayer.bounds = CGRectMake(0, 0, 100, 100);
	yellowLayer.anchorPoint = CGPointMake(0.5, 1); // bottom
	yellowLayer.position = CGPointMake(0,-50);
	[baseLayer addSublayer:yellowLayer];
 
	purpleLayer = [CALayer layer];
	purpleLayer.backgroundColor = [UIColor yellowColor].CGColor;
	purpleLayer.bounds = CGRectMake(0, 0, 100, 100);
	purpleLayer.anchorPoint = CGPointMake(0.5, 0); // top
	purpleLayer.position = CGPointMake(0,50);
	[baseLayer addSublayer:purpleLayer];
 
	// need a transform layer for green to mount magenta on
	greenLayer = [CATransformLayer layer];
	greenLayer.bounds = CGRectMake(0, 0, 100, 100);
	greenLayer.anchorPoint = CGPointMake(0, 0.5); // left
	greenLayer.position = CGPointMake(50,0);
	[baseLayer addSublayer:greenLayer];
 
	CALayer *greenSolidLayer = [CALayer layer];
	greenSolidLayer.backgroundColor = [UIColor greenColor].CGColor;
	greenSolidLayer.bounds = CGRectMake(0, 0, 100, 100);
	greenSolidLayer.anchorPoint = CGPointMake(0, 0); // top left
	greenSolidLayer.position = CGPointMake(0,0);
	[greenLayer addSublayer:greenSolidLayer];
 
	// the "lid"
	magentaLayer = [CALayer layer];
	magentaLayer.backgroundColor = [UIColor magentaColor].CGColor;
	magentaLayer.bounds = CGRectMake(0, 0, 100, 100);
	magentaLayer.anchorPoint = CGPointMake(0, 0.5); // left
	magentaLayer.position = CGPointMake(100,50);
	magentaLayer.doubleSided = YES;
	[greenLayer addSublayer:magentaLayer];
 
	CATransform3D initialTransform = baseLayer.sublayerTransform;
	initialTransform.m34 = 1.0 / -500;
	baseLayer.sublayerTransform = initialTransform;
}

After setting the view controller’s view’s backgroundColor to black we create the baseLayer which is in charge of preserving the three-dimensionality of its sublayers. CATransformLayers themselves cannot have a backgroundColor rather they serve as invisible structure elements.

The red, blue, yellow, purple and magenta layers are straightforward. All of them get mounted on the baseLayer, all 100*100 in size but with differing anchor points and positions. Again, the anchorPoint values need to be different because those will be used as hinges for the rotations later. Also note the position of the baseLayer which was placed such that (0,0) is in the center of the view.

The lid of the box hinges on the right side of the green square. If we were to mount the magenta lid directly on a green square then upon rotating that you would only see a flattened projection of the magenta layer into the plane of the green layer. Thus we need another invisible CATransformLayer as stand in for the green side to preserve the 3D-rotation of the lid and we mount the green square on this. Without it the lib would become invisible as it is rotated to be at a right angle from the green layer because the projection of it would be just a line.

The final paragraph of the above code sets the m34 field of the sublayerTransform of our baseLayer. This value determines the amount of perspective skewing applied to its sublayers when rotated in 3D space. Think of the -500 as if you are hovering your eye 500 pixels above the plane of the screen. The closer this value is to 0 the wider your angle of viewing will be.

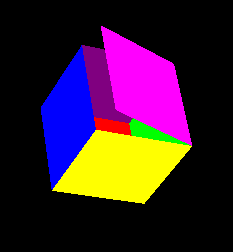
Here’s is a value of m34 = 1/-120, really close.

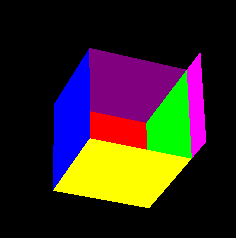
And here we are further away with m34 = 1/-1200. This is so “far away” that a rotation does barely skew the yellow layer.

As a rule of thumb you can assume that the “closer” you get, the more perspective skewing will occur. We only apply all transforms to the sublayerTransform of the baseLayer because we only want the subLayers to be rotated.

I have no better explanation why the sublayerTransform and not the regular transform. We need to set the m34 only once at the beginning because subsequent incremental rotations will also affect this value. During my experiments I kept setting this to the initial value which caused the perspective to be wrong. Just set it once to fix the imaginative distance and then leave it alone.

Let’s Get Rolling

Now the whole thing is way more fun if we can rotate it around the x and y axis by dragging our finger on the screen. The basis for this technique was first written up by Bill Dudney in 2008, I’ve adapted it for use with a pan gesture recognizer.

This technique works by rotating the previous 3D transform around the x and y axis. Thereby one pixel travelled equates to one degree of rotation, hence the division by 180 and multiplication with Pi to convert it into radians.

CATransform3DRotate is a bit more complicated because it does the two rotations in one. It basically has just one angle value and then you need factors for x, y and z determining how much of this angle is applied to each axis. But here my mathematical knowledge of 3D matrices ends. Fortunately we don’t need to know any more since this formula works.

- (void)pan:(UIPanGestureRecognizer *)gesture
{
	if (gesture.state == UIGestureRecognizerStateChanged)
	{
		CGPoint displacement = [gesture translationInView:self.view];
		CATransform3D currentTransform = baseLayer.sublayerTransform;
 
		if (displacement.x==0 && displacement.y==0)
		{
			// no rotation, nothing to do
			return;
		}
 
		CGFloat totalRotation = sqrt(displacement.x * displacement.x + displacement.y * displacement.y) * M_PI / 180.0;
		CGFloat xRotationFactor = displacement.x/totalRotation;
		CGFloat yRotationFactor = displacement.y/totalRotation;
 
		if (isThreeDee)
		{
			currentTransform = CATransform3DTranslate(currentTransform, 0, 0, 50);
		}
 
		CATransform3D rotationalTransform = CATransform3DRotate(currentTransform, totalRotation,
																				  (xRotationFactor * currentTransform.m12 - yRotationFactor * currentTransform.m11),
																				  (xRotationFactor * currentTransform.m22 - yRotationFactor * currentTransform.m21),
																				  (xRotationFactor * currentTransform.m32 - yRotationFactor * currentTransform.m31));
 
		if (isThreeDee)
		{
			rotationalTransform = CATransform3DTranslate(rotationalTransform, 0, 0, -50);
		}
 
		[CATransaction setAnimationDuration:0];
 
		baseLayer.sublayerTransform = rotationalTransform;
 
		[gesture setTranslation:CGPointZero inView:self.view];
	}
}

The totalRotation is the length of the displacement vector, the xRotationFactor and yRotationFactor determine how much these elements contribute to the totalRotation. At the end of the gesture recognizer handler we setTranslation back to zero so that on the next update we get a delta only. There is a possibility of the deltas both being 0 so we have to prevent doing any calculation with that as it would mess up our beautiful transform with non-a-numbers (NAN).

The isThreeDee are a little bonus: When the box is flat then we want to rotate around z=0, but when it is closed then we want to rotate around its center at z=50. So we move the baseLayer before the incremental rotation and move it back afterwords if isThreeDee is YES.

Note that moving the finger along the x axis rotates around the y and vice versa.

Close The Box Already!

Alright, your wish is my command. We set up the squares with the appropriate hinges and with dragging the finger we can witness the awesome 3D-ness about to come from any perspective we wish.

Closing the box remains as a mere formality.

- (void)tap:(UITapGestureRecognizer *)gesture
{
	isThreeDee = !isThreeDee;
 
	if (isThreeDee)
	{
		greenLayer.transform = CATransform3DMakeRotation(-M_PI_2, 0, 1, 0);
		blueLayer.transform = CATransform3DMakeRotation(M_PI_2, 0, 1, 0);
		yellowLayer.transform = CATransform3DMakeRotation(-M_PI_2, 1, 0, 0);
		purpleLayer.transform = CATransform3DMakeRotation(M_PI_2, 1, 0, 0);
		magentaLayer.transform = CATransform3DMakeRotation(0.8*-M_PI_2, 0, 1, 0);
	}
	else
	{
		greenLayer.transform = CATransform3DIdentity;
		blueLayer.transform = CATransform3DIdentity;
		yellowLayer.transform = CATransform3DIdentity;
		purpleLayer.transform = CATransform3DIdentity;
		magentaLayer.transform = CATransform3DIdentity;
	}
}

When the box is flat then all transforms are the identity transforms. To close it there are rotations by the amount of half of Pi (= 90 degrees) with the 1 specifying the axis around which to rotate the plane. Only the magentaLayer I did not fully rotate so that we can still peek inside the box. Positive rotations are counter clockwise, negative clockwise.

I have to admit that experimentation yielded the correct values much faster than if I had thought it through. In any case, tapping the display now will close the box with a duration of one second which is the default CoreAnimation implicit animation duration.

Now you can also see that the magenta (aka pink) side stays connected with the green side which only was possible by using a CATransformLayer for this side.

You still don’t believe me? Ok, here is how it looks if you add the green layer directly to baseLayer and the pink layer directly to the green layer.

You see that only a projection of the pink layer onto the plane of the green one is visible. If this were rotated the full 90 degrees it would be no longer visible.

Conclusion

There are multiple items that were not immediately obvious to me. The most fundamental one was the need for CATransformLayer which was pointed out to me by Friedrich Markgraf and Andreas Monitzer on Twitter. The second stumbling block was when and how to set up m34.

Finally I don’t think I would have been able to get the touch-based rotation to work if it weren’t for Bill Dudney who amazingly joined and quit Apple in the long time since the blog post where he described the algorithm.

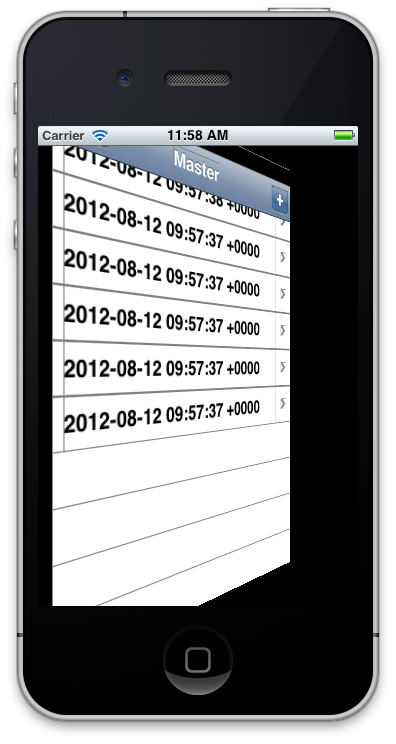
Originally I wanted to apply a 3D transform to a table view to visualize the individual elements comprising it. But I failed for the simple reason that even with a 3D translation applied to the sublayers I would still end up with a flat surface. Now you know why: no CATransformLayers anywhere in the view hierarchy and everything is projected flat onto the host layer.

At least I think that this is the explanation. Please let me know if you know of a method to have the subviews be hovering above the plane of the app’s window.

But at least know we know how this Cubic business works. :-)

Source code of the project is available in my Examples GitHub repository.

flattr this!

Podcast #40 – “Happy App.net Day”

$
0
0

App.net reaches their funding goal, Apple releases Xcode 4.4 and almost kills armv6 support and a crowdsourced system estimates review times more accurately.


Show Notes

Since July 10 when Apple has released the Xcode 4.4. GM they started to accept submissions made with 4.4. They specifically encourage developers to use the new Mountain Lion features in their submitted apps, specifically highlighting the “new cross-platform Game Center Groups, so they’ll be available when OS X Mountain Lion ships”.

Having a shiny new version of Xcode also raised the question whether we could also submit iOS apps with that. Some very early adopters reported being rejected for Xcode 4.4. being not yet accepted. But soon thereafter other developers reported successful submissions. So at present we believe that Xcode 4.4. can be used for building app store legal iOS apps.

According to Apple the only difference between Xcode 4.4 and Xcode 4.5 is that the latter includes the iOS 6 BETA SDK. Though there are also some important differences that I was able to see.

  • There is no iOS 3 or iOS 4 debugging support that you can download and use. Looks like you can only debug iOS 5 and 6 apps with Xcode 4.5.
  • Building for armv6 is will no longer be supported in Xcode 4.5. Also the minimum OS version you can target with it is iOS 4.3.

Apple reacted quickly to the problems with IAP. They published a document that shows how to validate digital signatures on transactions using some private API that they permit you use for this specific purpose.

At the same time as Mountain Lion also several other updates were released:

  • Java 2012 004 which I need for Charles
  • The SMC 1.5 update activated power nap for my 13″ Air
  • The iWork apps now finally have iCloud support

At 5:32 pm UTC App.net has reached their funding goal of $500,000.

Tips

If you get an iOS or Mac app approved then tweet with #iosreviewtime or #macreviewtime ! A free site averages those: reviewtimes.shinydevelopment.com

To fix the problem of Reachability losing the ability of knowing that there is a connectivity.

To resign the keyboard from anywhere:

Always happy to have you follow me @cocoanetics on Twitter and app.net and receiver your questions via oliver@cocoanetics.com.

flattr this!

Smart App Banners

$
0
0

How often do you get annoyed by the following? You look up something on Google on your iPhone and you find an answer in a form. When you click-through the search result the forum does not just show you what you were looking for, but it pops up a large annoying alert informing you that with their native app the reading experience would be so much nicer. And it does so even if you gave in some time earlier and had already installed the app.

Fortunately it has been announced that Apple will include a smart solution to this problem in iOS 6. Safari will gain the ability of automatically displaying such banners.


Now there are actually 2 kinds of problems that are being solved at the same time. The first being that the owner of the website simply wants to inform you that “there’s an app for that”. An automatic and unobtrusive way to advertise their iOS app to you. It shows you the app icon, the name of the maker, what it costs and there’s a smart button. This either opens the app page on the app store or even opens the app if you already have it.

It Is Served

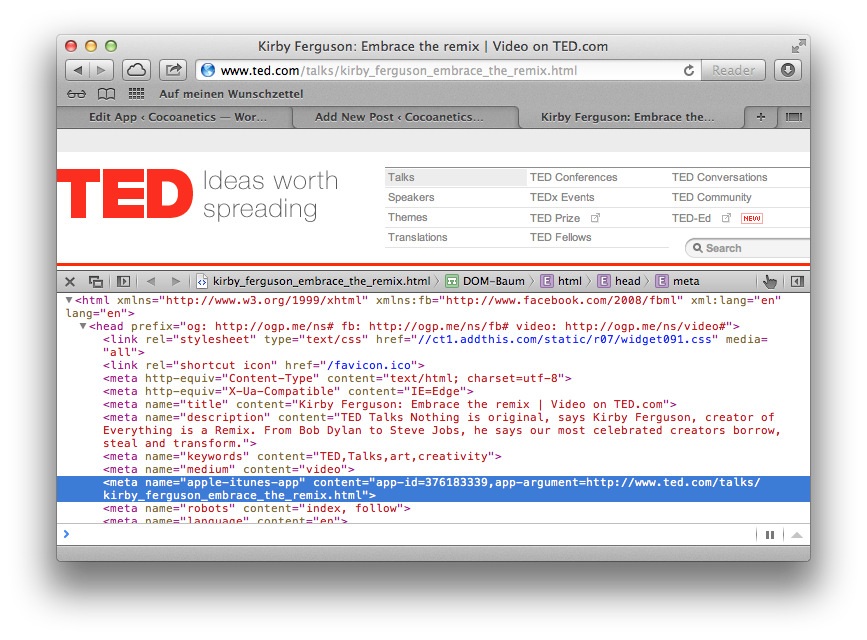
There might have been several pages that implemented the necessary META tag right after the WWDC presentation, but the first time I ever saw it in the wild was on the TED.com website.

Even though this relates to unpublished technology there are already several guides on the internet informing us as to what the appropriate HTML additions are to achieve the displaying of these banners. Or we can simply inspect the META tags present at a website that has them already implemented. That of that makes them public knowledge that we can comment on.

The META tag has the name “apple-itunes-app” and in its content it has the “app-id” which is the internal identifier that every app has on the Apple App Store. If find out your App ID you can peruse Apple’s iTunes Link Maker or you simply inspect one of the long-form URLs leading to your app on the app store. There’s a long number in there and that is it.

The second kind of problem that the banners solve in a smart way is to actually allowing website makers to deep-link to specific content. Like in the TED example above I’ve opened up a page of an individual video. If I have the TED.com app installed then tapping the banner button should also open up the app to this very same video.

This is achieved by the second (optional) parameter in the tag, named “app-argument”. This has to be a valid URL because it is passed as NSURL into the app, similar to launching the app with a custom URL scheme. Here TED.com simply passes the URL of the video page to the app because this is probably the permalink to this piece of content. Their app will know how to go to the video that corresponds to this URL.

People have already begun to embrace these two usage scenarios. Blogs and content sites are specifying deep-link URLs to open content people found on Google in their native apps. App makers are using the tag to use the banners are ads.

Stephen Darlington of Wandle Software has published a WordPress plugin that adds Smart App Banner capability to any WordPress blog. You get a new box in which to enter the app id for each post or page. If set then the appropriate basic tag is added.

I have this plugin running on Cocoanetics.com until my web designer updates my custom theme to support them without plugin. I’m thinking of having the simple banners on all iOS app pages and if I am ever going to do a dedicated reading app then I would want to pass the current page’s permalink to the app as well as argument.

App Implementation

I’m not telling you any secrets here because handling Smart Banner arguments is exactly the same as handling reacting to opening via custom URL scheme.

You need to be using the modern application:didFinishLaunchingWithOptions: delegate method instead of the outmoded applicationDidFinishLaunching. The newer method returns a BOOL of YES if it is able to handle a URL. If a URL was passed then you find it in the options dictionary via the UIApplicationLaunchOptionsURLKey.

But this is not yet a good place to handle it. If you return YES here, then application:openURL:sourceApplication:annotation: (new in iOS 4.2) will be called giving you the opportunity to handle the passed URL. So you won’t have to go digging for the URL in the dictionary, just use the url parameter passed here.

At this point it is up to you what you do with the NSURL or even how it is constructed. If it is a permalink to a web page then you probably have a method to retrieve the matching article. If it is a custom scheme then you will know how to parse its parts and derive the appropriate command from it.

You’re not limited in any way. Say if you have a web service where different pages show different functions, then you could map via a custom URL scheme to the matching pages/functions inside your app.

Conclusion

If you are amongst the content providers who are guilty of the JavaScript Nag Alert then please implement Smart App Banners as soon as you can. If you have a content app, then pass the appropriate deep-link URLs to allow people to seamlessly transition from the small-text web page to the wonderfully optimized version in your app.

If you are an app maker then consider adding the necessary META tag to your product pages, either by hand or with the help of the mentioned plug-in.

Smart App Banners are a really great invention. I am certain that they will find wide adoption because they are simple to support in apps and even simpler to implement on web sites. Hardly any technology is simpler than only having to add a META tag.

flattr this!

iPhone 5 Fake Rumor Roundup

$
0
0

Current rumors about the next iPhone are that it will have a 4″ screen, a smaller SIM card and will probably start with pre-orders on September 12th. We’ve heard all that, that’s old news.

Following in the footsteps of the fake Asymmetric Screws rumour which was planted by Swede Lukasz Lindell (and friends) I felt a sudden wave of sadness crush on me when I realized that I simply lack the amount of creativity that goes into constructing a good Apple rumor. If only I was creative enough to think of several such good and believable rumours, I could probably make a living just from the blog traffic alone. #linkbait

So I vented this frustration on Twitter and to my surprise many people took this as an invitation to chime in and also play the game. Here’s a roundup of the best fake rumors I’ve heard. If you respond with a good one I’ll add your contribution as well.


One suggestion aimed at automating the Rumor Mill:

There really should be an App that randomly generates and spread Apple rumors. Would save us all a lot of time. — @donal_cahalane

Which was immediately followed by a witty remark:

There is such an app. It’s called Twitter :-)  — @gianniponzi

But in all seriousness …


The Actual Rumours

Here we go, I’ve sorted the rumors slightly so that some are paired that go together well.

Apple is doomed! — @sneezr

Ah, the classic. Have we seen Peak-Apple? I can only go down from here…

I hear the new iPhone is going to have a tiny moustache. — @applingua

According to KnowYourMeme moustaches “are self grown powerhouses of awesome”. The iPhone is grown up and is awesome, thus it deserves a moustache.

iPhone 5 will have Push to Talk – Since Apple is buying Sprint it all makes sense now. I miss that PtT sound. — @jayjardim

Awesome, then we could finally play pretend-Police, tootiloot!

Apple will use rivets instead of screws in the next iРhone. — @glebd

That surely would make it even less recycleable than the Retina MacBook Pro!

I’ve heard that the screws in the new iPhone are entirely fictional. I guess that means they’ll hold it together with magnets. — @qrunchmonkey

Hm, that contradicts the rivets and wouldn’t that cause my iPhone to fall apart?

The Next iPhone To Have Two Dock Connectors, Can Be Docked Either Side Up. — @adurdin

Actually I have a better idea: How about being able to dock in Portrait AND Landscape?

Apple is about to launch a game console. You might be able to use an iPhone as a gamepad for guests. — @madewulf

Totally makes sense! Since my guests have iPhones they’ll always have their own controllers on them. And I have to get space iPod Touches for all unlucky people who don’t.

Conclusion

As our Swedish friends have demonstrated it is fairly simple to generate good sounding rumors and with the help of blogs and tweets those can be made to spread like wildfire if they contain a certain degree of general believability. It certainly helps to have a good 3D rendering that you mail to yourself and black out your address in the From: “to protect your sources”.

The less you originally provide as information the faster it will spread because people tend to snowball the kernel by attaching their own hopes and fears to it. TapMag UK has collected people’s outrageous ideas that Apple most certainly will ignore. True to Apple’s philosophy that the user never knows what he wants until he sees it.

flattr this!

Software Update Server Guide

$
0
0

Once you get to a level of having more than a single Mac you might find it a bit of a hassle having to download and install all updates for all your Macs from Apple over the Internet. When you check for updates then every Mac will by default connect to Apple’s catalog of updates and download the updates from there.

This is where a Software Update Server (SUS) starts making sense. Let me share some things that I learned over the past 2 days investigating how to best set this up for our work group in the office as well as for all the Macs I have at home.


In stark contrast to Windows there is no special server operating system in the Mac world. The OS is the same between OS X and OS X Server. Since Lion the Server part is just a thing you can buy on the Mac App Store. And it’s also gotten cheaper than ever before. At 16 Euros it is a total no-brainer if you can benefit from it. And benefit you do if you have one permanently running Mac that does Server-y things.

So the equation is simple: an Mac + OS X + Server App = Mac OS X Server.

What is a bit more complicated is the possible combinations of servers and clients, because for some weird reason Apple puts an artificial limit on which can serve which.

  • OS X Server on Mountain Lion can provide Apple Software Updates to OS X Mountain Lion, OS X Lion, and Mac OS X v10.6 clients.
  • Lion Server Software Update Service can provide Apple Software Updates to OS X Lion, Mac OS X v10.6, and Mac OS X v10.5 clients.
  • Mac OS X Server v10.6 Software Update Service can provide Apple Software Updates to OS X Lion, Mac OS X v10.6, Mac OS X v10.5, and Mac OS X v10.4 clients.
  • Mac OS X Server v10.5 Software Update Service can provide Apple Software Updates to Mac OS X v10.5 and Mac OS X v10.4 clients.
  • Mac OS X Server v10.4 Software Update Service can provide Apple Software Updates to Mac OS X v10.4 clients only.

This means any OS X Server can only serve updates up to its own level. Lion cannot serve updates from Mountain Lion.

Mountain Lion Server

If you are able to dedicate a modern MacMini to take on the task of a MoLo Server then this is the easiest approach. The latest generation MacMinis have an incredibly low power consumption. 10.8 runs on all MacMinis from early 2009 or newer, so you can possibly get a used one for quite a bargain if you don’t yet have one.

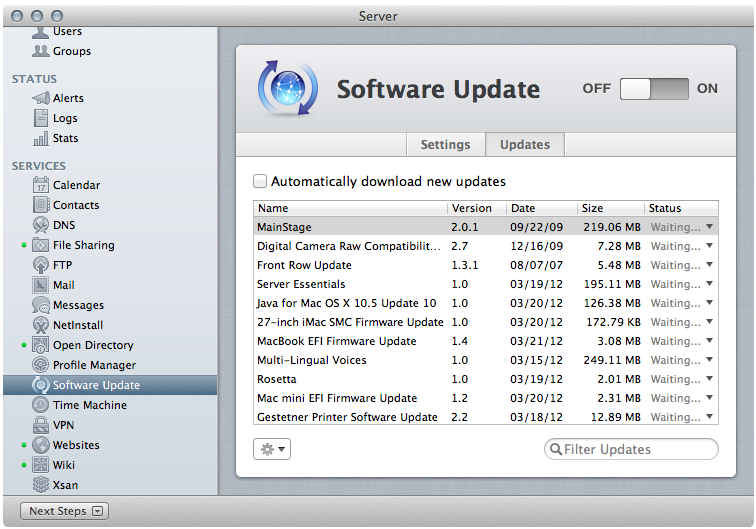
On 10.8 all you need to do is to start the Server app, after having purchased it. Then you see the “Software Update” service under Services.

All you have to do is to flip the switch to turn it on. You have two options: Automatic will take care of everything, Manual allows you to manually download and enable specific updates. I recommend leaving this on Automatic unless you want to specifically prevent a certain update from being presented to your clients.

On Server you can individually enable just the services that you actually are using. But even if SUS is the only service you will ever want, the convenience and speed for updating all your Macs easily is worth the expense.

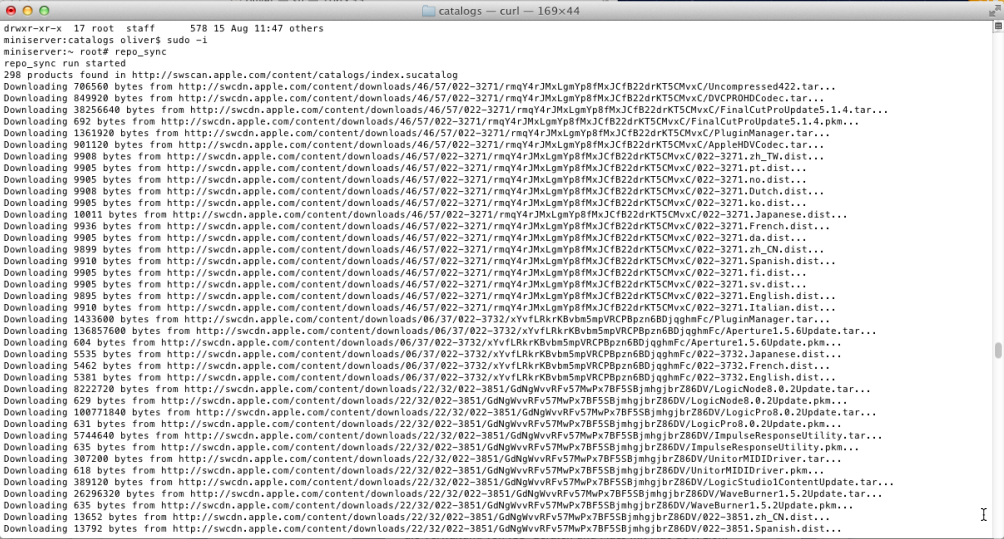
Once you have set up the service you have to be patient until SUS has copied all the available update packages from Apple’s server over the Internet to your server’s hard disk. Depending on your connection that can take upwards of 10 hours.

Client Setup

The clients for your SUS are the individual Macs. Apple knows two kinds of Macs: managed or unmanaged. Managed Macs get administrated via the Apple Remote Desktop app. Unmanaged Macs are all others. Remote Desktop carries a higher price tag than Server, 70 Euros are something to not spend so easily. I guess you’ll want that if you actually have 5 or more workstations and a couple of servers when the benefit of a central app for managing these starts making sense.

The configuration of the individual Macs boils down to setting a singto setting a defaults setting. Since all my Macs are unmanaged, that means opening a terminal window and issuing a command like:

sudo defaults write /Library/Preferences/com.apple.SoftwareUpdate CatalogURL http://su.example.com:8088/index.sucatalog

To query the current setting you can output the value with defaults read.

defaults read /Library/Preferences/com.apple.SoftwareUpdate CatalogURL

And to revert to the default setting i.e. having updates come from Apple you remove the CatalogURL setting.

sudo defaults delete /Library/Preferences/com.apple.SoftwareUpdate CatalogURL

Andrew Wellington has created a Mac app Software Update Enabler that is able to do these settings without having to use terminal.

Lion Server, NOT

The MacMini server I have running to serve my home network is just a teensy bit too old to make the cut off for Mountain Lion. This means I am stuck with Lion on it until I can find a replacement. Lion was the first OS that also had the separate Server App for download via the Mac App Store. At the time of this writing it is not available so I suspect that Apple might have discontinued it.

I had gotten the Server App for Lion unlocked in my purchases when I purchased the MacMini server for my office a few days before the MoLo release. Through the Apple’s UpToDate program I had then also gotten codes to unlock Server for Mountain Lion as well MoLo itself. After having seen how easy the server setup was on 10.8 I tried the same at home but to my astonishment I couldn’t find the SUS setup.

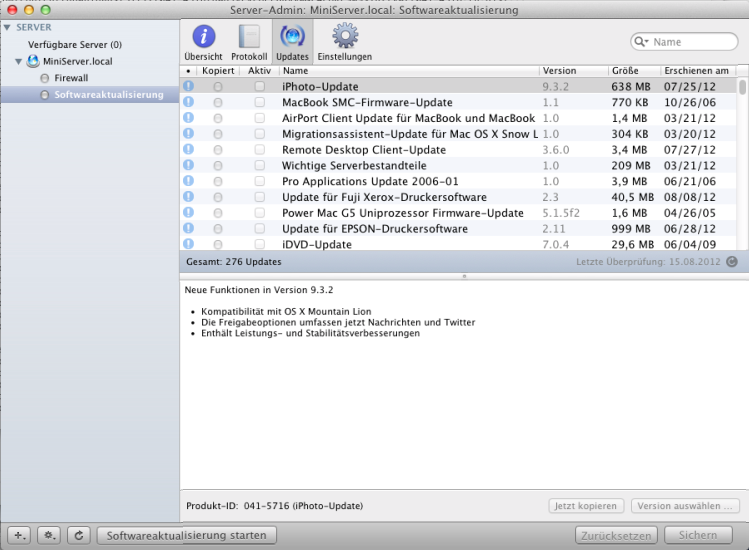
Turns out it was only with 10.8 that Apple had consolidated (and simplified) all server things in a single app. Under Lion you need an additional free app called Server Admin Tools. There the setup of SUS is almost identical, albeit with a few settings that Apple has simplified away.

Unfortunately – as mentioned above – you cannot serve updates for anything after Lion from Lion server. So I’m only mentioning this for completing the picture. If all we had available where Apple’s solutions then I would be out of luck for my home network. Also another severe drawback is that you cannot use mapped network shares for the place to save the downloads on, only plugged in or internal hard disks.

Fortunately there is an Open Source solution that does not have these drawbacks.

Reposado – The Open Source SUS

Walt Disney Animation Studios (WDAS) anticipated the need for a FOSS solution to this problem. And so they created Reposado which is available on GitHub. They describe it such:

Reposado is a set of tools written in Python that replicate the key functionality of Mac OS X Server’s Software Update Service. Reposado, together with the “curl” binary tool and a web server such as Apache 2, enables you to host a local Apple Software Update Server on any hardware and OS of your choice. Reposado is licensed under the new BSD license.

Lion has Apache 2 and Python built-in. So the general setup is achievable even if you are no Linux-guru.

First I connected an external hard disk for storing the downloads because the internal hard disk would be too limited. I named it ExtraHDD.

The I cloned out the sources for Reposado from github right onto ExtraHDD. You only need the source for building as far as I understood.

sudo -i
cd /Volumes/ExtraHDD
git clone https://github.com/wdas/reposado.git
cd reposado
python setup.py build
python setup.py install

This builds and installs Reposado into /usr/local/bin.

Next we need folders on ExtraHDD to keep the html and the meta information.

cd /Volumes/ExtraHDD
mkdir meta
chmod 777 meta
mkdir html
chomod 777 html

I didn’t know (or care to know) the user that is is used by Apache for accessing these so I just made them writeable and searchable for everybody.

The final step in configuring is to call the configurator and specify the above created paths as well as the server name and port. Still as root we configure Reposado.

repoutil --configure
Path to store replicated catalogs and updates []: /Volumes/ExtraHDD/html
Path to store Reposado metadata []: /Volumes/ExtraHDD/meta
Base URL for your local Software Update Service
(Example: http://su.your.org -- leave empty if you are not replicating updates) []: http://miniserver.lan:8088

Reposado does not have a daemon or constantly running process. Rather every time repo_sync is run the repository is synched with Apple and this builds a set of static files that need to be served by a web server.

Because I had Lion server already set up I used the Web service configuration there to set up the update site to run on port 8088.

A true geek would probably do the Apache configuration on the shell but I preferred the ease of the Server tool. The new site was set to listen on port 8088 and serve the contents of our html folder. To test that you can put an index.htm page containing some text in the html folder and see if this appears if you open the URL in Safari.

The final step for setting up Reposado is to do the initial sync, again as root, calling repo_sync. This is the command that you will want to execute regularly, possibly on a chron job.

Again you have to be patient for the initial sync to finish because several Gigabytes of packages are being downloaded here.

I’ve seen some Unix cracks configure Rewrite rules for Apache so that the correct index file is automatically served depending on the client. Though that reeks too much of black magic to me, so I prefer to set the clients up as mentioned in the client_configuration.txt file.

For 10.8 the update URL is: http://miniserver.local:8088/content/catalogs/others/index-mountainlion-lion-snowleopard-leopard.merged-1.sucatalog

For 10.7 the update URL is: http://miniserver.local:8088/content/catalogs/others/index-lion-snowleopard-leopard.merged-1.sucatalog

Test the URLs in Safari, they should return a large XML plist.

Conclusion

As soon as you have more than one Mac it is increasing your update comfort and decreasing your bandwidth usage to have a Software Update Server running. If you can then use the cheap 10.8 Server for this purpose. If you cannot, then Reposado is a viable alternative which can be setup on any old MacMini or even Linux box.

flattr this!

iCatalog+

$
0
0

Our partners at International Color Services (ICS) have been rather busy throughout the summer. The main reason is that we released the next major update to the iCatalog.framework, adding several new features which are nowadays a “must have” for a state-of-the-art digital catalog experience. We call it simply iCatalog+ because it offers way more than just catalogs.

Several catalog clients already have their free iCatalog+ on the App Store, you should definitely check these out.


New functions in the 2.6 version include an expanded interface with tabs to access the catalog library, videos, photo gallery, social media sites and store locator. All iCatalog+ editions support the beautiful Retina display on the new iPad. You can see this new brilliance when viewing catalogs as well as the now much larger catalog covers on the library tab. On high resolutions screens these covers and catalogs really do POP, I argue even more than on glossy paper.

Push Notifications let you know the instant when a new catalog edition is released. This is where the iPhone app comes in that we hope to be releasing to the public soon too: Urban Airship Commander. This has proven invaluable testing and deploying APN via Urban Airship. This app allowed us to test push notifications without having to use the website. Rather it allows to configure test devices and keep sending the same test messages including custom payloads to the app to trigger actions like automatic downloading of the latest available catalog.

Being able to require iOS 5 allowed us to make sweeping improvements on many of the underpinnings of the digital catalog viewer part of iCatalog. You won’t believe the amount of work that went into the migrating the whole thing to ARC. Leaks be gone! Also we needed the new view controller containment that only became available in iOS 5 last year. But use of these modern technologies gives a nice payoff in performance and yields an even smoother overall experience.

The greatest thing about the iCatalog+ solution is that we have the ability of customizing the app sections and design from our server without having to release new versions of the app itself. Add a Pinterest section? No problem!

Recently updated iCatalog+ apps include the following with many more to follow. They are free, go download them now!

As developer we are proud of the iCatalog+ system and our clients love it because of the additional brand engagement this gives them with their store customers. Together we feel that iCatalog+ fulfills its primary mission: to keep pulling users into the app and make their time in it as enjoyable as possible.

I won’t bore you with the intricacies of the “catalog-on-tablet market”. Suffice it to say that some players don’t really play fair. Let me only assert that I believe that iCatalog+ is the cream of the crop of digital catalog solutions.

flattr this!


Podcast #41 – “Megabytes of Who-Knows-What”

$
0
0

Apple updates Xcode 4.4, seeds the first point release for Mountain Lion, and somehow manual symbolicating of crash reports has become broken.


Show Notes

On August 7th Apple released version 4.4.1 of Xcode. Besides the already known 4.4 news the release notes are simply “This update runs on both OS X Lion and OS X Mountain Lion.”. There was an article by Apple Insider that claimed that 4.4.1 was the first release of Xcode as a standalone app, but apparently they deleted the article after realizing that this was BS. Though you still can find all the other blogs which simply copied some contents of the original content. I think I remember that Xcode 4.3 was the first version which replaced the installer app with an Xcode.app and moved some of the developer tools inside the app bundle.

Version 10.8.1 of Mountain Lion is not out to the public yet, but if you’re registered for the Mac developer program you have received an invite to the seed download invitation. There were rumors that this supposedly tweaks something about the graphics card to use less battery because people were claiming reduced battery endurance with 10.8. Though the seed notes do not mention this.

A user opened the distribution files in a tool called “Pacifist” and reports this:

Things of Note: Mail, QuickTime Player, kernel, AppleSmartBatteryManager (AHA!), 802.11, AHCI, and USB kexts, updates to system Mail components, Messages components, Bonjour.

Zimbra + Mountain Lion not being able to add calendar entries over CalDAV = Bug in Zimbra, Workaround is to set the default alert times. The problem occurs if the Calendar app tries to add an appointment with no alert set. Weird that this never occured before. In fact this was always working perfectly on my iOS devices. But ok, I set the default alerts and now the problem no longer occurs.

Several developers reported that they are no longer able to manually symbolicate crash reports with the Xcode 4.4 tools. We found this problem ourselves as well trying to symbolicate a crash report with a dSYM and app binary which had before generated on our Jenkins build server. There are two apparent workarounds, though I don’t understand how those are interrelated: Getting the atos start address, or hacking the symbolicate script. As I understand it then you can just look at the latter because the atos one only works if you have the debug symbols not stripped from the binary. The script fix is about helping mdfind which is used by the script to find the binary inside the .app bundle to actually find it. It might have to do with some people renaming the app bundle and dSYM after building to for example include the build number.

Smart App Banners


flattr this!

Time-Limited Demo of Our Components

$
0
0

I’m happy to announce today that we will begin to make available test versions of our components so that you can try them out in your apps. This is possible with the help of our Jenkins build server which installs a “time bomb” on every nightly build of the components. This limits the utility of the static universal frameworks to 30 days of testing. Of course you can download a new copy as often as you like to further extend the testing time. But you cannot publish any production apps with that.

Our best-selling component is DTRichTextEditor and also by far the most complex because of the multiple sub-projects. Here’s a guide how to get set up for evaluating the component.


There is a DTRichTextEditorDemo host project available on GitHub. Except for the framework – which we still need to download – this is a fully functioning app.

Download a fresh copy of  http://beta.cocoanetics.com/demo/DTRichTextEditor.embeddedframework.zip and unzip it.

This is an embedded framework because of the DTLoupe.bundle which contains the resources for the magifying glass. The framework itself is also contained in there. The reason for this is that you simply drag the embeddedframework folder into Xcode and it does the right things with what it finds. The resources will be copied to the app bundle, the static universal library will be linked into your app binary.

So you drag the folder into your project.

You want to copy all files into your project folder as well as assign them to the target.

This action achieves several things at the same time:

  • Copies the library and bundle into the project tree
  • Adds the bundle to the “Copy Bundle Resources” build phase
  • Adds the library to the “Link Binary with Libraries” build phase
  • Adds “$(SRCROOT)/DTRichTextEditor.embeddedframework” to the “Framework Search Paths” build setting

We do not need to set up any additional header search paths because all headers required can be found inside the framework’s headers folder.

Finally, I recommend adding the import for the global DTRichTextEditor.h to the PCH file like so:

#ifdef __OBJC__
   #import <UIKit/UIKit.h>
   #import <Foundation/Foundation.h>
   #import <DTRichTextEditor/DTRichTextEditor.h>
#endif

That’s all it takes. (I hope) The Demo is set up to add some rich Hello World text.

Due to the amount of buttons added to the toolbar I made it iPad-only for now so that I didn’t have to invent a user interface suitable for iPhones, too. B, I, U, H are Bold, Italic, Underlined and Highlighted. L,C, R, J are Left-, Center-, Right-aligned and Justified paragraph styles. The 1. and + are an incomplete implementation of list-support. The photo inserts a picture from the photo album. The smiley button inserts an inline smiley graphic. And the URL button shows how to turn some text into a hyperlink.

I am happy to accept your pull requests for nicer UI in exchange for discounts on the component. I’m especially looking for a font picker and style popup like Apple has it in Pages for iOS. :-)

Conclusion

With this guide and by looking at the demo project you should be able to evaluate the component in the context of your own apps. Then when you’re ready to purchase a full license you simply remove the framework and replace it with the original source code as a sub-project. Now that I have figured out the process end-to-end I will make more and more components available this way.

Let me know if you have any preference which components I should make available as time-limited demo next. Otherwise I’ll approach them by number of recent sales.

flattr this!

Pixate Reboots Their Kickstarter (Scandal)

$
0
0

Paul Colton contacted me on July 17th, a week before they went live with their first Kickstarter campaign. Always happy to support my fellow iOS developers I agreed that I would make Linguan available for a reward if they could make it work. Unfortunately Kickstarter’s rules prohibit offering of products that the project owners didn’t make themselves. So that tie-in never materialized.

Colton launched Pixate as a product that promises to allow you to use a CSS subset to style UIKit controls instead of doing that in code or Interface Builder. People who hear this tend to fall into two categories: “WTF? Keep that non-native HTML crap away from me!” and “Awesome, now I can design my UI in Safari”.

Their promise certainly is a polarizing one. I find it even more fascinating and unsettling what seems to be going on behind the scenes. The latest developments triggered my sense of fairness quite a bit and this prompted me to summarize what I feel deserves to be called a scandal.


Pixate went online with their first campaign on July 20th with a funding goal of $200,000. Ambitious by any standard. They did have to show off some basic functionality working but interest was only lukewarm as evidenced by Kicktraq.

You can see the almost horizontal development, only broken on July 30th when some angel tossed $10,000 into the pot. That might have been the Pixate guys (or a close friend of theirs) in a desperate hope to jump start the stuttering campaign.

Pixate was not the first business that Colton had set his mind to. According to the Appcelerator Development Blog:

Appcelerator is the first corporate sponsor of a worthy new Y combinator backed startup called Pixate. Pixate was recently founded by Paul Colton and Kevin Lindsey. Paul was the founder of Aptana, a company we bought 18 months ago and Kevin was one of the key developers on Aptana as well as Titanium Studio.

This statement was dated August 1st, awfully close the influx of the suspect $10K contribution mentioned above. Could this have been from Y combinator? I think I read somewhere that this is the initial seed fund amount for all the businesses they take under their wings. But apart from this there was no visible uptake of funding at that time which tells us that probably very few people like Appcelerator.

The Death of a Campaign

Besides the lofty goal and the polarizing project one of the main reasons for their failure might have been the fact that the rewards were not very attractive. The $5 level would only get people listed as contributors aka be a donation. At $35 you’d get a T-Shirt and in between access to some BETAs. Then at $40 they promised a Visualizer app (to be created?). If you read on it becomes clear at level $50 that all the BETA access is worth nothing long term because there people would get “early adopter pricing when we ship”.

Let me get this straight: you don’t get anything physical (except a T-Shirt), the BETA access is worthless and the final product is something that sounds like it might be better suited to be an Open Source project.

My opinion of the project is that Colton is desperate to have Pixate become his next big thing. $200k would allow him to be relaxed about money for a year or so with something to spare for additional developers, marketing, etc. It’s a “found a business” project thinly disguised as a digital product. According to Kickstarter’s project guidelines “starting a business does not qualify as a project”.

Colton was smart to circumnavigate the guidelines cliffs and formulate the endeavor as a project with a product as outcome. But does that serve the customers who are willing to jump on his bandwagon?

All of the advance marketing and communication did not help the flat trend of the first project. You might have peeked at the Kicktraq chart, come to the same conclusions as me and then relegated the project to oblivion. Funding was cancelled on August 14th when it was absolutely certain that there was literally no chance in hell that these two lines would ever cross. The total tally was $21,752 from 169 backers.

Apparently Mr. Colton is not one to settle for defeat. Somebody might have taken a hint and conclude that this is the wrong project for the wrong people with the wrong goal … and Kickstarter is the wrong place to get it funded.

What do we do if a campaign fails?

More Marketing!

On the same day the first campaign got cancelled Colton create a new one but with a much lower funding goal. The first campaign had shown that their audience might cough up in the vicinity of $20,000. So in a sudden rush of boldness he set the new campaign’s target to $25,000.

This technique is similar to when you finished a role playing game and start it from the beginning keeping all your weapons and experience. The last update on the first project was only for backers asking them to immediately hop on the the new campaign.

And people worth approximately $18,000 immediately did re-pledge. Together with the existing marketing momentum the second campaign crossed the ridiculous funding threshold 4 days after campaign start with an overall trend towards upwards of $50,000.

Restarting a game from scratch with higher stats than normal players is what gamers usually would call “Cheating”. Setting an extremely easily attainable funding goal communicates: “we’ll take your money in any case, thanks”.

Good kickstarter projects have a believable explanation about what the creator needs the funding for. Colton put this to the very very bottom of the project description right after lenghty viability demonstrations of technology that Pixate had been developing in the meantime since campaign 1.

Building Pixate requires a lot of engineering effort. We’ve already spent a bunch of time getting to this prototype phase and we need your help to see it to completion. We’ll be using the money to get to a minimum viable product that we can ship before the end of the year. We’ll start with the iOS engine first, then the Visualizer then move on to Android. The more we raise, the more we can accelerate the product release schedule.

What he didn’t tell us is that he also started to invest big bucks into advertising. Colton purchased a sponsorship slot on Daring Fireball for the week of August 13th, to the tune of $7,500. This got him mention in John Gruber’s RSS feed as well as a tweet.  What cracks me up is this statement by the honorable Mr. Gruber: “Sounds cool, and they’re really close to their funding goal.” LOL, yeah, with cheating and by sponsoring you with OPM (other people’s money).

Is that “using the money to get to a minimum viable product”? I thought this is called Ad-waste-izing.

Spending a third of the re-pledges Pixate was able to purchase some visible momentum. The casual observer would now see that the project “is winning” and this is making pledges even more likely, adding to the momentum.

Conclusion

Honestly I don’t have any opinion on the technical merits of Pixate.  I have quite a bit of experience with CSS myself because I am supporting most of the text-formatting commands in DTCoreText. And I can tell you from my experience hat it takes quite a bit of work to get the parsing of CSS down, let alone translate the CSS into meaningful styling of UIKit components.

What troubles me is that Pixate is setting a bad example of what kind of project NOT to do on Kickstarter. Also it creates a precedent of how to cheat by resetting your campaign. Good projects that have a natural audience with a few dollars to spend if they feel they can help something get made that they would enjoy.

But if a campaign fails to be accepted of fails even though it was accepted then the creator should take a hint and turn elsewhere. Look at app.net for a successful example of how to fund a business outside of Kickstarter. They didn’t get accepted, so they copied the process and succeeded. Any tech company is able to pull this off on their own website. No need to muck up Kickstarter.

flattr this!

Radar: AirPlay broken if only connected display is VNC

$
0
0

I got an AppleTV for our office and brought over my old Sharp TV which is able to display 720p well enough to be used as a presentation display via AirPlay. When I tried to use AirPlay to display the desktop of a MacMini server I discovered this bug.

The workaround at the moment is to use the AirParrot software which has no problems displaying the desktop. I filed it as rdar://12167290  and mirrored it on OpenRadar.


AirPlay broken if only connected display is VNC

Summary:

I have a current model MacMini that was last connected via display port and DIV to an LCD before turning it head less and putting it into my server cabinet.

When connecting via VNC to it and activating AirPlay mirroring you only see color blotches and some text fragments on the TV which is being served by a latest generation AppleTV.

Steps to Reproduce:

  • disconnect any monitor to MacMini
  • connect to it with VNC
  • enable AirPlay

Expected Results:

  • you should see the desktop mirrored via AirPlay

Actual Results:

  • you only see color blotches.

Regression:

n/a

Notes:

The AppleTV is serving the TV at 720p/60 Hz. The TV is a Sharp Aquos that has a maximum of 1080i.

flattr this!

NOT a Radar: Missing IR Remote Settings

$
0
0

I was about to file a second Radar from out latest AirPlay Experiments. When I was remote-controlling the AppleTV my colleague complained that stray radiation was also changing his speaker volume. When we looked at his Security Settings we couldn’t find the settings to disable IR.

But the solution was not to file a Radar and proceed to sulking. The problem lay in my own ballpark.


Turns out that it was not Apple’s fault, but mine. I apparently had experimented with a third party driver for the Apple Remote. You would have used that – at least in the past – if apps like Plex wouldn’t play nicely with the normal Apple Remote we used to be getting bundled with iMacs.

IOSpirit offers a fully fledged “remote control solution” via their Remote Buddy app, available for purchase on their website. If all you want is the driver this app uses you can also use Candelair. Both use the same driver, but the latter is only the driver plus a prefpane.

Even though I don’t remember ever installing Candelair on my iMac it was there. In /System/Library/Extensions the kernel extension for it was RBIOKitHelper.kext. Mine as old as October 2011, of course no longer compatible with Mountain Lion.

There are three methods to fix this:

  1. Remove the kext, reboot
  2. Download the Candelair installer, install the prefpane. Then uninstall it via the Uninstall option there.
  3. Install Candelair, update the driver via the prefpane. Keep using it.

Since the two iMacs are only used in our office we have no need for the IR anyway, so I performed option 1 and 2 on those and just disabled the port.

Strangely it seems that somehow this kernel extension had been spreading like a virus onto even a brand new 13″ MacBook Air. This computer’s user data had been transferred from previous Macs of mine. I wasn’t aware that kexts also get moved, but apparently they do. Though this computer didn’t have the settings appear even after removing the kext, for the simple reason of newer Airs not having an IR port.

For comparison, my mid 2011 iMac still has a port as you can see in the System Report USB section.

Apple decided some time ago that certain classes of laptops have no use for an IR Receiver. A support document about the Apple Remote control mentions the free Remote app as the alternative of choice for people who still require it. It’s a little bit funny: this way Apple manages to even migrate people’s remote controls onto iOS.

flattr this!

Viewing all 428 articles
Browse latest View live